Streaming music on YouTube is incredibly convenient. But sometimes you need those tracks in local formats like MP3 or M4A. Maybe you want to play YouTube songs on an old MP3 player. Perhaps you want to prevent losing your favorite fan-made music videos in case they get deleted. Whatever the reason, this guide will break down the most practical ways to rip music from YouTube across desktop and mobile, so you can choose the method that is comfortable for you.

Common Types of YouTube Audio Rippers
Not all YouTube audio rippers work the same way. Dedicated PC and Mac tools are suitable when you want to build an offline library. Mobile and browser options are perfect for quick one-time needs.
Here’s a quick breakdown of different methods available across Windows, Mac, Android and iPhone with each suited for a different need, so you can figure out which one actually fits your setup best.
(Mediaio, a-Shell + yt-dlp, Seal) Connect directly with YouTube servers and pull original streams (M4A, Opus).
They can re-encode into MP3 or other formats if needed.
Built for creating proper, organized music libraries. •Uncompromised quality
• Batch processing
• Smart tagging with proper ID3 metadata • Requires installation
• Mobile setups need maintenance (yt-dlp updates)
• Slight setup needed, compared to web tools
(Audacity, screen/internal recorders) They simply capture whatever is playing through your system or device using internal recording.
Suitable for capturing specific segments. • Full control over what portion you record
• Useful for getting short clips or custom edits
• Desktop tools like Audacity include editing features • Works in real-time (1× speed)
• Not ideal for full songs or playlists
• Limited or paid options on mobile
*Not recommended for iOS users
(EZMP3, CNVMP3, YTMP3) Paste a link and get an MP3.
Works on any device without installation. • Instant access, zero setup
• Good for quick one-time downloads
• Some tools offer bitrate selection or trim options • Single file processing only
• No batch support
• Messy or missing metadata
• Sites often go offline frequently
How to Rip Music from YouTube to PC or Mac
PC and Mac give you access to powerful tools like Mediaio Audio Converter, so ripping a large number of songs from YouTube is simple. At the same time, you also have the flexibility to use online rippers or recorders that are suitable for one-time needs. Let’s look at all three ways one by one.
Way 1. Use Audio Ripper App - Mediaio Audio Converter
Mediaio Audio Converter is suitable when you want to build a proper offline music library. It comes as a dedicated tool on Windows and Mac.
Here, YouTube Music support is built in. So you can sign in to your account once, browse your library and search for YouTube music videos titles and convert them to MP3, FLAC, WAV, etc. You can also directly select the songs, albums or playlists in YouTube Music to conversion. The best thing is that the output sound quality can reach a maximum quality of 320kbps.
Mediaio also preserves the original metadata, such as song name, artist name, album info and artwork without adding any watermark. It even goes as far as arranging your albums and playlists into a dedicated folder with the same order. So no matter how many songs you convert, they are automatically organized on your computer. Once saved, you can listen to the tracks using any media player like Strawberry or Foobar2000, without internet or ads.
Steps to Extract Audio from Music Videos on YouTube Using Mediaio Audio Converter
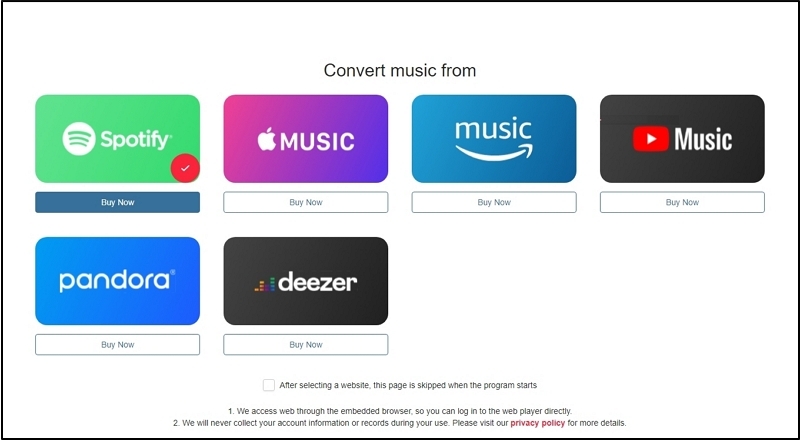
Step 1. Get Mediaio Audio Converter on your Windows or Mac and open it. On the home screen, pick YouTube Music to get started.
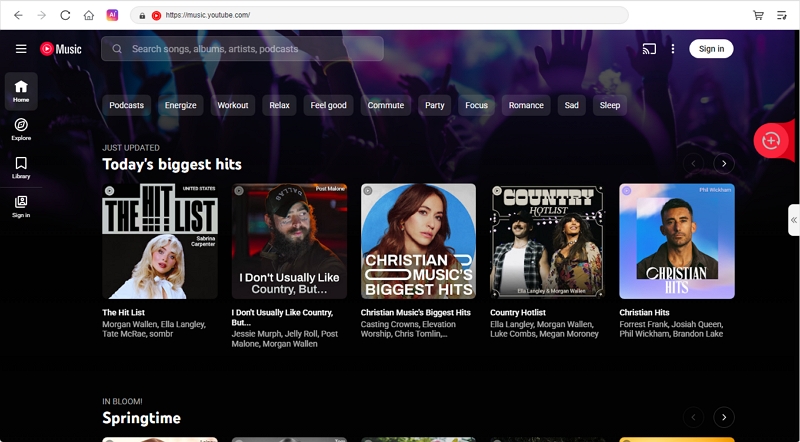
Step 2. Sign in with your free or Premium Google account to access the YTMusic library.
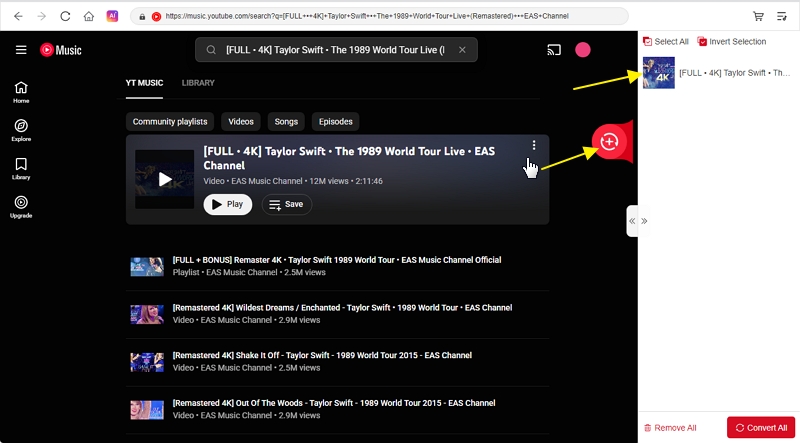
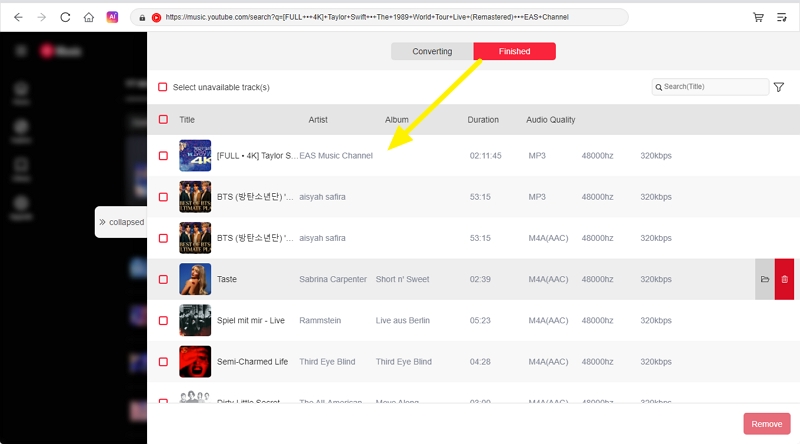
Step 3. Search for music videos titles from YouTube. Drag and drag them to the + button on the right. The titles will be listed on the right pane instantly.
Step 4. Choose the output format. You can also tweak bitrate or sample rate if needed or leave it as is. Hit Convert All and let it run.
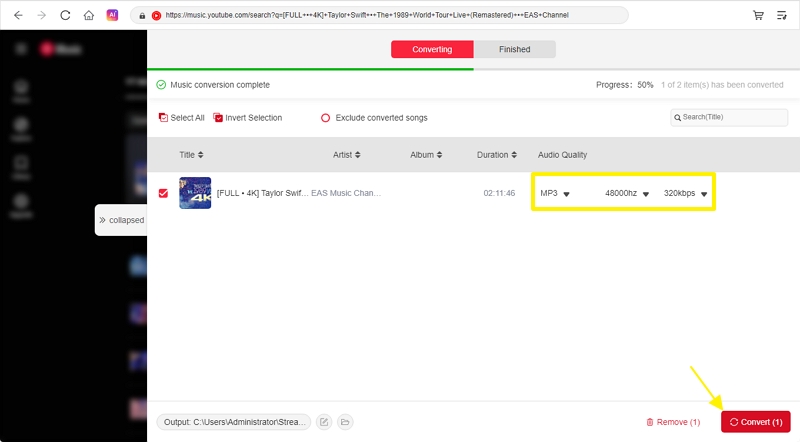
Step 5. The music videos will be processed and saved locally, ready to use.
• Adjustable output quality.
• Option to keep and improve original audio quality or convert as needed.
• Includes song title, artist name, album info, and cover art.
• Playlists and albums are saved into properly named folders.
• No watermarking or file tampering.
• Batch download support for large queues.
• The conversion of a 1-hour music video takes 2 minutes.
Way 2. Use Audio Recorder - Audacity
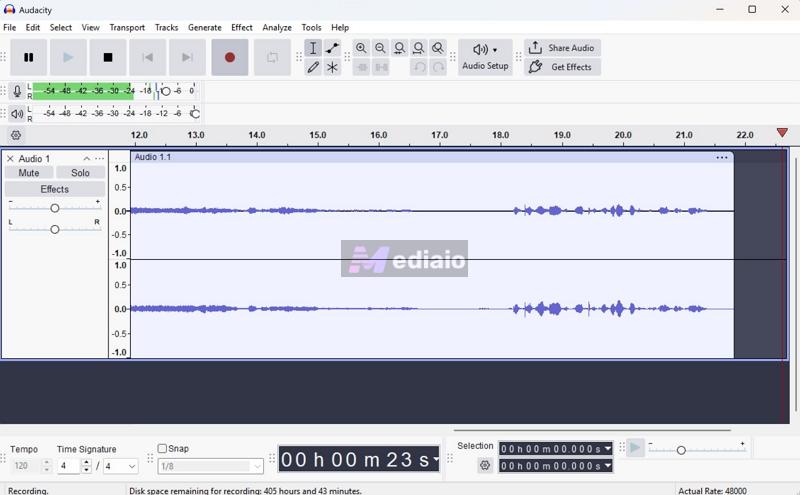
Where Mediaio pulls music directly from YouTube Music servers, audio recorders like Audacity are built to capture whatever is playing through your system. It will record the exact sound output from your computer’s soundcard.
Now yes, recording is a slower method—a four-minute song will take four minutes to record. But it makes sense when you just need a small segment of the YouTube video track, such as a 10-second guitar solo or want to make a custom ringtone.
Steps to Rip YouTube Audio Using Audacity
Step 1. You’ll first have to set up Audacity correctly to make it record system audio but not your microphone. For this:
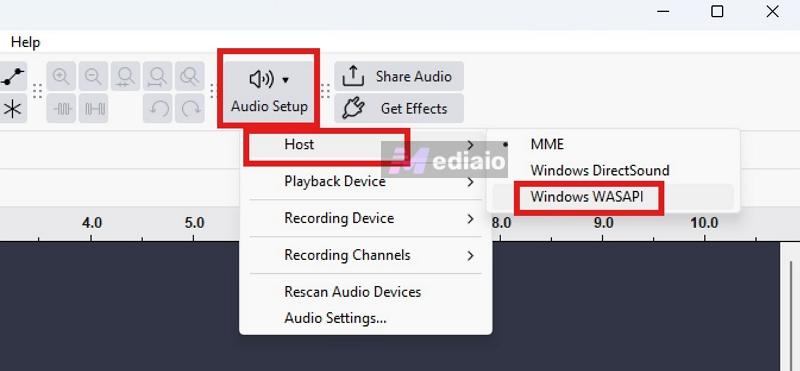
- Open Audacity. At the top, you’ll see the Audio Setup option in the main toolbar (speaker icon). Click it.
- Go to Host. Select Windows WASAPI (on Windows).
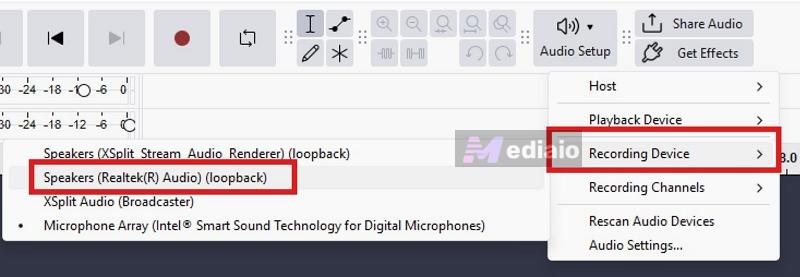
- Then go back to Audio Setup. This time, hover over Recording Device and choose your primary speakers or headphones with “(loopback)” at the end.
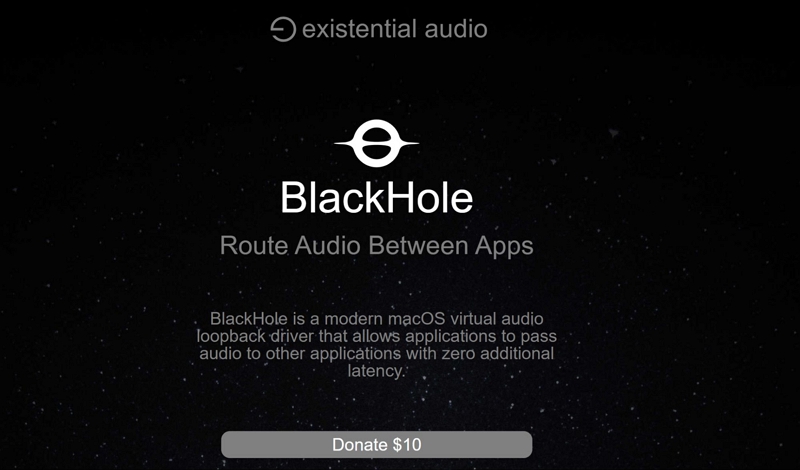
On macOS, this will work differently. macOS doesn’t allow apps to record internal audio directly. So you’ll need a virtual audio tool like BlackHole or Soundflower. Install one of them and select it as your recording device inside Audacity. After that, the setup works the same way.
Step 2. Now press the red Record button in Audacity. Then, play your track video on YouTube. It will start capturing whatever is playing on your computer internally.
Step 3. Once your desired section is done, click the Stop button.
Step 4. Audacity also gives you tons of editing options. So you can adjust the track if needed.
- Use Effect to apply EQ, fade in/out, or other adjustments.
- Use Generate to add silence or combine sounds.
- Mix, trim, or tweak sections as required.
Step 5. Go to File. Choose Export Audio.
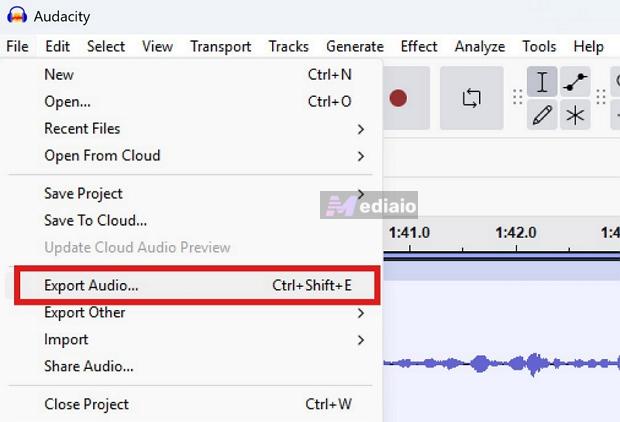
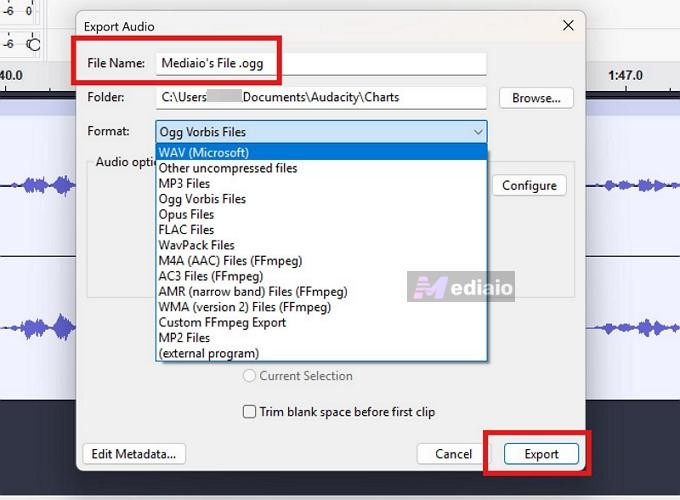
In the Export Audio menu:
- Choose where to save the file.
- Give it a name — as Audacity cannot tag it on its own.
- Select your format (MP3, WAV, etc.).
- Then click Export.
That’s it. Your recorded audio will be saved to your computer.
• Ideal for capturing YouTube’s 256kbps stream as it is.
• Cannot upgrade audio to true lossless or studio-grade quality.
• Supports WAV, AIFF, MP3, OGG, FLAC and more.
• Lets you control bitrate and sample format (for example, 24-bit or 32-bit float).
• No automatic ID3 tag fetching.
• You can enter song name, artist, album, and other details during export.
• Use the Edit Metadata option in the export window to fill in tags.
• No batch processing support.
• Not ideal for downloading full playlists or large libraries.
Way 3. Use Online Audio Ripper - EzMP3
Online tools have been the most popular option for ripping YouTube video’s audio. And for good reason: they require no software installations or sign-ups (in most cases). However, that single convenience brings a lot of trade-offs.
Online YouTube rippers don’t support batch converts. You will have to copy and paste every link, one by one. Most of these converters rarely offer any format other than MP3. Plus, the processing speed is usually slow during peak hours. On top of that, they replace the original metadata with their own website URL or custom watermarks. Finally, these sites often go offline because of constant takedowns by ISPs, so keep three or four names bookmarked.
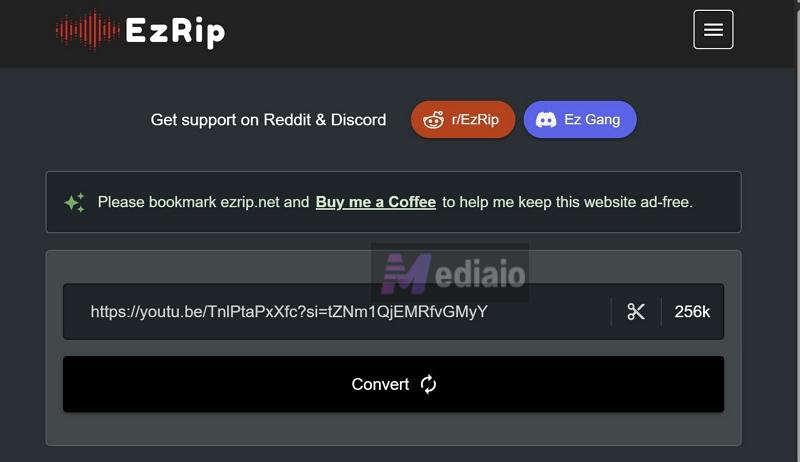
Still, EzMP3 remains accessible most of the time, but under different domain names, making track that problematic. As for its features, EzMP3 (now EzRIP.net) supports YouTube links directly. It can also handle long music collections, like a 90-minute full album video. You will also get a trim option. And EzMP3 even lets you pick your preferred bitrate (from 64kbps up to 320kbps), with the option to remember that setting for future downloads.
Steps to Extract Audio from YouTube Videos with EzMP3
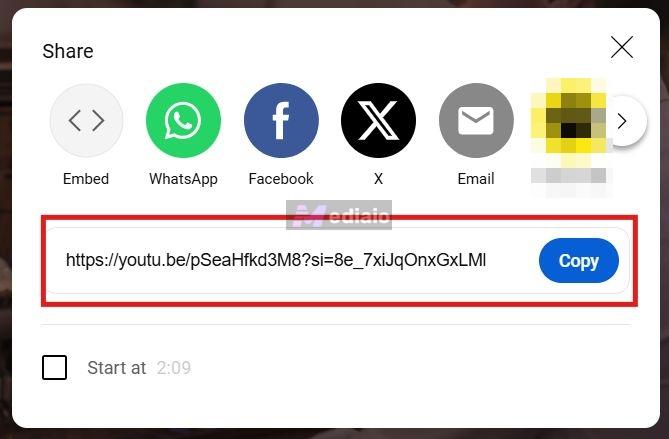
Step 1. Open a YouTube video, click on the Share button and copy the URL.
Step 2. Go to the current working domain (ezrip.net). Paste the link into the input box. Right next to the URL box:
- Click on the bitrate label (defaults to 256kbps). A pop-up will appear. Select your preferred quality up to 320kbps.
- Click on the scissors icon. Turn on the trim option. Set the start time and end time and define the portion you want.
Then click Convert.
Step 3. Now the tool will process the link. It can take some time depending on traffic and video length.
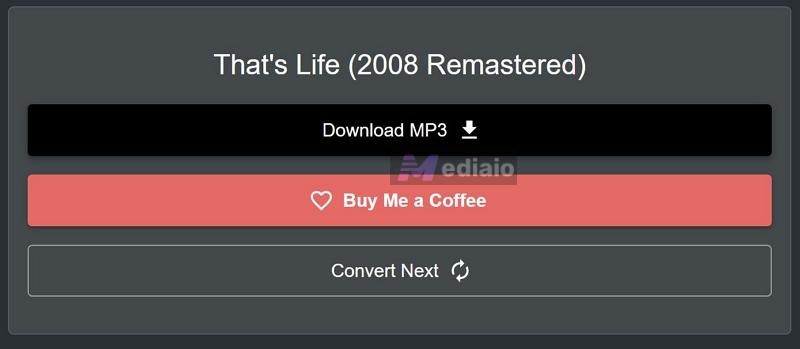
Once the conversion is done, you will see the Download MP3 button. Click on it. Your file explorer will open. Choose the location and save the file.
• Offers up to 320kbps option.
• Actual quality is limited to the lossy YouTube stream
• Include thumbnail as cover art (inconsistent)
• Does not properly embed full ID3 tags
• Album, genre, and other details are usually missing
• Each track must be processed separately
• It takes 15 minutes to convert a 1-hour music video.
How to Rip Music from YouTube to iPhone
Extracting MP3 from YouTube directly on your iPhone is notoriously restrictive. There was a time when a few App Store apps allowed this more freely, but Apple has largely shut that down. That’s why many guides push you toward sideloading or unreliable hacks. However, that’s not really necessary. There are still multiple workable methods and each one fits a different need. Let’s look at all of them.
Method 1. Use Shell + yt-dlp (Ripper App)
When it comes to apps, most people suggest going with Telegram bots. But they are not reliable: one day they work, the next day they disappear.
So instead of depending on Telegram bots, it is far better to create your own YouTube ripper directly on your iPhone. For this, you need two things:
- a-Shell app — a local Unix terminal emulator for iOS
- yt-dlp — an open-source media extractor
At the center of this setup is yt-dlp. It is considered the gold standard for extracting media from YouTube. And what a-Shell does is simple—it allows you to run that same command-line tool directly on your iPhone.
However, the setup involves typing commands every time you have to convert a song. And that is challenging on the iPhone’s keyboard.
Steps to Use a-Shell + yt-dlp to Rip Audio from YouTube
You’ll need an iPhone or iPad running iOS 14 or later for this to work.
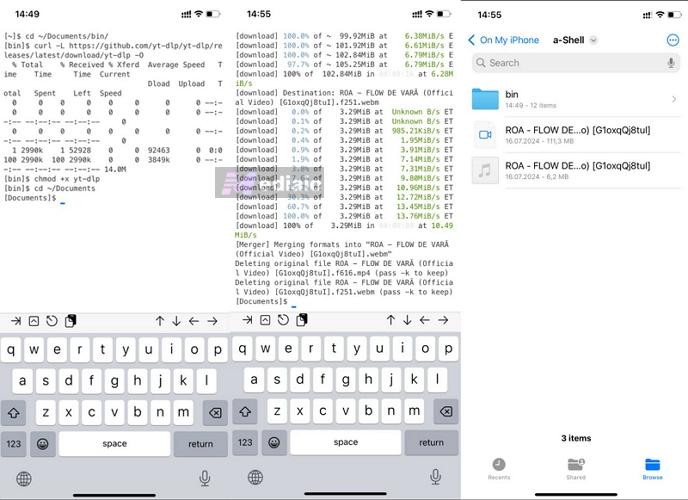
Step 1. Open the App Store. Install a-Shell and open it. Run these commands one by one (press return on the keypad after each command):
mkdir ~/Documents/bin
cd ~/Documents/bin
curl -L https://github.com/yt-dlp/yt-dlp/releases/latest/download/yt-dlp -O
chmod +x yt-dlp
cd ~/Documents
This will set up yt-dlp locally and make it ready to run.
Step 2. Copy the track or playlist link from the YouTube app. Return to a-Shell. Then, run these commands using that link to extract the audio in MP3.
For a single track:
yt-dlp -x --audio-format mp3 "PASTE_LINK_HERE"
For a playlist:
yt-dlp -x --audio-format mp3 -o "%(playlist_index)s - %(title)s.%(ext)s" "PASTE_LINK_HERE"
Step 3. Open the Files app. Access the a-Shell folder inside On My iPhone. You’ll find the extracted audio as regular MP3 there. You can move the track if needed or open it via other apps.
• No re-recording or quality loss during extraction
• Output stays as close as possible to the source stream
• Default commands extract MP3 directly
• Can be adjusted to output FLAC, WAV, AAC, or M4A based on your needs
• Keeps playlist and album order intact automatically
• Avoids random file naming seen in online tools
• No need to process files one by one
• Files are saved directly to your iPhone (Files app) and ready to use
Method 2. Use YTMP3 (Website)
Terminal is an overkill when you just want to grab a single song quickly, like for editing or a quick use. In that case, you can use the same online converters you saw on desktop, but directly through your iPhone’s browser like Safari.
Keep in mind that the same limitations carry over. You can only process one link at a time. The output is mostly MP3. Metadata is either missing or replaced, so file names can get messy. Still, the setup is quick and works fine for one-off downloads.
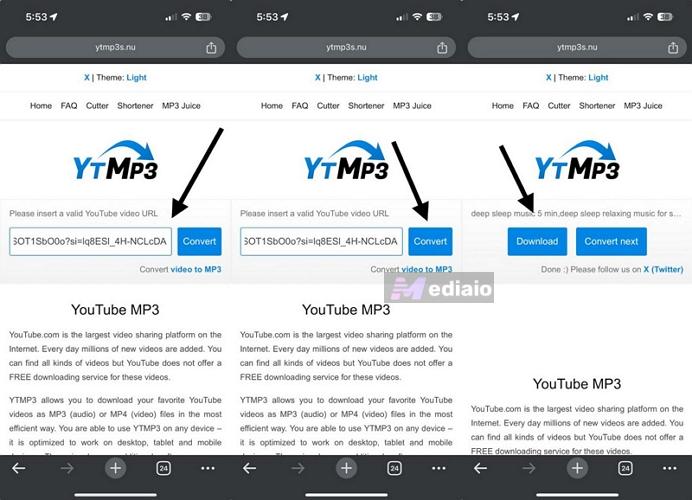
Steps to Use YTMP3 to Rip YouTube Audio as MP3
Step 1. Open Safari and search for “YTMP3”. You can also use other converters, such as CNVMP3 and EzMP3. All of them follow the same flow.
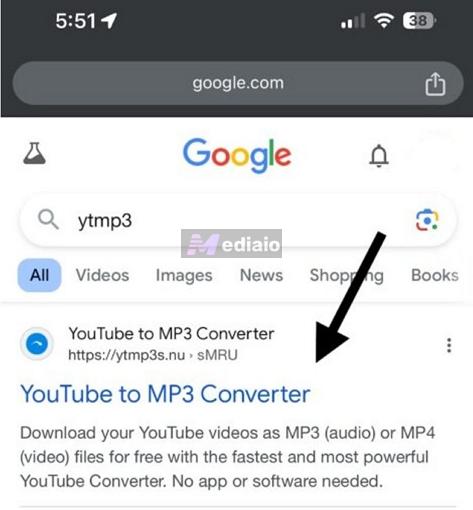
Step 2. Open the site and paste the YouTube video link into the URL box.
Step 3. Tap the Convert button. Wait for it to process.
Step 4. Tap Download. Safari will ask for confirmation. Tap Download again.
Step 5. Open the Files app. Go to On My iPhone > Downloads. Your MP3 file will be there.
• Medium audio quality: 100 to 200kbps.
• No proper ID3 tags
• File name is usually just the YouTube title
• No batch support
• Works fine for quick one-time downloads
Method 3. With Screen Recording - Recorder
This method works, but it’s not recommended because it’s time-consuming. It can help in very specific cases, like when you want a short segment, a sound effect, or if you don’t want to use other tools. You cannot directly get an MP3 here by using this way. Instead, you will have to record the screen while YouTube plays and then convert that into audio using another app. That will make the whole process longer. This is because iOS does not allow direct internal audio recording into MP3. So there’s no simple “record and save as audio” option.
Steps to Record YouTube Video and Extract the Audio on iPhone
Step 1. Turn on DND to avoid notifications interrupting your recording.
Step 2. Open Control Center. Long-press the screen recording icon.
Turn off the Microphone button at the bottom. This ensures only internal audio is captured, not your voice or background noise.
Step 3. Tap Start Recording. Play your track on YouTube Music. The recording will capture everything as the music plays.
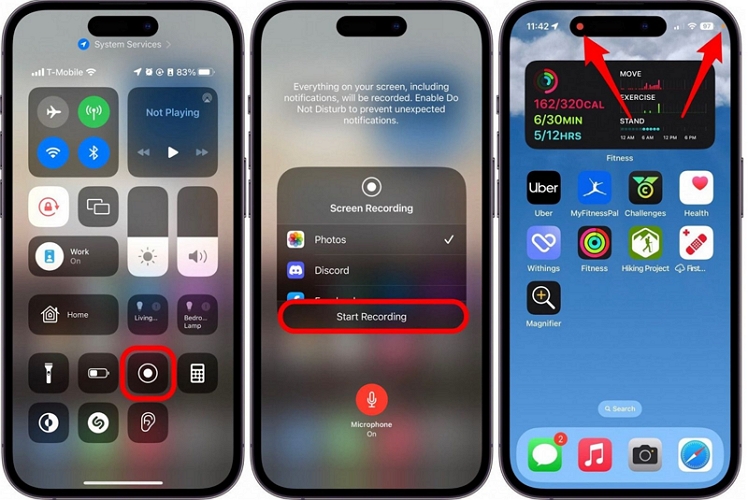
Step 4. Tap the red indicator at the top. Select Stop. The video will be saved automatically in your Photos app.
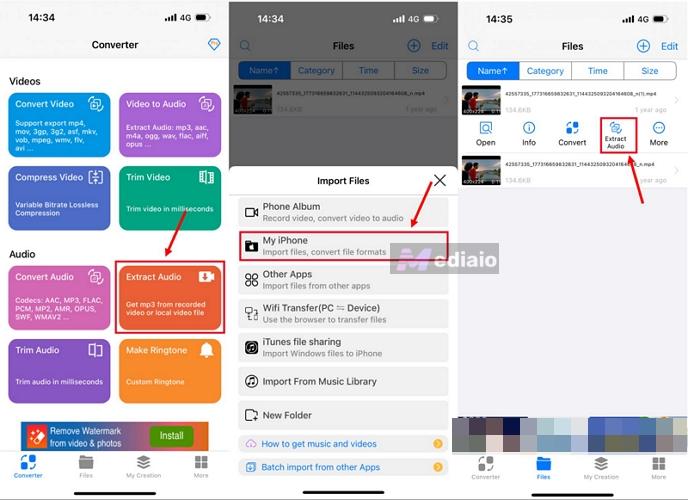
Step 5. Open a converter app (like Media Converter or any audio extractor). Import the recorded video and convert it to MP3.
• Recorded from already compressed stream(about 128kbps)
• Compressed again during MP3 conversion
• Final format depends on the converter app (MP3, etc.)
• File must be named and organized manually
• Then separate conversion step
• Takes roughly double the time for a single track
How to Rip Music from YouTube to Android
Android gives you far more flexibility. You’re not restricted in the same way as the iPhone. You just need the right tools to rip YouTube audio in the way you want. Here are the main options.
Option 1. Seal — Ripper App
Seal is basically yt-dlp in a proper app form. Instead of using a terminal like on iPhone, Seal wraps the same engine into a clean interface. So you don’t have to type commands. You just paste the link and control everything from the UI.
Steps to Install and Use Seal to Extract Music from YouTube
Step 1. Open Chrome (or any browser). Search for “Seal GitHub”.
- Open the official repository (junkfood02/Seal). Go to the Releases section.
- Scroll down to Assets.
- Download arm64-v8a-release.apk (works for most phones). Or you can download the universal APK (it will just take more space).
Step 2. Since Seal is a third-party app, Android will show a warning. Tap Download anyway.
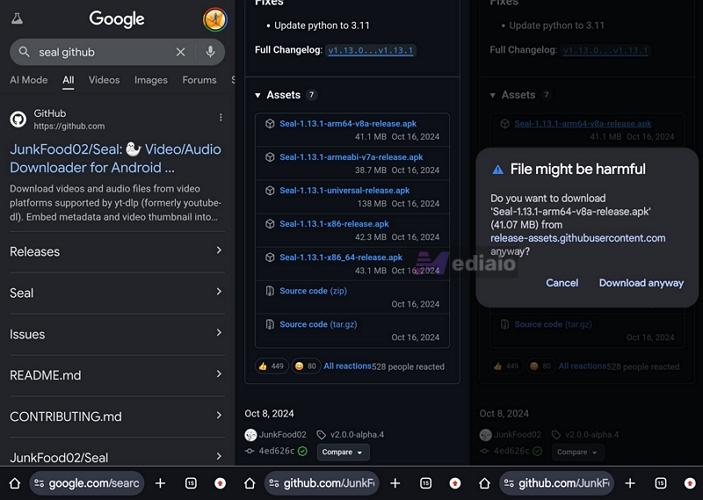
Note: If installation is blocked, go to Settings and enable Allow from this source. Then install the APK.
Step 3. Open Seal. Go to Settings. Tap Update yt-dlp, which is important. Without updating, the app may not work properly. Once updated, you’re ready.
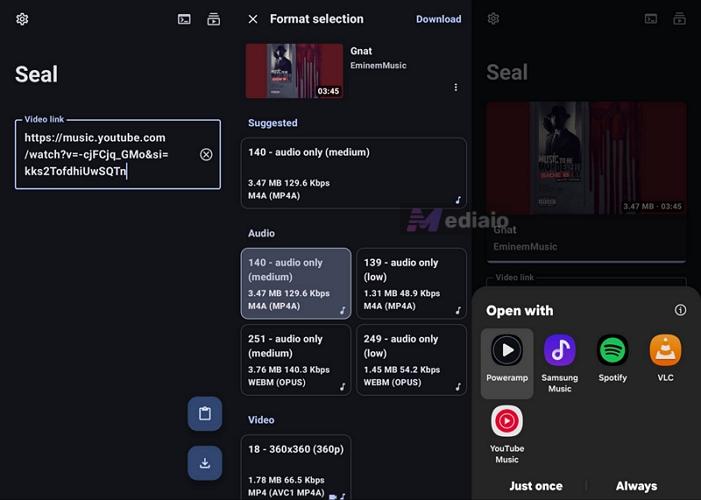
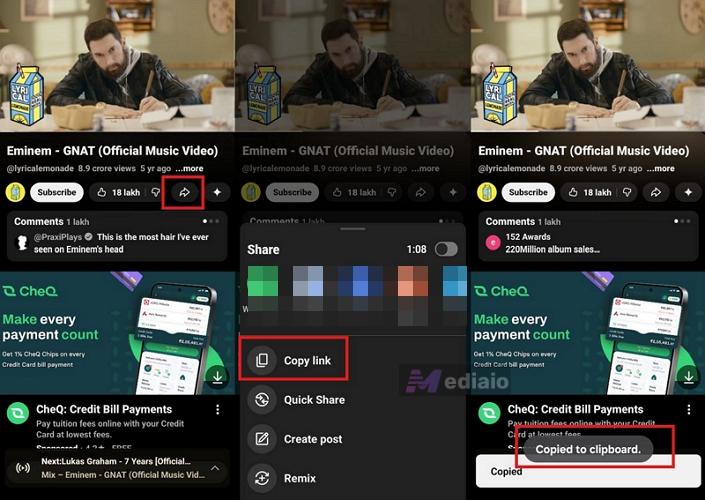
Step 4. Open YouTube. Find the track video, tap the three dots, choose Share and tap Copy link.
Step 5. Go back to Seal. Paste the link into the input box. Tap the Download button.
The app will analyze the link and show format options. Choose audio format — M4A (AAC) or WebM (Opus), depending on availability.
Finally, tap Download. The file will be extracted and saved. You can play it directly or find it in your Downloads folder.
• No re-encoding loss during extraction
• Supports M4A, WebM
• Can be configured to convert into MP3
• Cover art will require enabling in settings
• No ads or interruptions
• Faster than manual or browser-based methods
Option 2. CNVMP3 - Online Ripper
If you don’t want to install APK, you can use online options like CNVMP3. It works well if you just need a quick, one-time download. But then again, you’ll have to compromise with the usual limitations of the online rippers. You still don’t get batch downloads.
Steps to Use CNVMP3 to Rip Music from YouTube
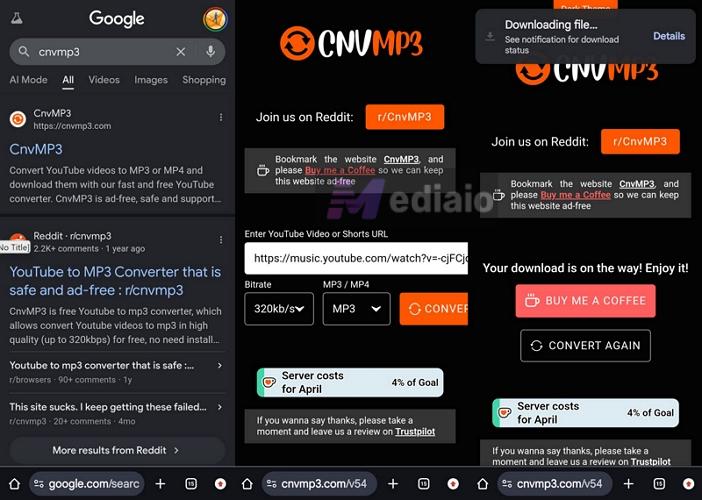
Step 1. Open CNVMP3 on your mobile browser.
Step 2. Paste the YouTube’s song URL into the input box.
Step 3. Tap on the bitrate drop-down and choose your preferred quality. Leave the format as MP3.
Step 4. Tap CONVERT. The tool will process the file and trigger the download. Depending on your browser, it will download automatically or redirect you to a different tab.
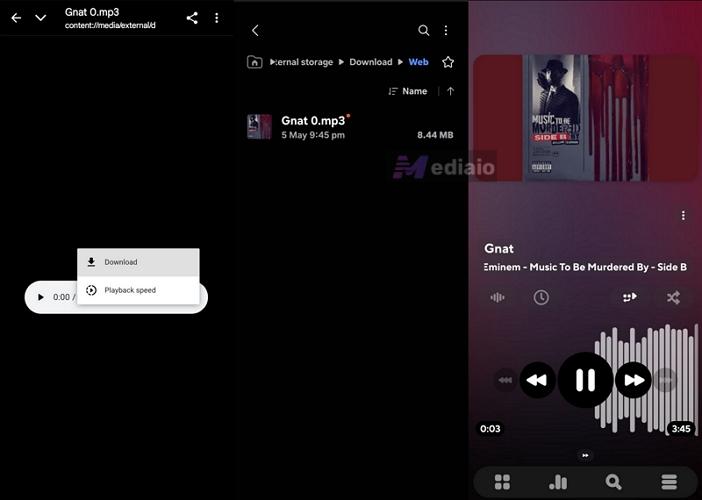
Step 5. Go to Internal Storage > Downloads. Your MP3 file will be there.
• Even at 320kbps, source is still YouTube’s compressed stream. This means you can get audio quality of up to 256kbps at most.
• Keeps title and thumbnail in most cases
• File naming can be messy (extra numbering, inconsistent naming)
• Manual cleanup may be needed
• No batch or playlist support
• Works fine for quick downloads
Option 3. Internal Audio Recorder
Compared to the App Store, Google Play Store features many apps that can record internal audio directly. However, most of these apps are paid.
Still, there are some apps that work on freemium basics, like the Internal Audio Recorder by PTS Studio. But its free version usually records in mono audio. To unlock proper stereo or higher-quality output, you will need the premium upgrade (not really necessary for YouTube audio). It also comes with advanced options like recording just an app instead of everything that is playing on the device, so you don’t have to worry about notification sounds in the YouTube audio recording.
Steps to Use Internal Audio Recorder to Rip YouTube Audio
Step 1. Install Internal Audio Recorder by PTS Studio from Play Store.
Step 2. Launch the app. Grant the required permissions. Then, set your recording format, bitrate, and sample rate.
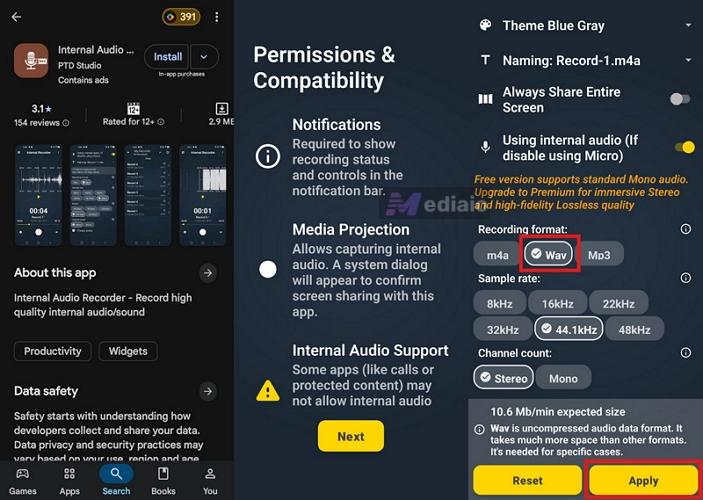
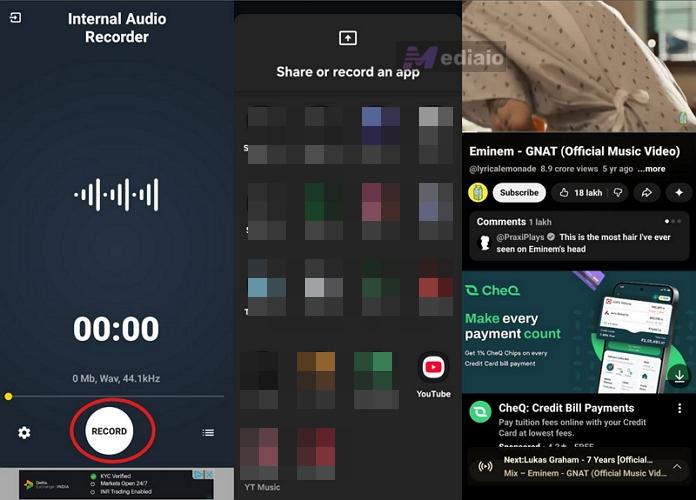
Step 3. Tap the Record button. Choose Record an app instead of full screen. Select YouTube.
Step 4. YouTube will open. Play the track you want to record. Make sure to stay on the screen if you don’t have Premium.
Step 5. Pull down the notification panel and tap Stop. You’ll be taken back to the recorder app.
Step 6. Go to All Recordings. Tap the three dots next to the recorded file. Choose Save As to export it to your internal storage.

• Free version usually records in mono
• Premium unlocks stereo/higher quality
• Captures source audio as played
• Flexible format selection
• Files saved as generic names (record-1, etc.)
• Manual tagging required
• No batch recording
When It's Okay to Download YouTube Content
Still, there are situations where converting the audio falls is okay. For instance:
- If the track is licensed under Creative Commons, you can usually convert and reuse it in future projects, even commercial ones (like another YouTube video). Just make sure the license actually permits that use.
- The second case is personal use. Maybe you just want to listen on an old MP3 player that doesn’t support the YouTube app.
As long as you do not distribute or reuse the ripped audio publicly — ripping YouTube audio is considered acceptable.
Final Words
So that’s what the current YouTube audio ripping landscape looks like.
PC and Mac still give you the most control, especially when you are using a dedicated audio converter like Mediaio Audio Converter. It allows you to build a proper offline music library because most of the work — metadata, organization, batch processing, and suitable format conversion, happens automatically.
Other methods still have their place. They are useful for quick one-time downloads on your phone or even through online browser tools on the computer.