If you have finally decided to move from Spotify to TIDAL which still offers better sound even after Spotify’s lossless update, make sure you do it the right way. Many people switch accounts and leave their playlists behind. You do not have to actually, as it’s available to take your music with you.
This guide walks through different ways to transfer your Spotify playlists to TIDAL. Free tools and paid services are both explained. You can migrate your entire Spotify library in one go or only move selected playlists, such as Liked Songs and leave the rest behind.

Spotify VS TIDAL: Which One Is Best for You
If you’re still torn between Spotify and TIDAL and unsure whether to make the switch, this no-nonsense comparison will help you decide. Of course, if you’ve already decided to switch to TIDAL, this table can also help you see whether the platform is right for you.
Include 6M+ podcasts & audiobooks. 110 Million+ songs
Focus on music, videos and exclusives. TIDAL wins on numbers while Spotify on variety.
TIDAL has weird gaps in niche genres like ambient or specific jazz, but it has way more 'versions' of the same song or albums.
Finally added (24-bit/44.1kHz FLAC).
Note: Still rolling out/market dependent. Hi-Res Lossless (Studio Quality)
Up to 24-bit/192kHz FLAC.
Support Dolby Atmos & Sony 360. TIDAL is still the King.
Spotify Lossless is liked mainly for Bluetooth. On a real system, TIDAL's soundstage is wider and punchier.
US$21.99/month (Family)
Free tier available (Ad-heavy). US$10.99/month (Individual)
US$16.99/month (Family)
No Free tier (Trial only). TIDAL is now cheaper.
Also, TIDAL pays artists significantly more (~US$0.012 vs Spotify's ~US$0.004 per stream).
Discover Weekly & Release Radar are frighteningly accurate. Editorial & "Culture" Focused
Good "Daily Discovery", but rely more on human curation. Spotify knows you better.
TIDAL’s recommendations mostly show you the hits on its platform.
Spotify’s algorithm feels like it’s inside your brain.
Great "Connect" feature to control playback on any device. Clean & Minimalist
Music-first interface. No podcast bloat. TIDAL for purity and Spotify for convenience.
Many users on Reddit hate the fact that the TIDAL Connect is buggy. Some say that half the time, it disconnects on its own.
Spotify Connect is bulletproof.
How to Transfer Spotify Playlists to TIDAL
You can move your library to TIDAL manually or with a tool. Here’s an overview of the three best methods:
Way 1. Recreate Playlist
This is the most straightforward way to move your music collection from Spotify to TIDAL and also the most hands-on. The idea is simple: you search for the same songs in TIDAL’s library, then rebuild the playlist manually.
This method works best when:
- You have critical listening playlists (1-2 important playlists that do not have many tracks).
- A reference list you really want on TIDAL as well.
- You want to choose the proper version of a song. As TIDAL often has multiple versions of the same song, such as standard vs explicit (Eg. SICKO MODE, God’s Plan, WAP), remasters (Eg. “Listen to the Music (2016 Remaster)” by The Doobie Brothers) and high-resolution/MAX versions. Manual recreation will give you full control. Most automatic tools won’t let you choose which version you want, they just match the “closest equivalent”.
That said, this method has limits. Realistically:
- It is only good for 1–2 playlists with around 50–100 songs total.
- Manual transfers can be tiring.
Steps to Recreate a Spotify Playlist on TIDAL
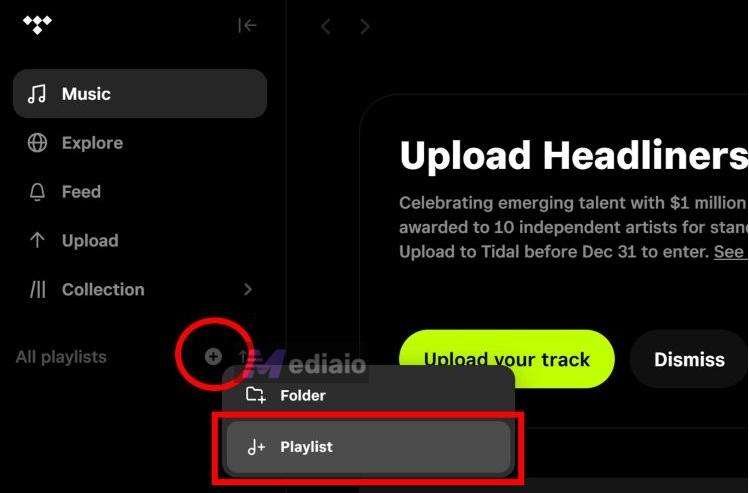
- Open TIDAL desktop.
- Look for All playlists option in the left sidebar.
- Click the plus (+) icon and choose Playlist.
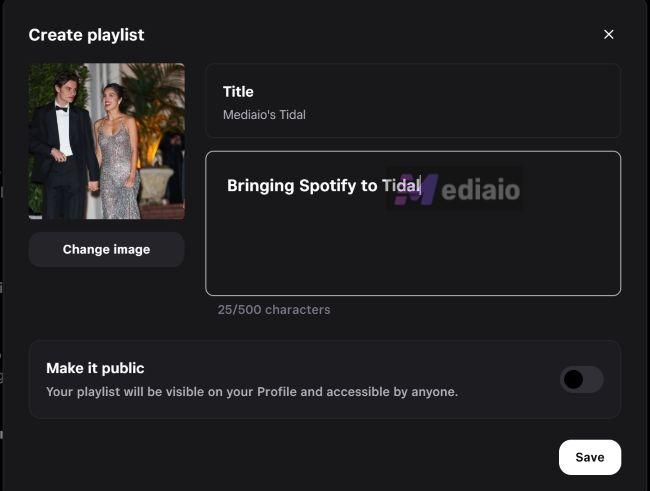
- A small Create Playlist window will pop up. Give the playlist a name (similar to the Spotify one). Add a description or image if you want. Save the playlist finally.
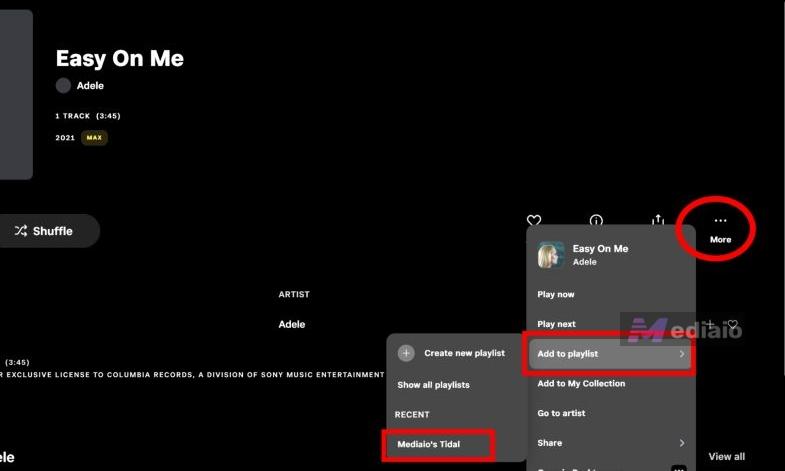
- Search the desired song name and open the song result. Click the More (⋯) option on the song. choose Add to playlist and select the playlist you just created.
Repeat these steps for the rest of the tracks.
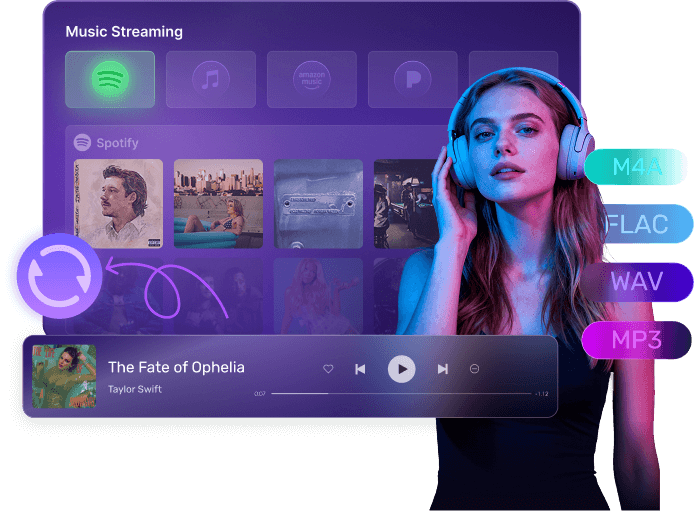
Mediaio Audio Converter allows you to convert streaming music into local files for personal use, preserving high audio quality and complete metadata. With its batch conversion feature and up to 30X faster processing speed, your music conversion becomes quick and effortless.
More DetailsWay 2. Use Online Service
If recreating playlists manually feels too slow, this is where online transfer services make sense. All online transfer tools work on the same core idea:
- Connect to Spotify using Spotify’s API.
- Read your playlists, Liked songs, albums or artists.
- Match each track against the TIDAL catalog.
- Recreate the playlist inside your TIDAL account with the same name and structure.
How they work make them ideal for long or multiple playlists at once. However, none of these tools guarantees perfect matches. You will need to review playlists after transfer. Here are the popular Spotify to Tidal online transfer tools.
Transfer Spotify Playlists to TIDAL Using TuneMyMusic
All three services behave similarly and we’ll use TuneMyMusic as the example.
Step 1. Open TuneMyMusic
- Go to TuneMyMusic in your browser.
- Choose Spotify as the source platform
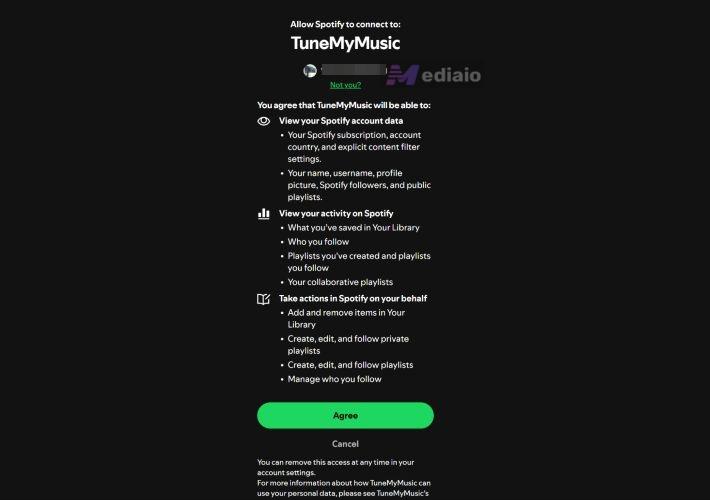
Step 2. Connect Your Spotify Account
- A Spotify permission screen appears.
- Review the access details.
- Click Agree to allow playlist reading.
This lets the service fetch your playlists, Liked songs and library data.
Step 3. Load Playlists
You now have two options:
- Load from Spotify account (recommended)
- Paste Spotify playlist URL manually
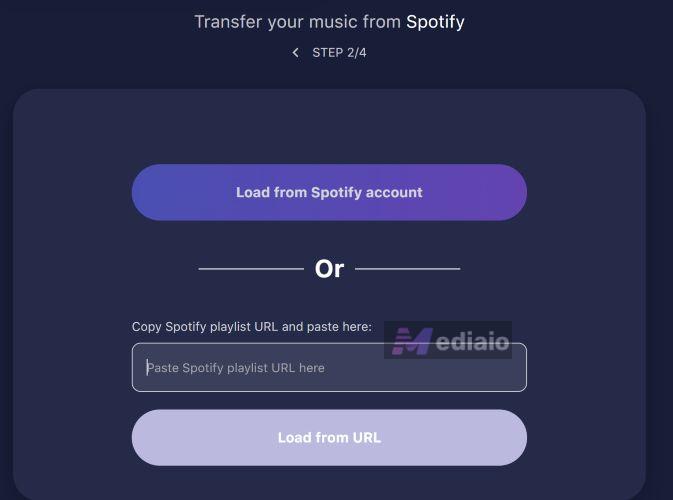
Select the playlists you want to move.
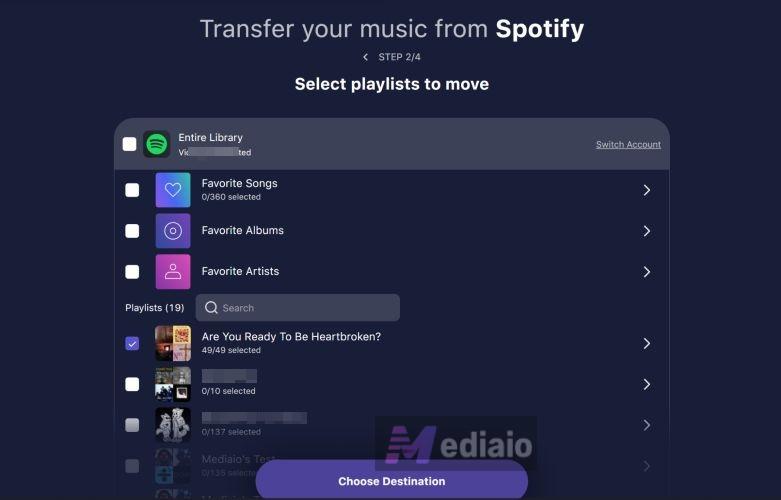
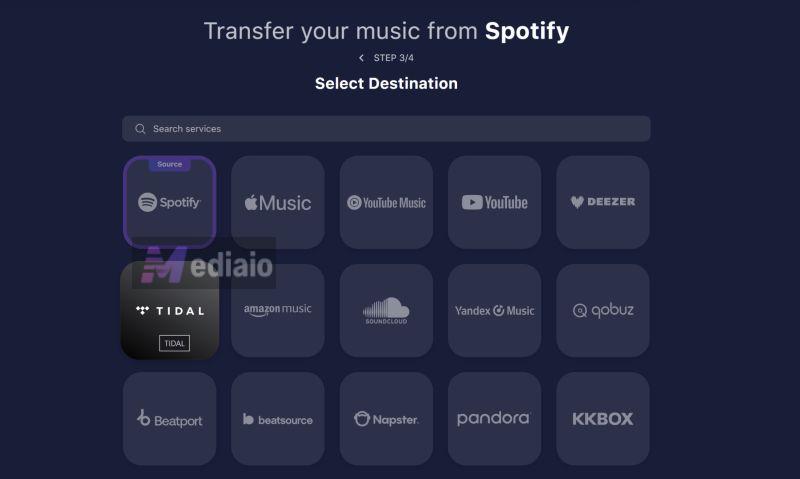
Step 4. Choose Destination
- Click Choose Destination.
- Select TIDAL.
Step 5. Sign in to TIDAL
- Log in normally to your TIDAL account.
- Approve access when prompted.
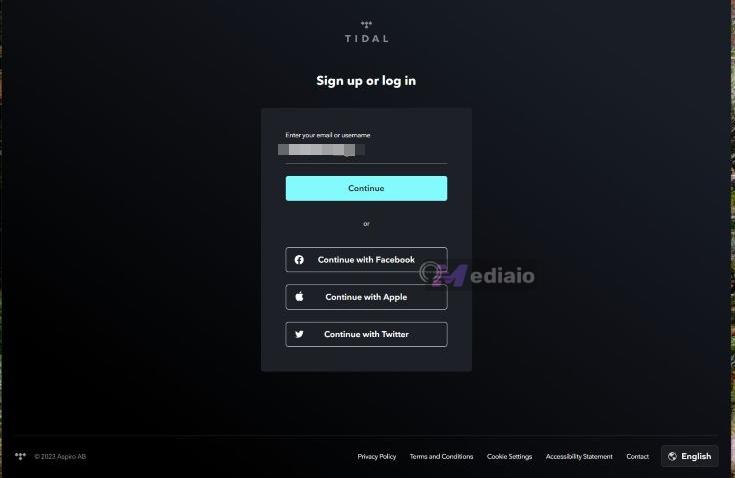
Once connected, you’ll see: Spotify to TIDAL transfer confirmation.
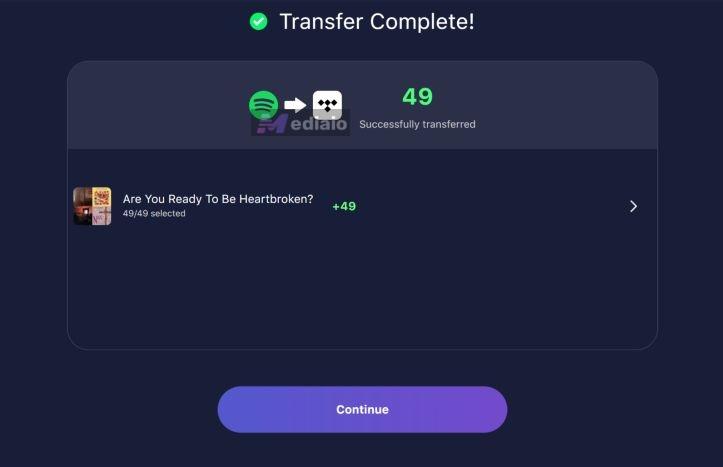
Step 6. Start Transfer
- Click Start Transfer.
- The tool begins matching tracks.

On the free plan: only the first 500 songs are transferred. When finished, you’ll see Transfer Complete on screen.
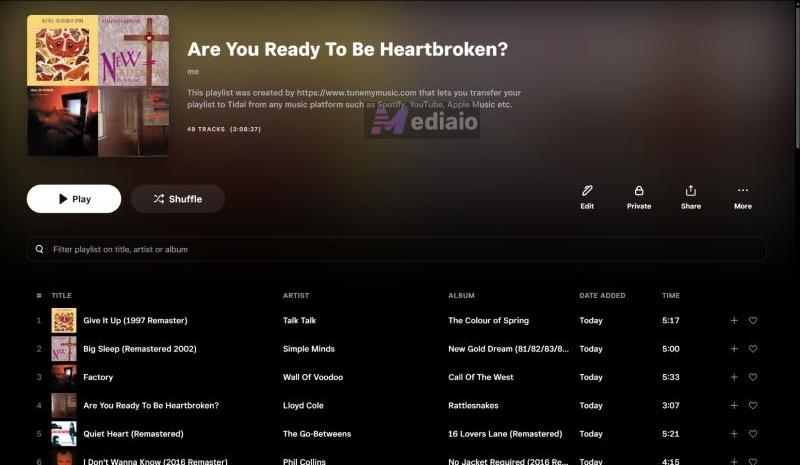
What Happens After Transfer
- The playlist will appear in your TIDAL library.
- Track order is usually preserved.
- Playlist description mentions the transfer tool name when using the free version, but it’s editable.
- The playlist is typically set to Private by default.
Tip: What Is TIDAL “Liked Songs” Limit
When you use tools like TuneMyMusic or similar online services, you can also move your Favorite Songs, meaning Spotify’s Liked Songs, directly into TIDAL.
Here’s how that works on TIDAL:
- Liked songs do not become a playlist.
- They appear under Collection > Tracks.
- Each song is marked with a heart icon, which is TIDAL’s equivalent of Spotify’s Liked Songs.
However, there is a hard limit that you should know: TIDAL has a hard cap of 10,000 likes. This limit applies on mobile and desktop.
Spotify also has the same 10,000 tracks limit. However, there is an easy way to bypass that if you’re on the desktop. So if your Spotify Liked Songs exceed 10,000, online transfer tools like TuneMyMusic will stop midway.
Practical workaround:
Before transferring, split your liked songs into multiple playlists on Spotify. So you can create playlists like Liked Songs 1, Liked Songs 2 and Liked Songs 3, add 2,000–4,000 tracks per playlist and then transfer those playlists.
This way:
- You can avoid TIDAL’s hard 10,000-track limit.
- Your playlist transfer completes without errors.
- You can keep your TIDAL Liked collection clean and use it for discovery, letting TIDAL’s algorithm learn what you currently enjoy as you explore new music.
Way 3. Try GitHub Tool

Online transfer sites are convenient, but they often cap transfers until you pay. If you’d rather avoid those “web limit dramas” and you’re okay with a slightly technical setup, an independent GitHub project like spotify2tidal can be a solid alternative.
It’s a command-line tool. The trade-off is simple: you have to do a long setup. Once you do that, you can sync all Spotify playlists in one run, transfer a specific playlist by URI, and even sync Spotify “Liked Songs”, without a “per-playlist transfer cap” from a website plan.
Before you start, make sure to have:
- Python 3 installed on your computer — Windows or macOS.
- A way to download the repo: Git or download the ZIP from GitHub.
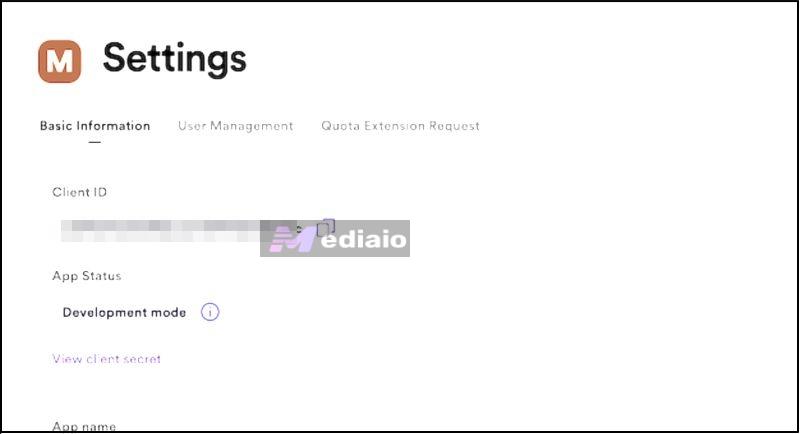
- A Spotify Developer app from the Spotify Developer Dashboard. To download the app, you’ll need Client ID + Client Secret, plus a Redirect URI.
Step 1: Install spotify2tidal from the repo
Open Terminal, Command Prompt or PowerShell. Go to the project root folder. Then, run: python3 -m pip install -e .spotify_to_tidal
Step 2: Create and Fill the Config File
- Rename the sample config file: config.example.yml > config.yml
- Visit the Spotify Developer Dashboard. Register a new Spotify app.
- You’ll get a Client ID and Client Secret. Open the spotify section of config.yml and paste the details.
- Copy the tool’s redirect_uri value into your Spotify app’s Redirect URI list. Then save it.
- Enter your Spotify username in config.yml.
Keep your Client Secret private. Don’t paste it into random places or share screenshots with it.
Step 3: Run the Transfer
1. Sync Spotify “Liked Songs”:
Run: spotify_to_tidal --sync-favorites
2. Transfer only one playlist (best when you’re testing):
spotify_to_tidal --uri <playlist_id_or_full_playlist_uri>
3. Sync all your Spotify playlists:
Run "spotify_to_tidal"
That’s basically it.
Conclusion
So that’s it. Moving from Spotify to TIDAL does not mean leaving your music behind. Any playlist you care about, such as Liked Songs, can come with you. You have seen the different ways to do it. Choose the one that fits your situation, finish the transfer, and keep listening on TIDAL with everything you already built intact.