There are times when a perfectly captured video is ruined by bad audio, like distracting background noise or copyrighted music playing over the clip. No worries, this guide will walk you through the most practical ways to remove audio from iPhone video, whether you want to fully mute the clip or silence a specific 5-second portion. We will also cover methods that can target specific sound layers, such as separating vocals from instruments, so you can replace them with a new voiceover or royalty-free music.
How to Remove Audio from iPhone Video (Fully Mute/Lower Volume)
We will start with the tools that work on the video’s full audio layer. These apps are built for simpler audio control, so they mainly let you fully mute the clip, lower the original volume, or replace it with another sound track. But the editing control still applies to the audio layer as a whole. You cannot use them to isolate vocals or mute only a precise five-second portion of the clip.
That said, these tools are still the quickest and most convenient ways to remove sound from an iPhone video, since most of these apps are already sitting on your device.
Way 1. Use Inbuilt Photos App
Use this when you just want to strip all background noise from your video without sacrificing an ounce of video resolution.

Apple’s native muting option inside the Photos app is more of an all-or-nothing toggle. Simply put, it will just make the video completely silent.
The biggest benefit is that the edit is non-destructive. The audio isn't permanently removed here. Instead, it will simply become hidden. That means you canopen the same video on your iPhone and restore the original sound with a single tap whenever you want. And through it all, your video resolution will stay exactly as it was recorded. When it comes to sharing, Apple will send the video in its current state (muted).
Steps to Mute iPhone Video Using Photos App
Step 1. Head into the Photos app and bring up the video you want to silence.
Step 2. Once it’s on screen, move to the Edit controls (the slider-style icon) sitting along the bottom bar.
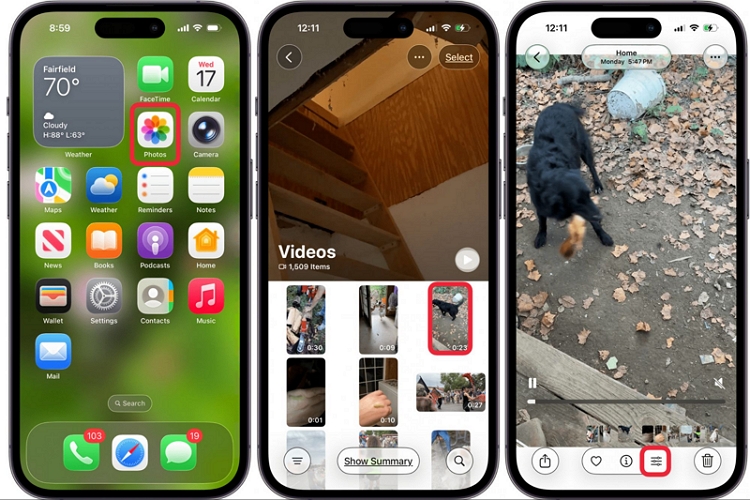
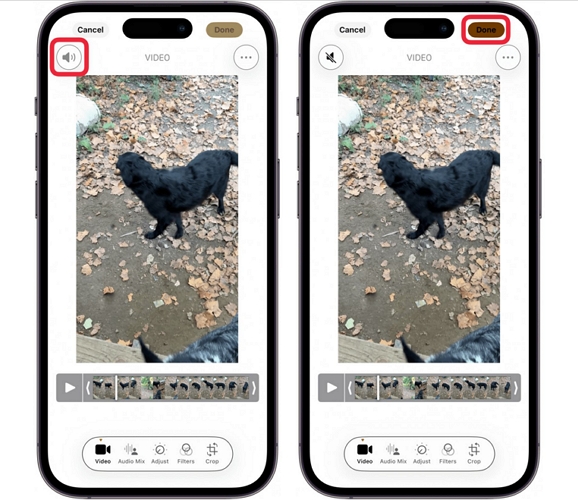
Step 3. Tap the yellow speaker icon in the top-left. The icon will turn into grey with a diagonal slash, which confirms the sound is now completely cut off.
Step 4. Hit Done at the top right. The muted version will now overwrite the original clip. It will stay silent when you play it on your iPhone or even when you share it with your friend through iMessage.
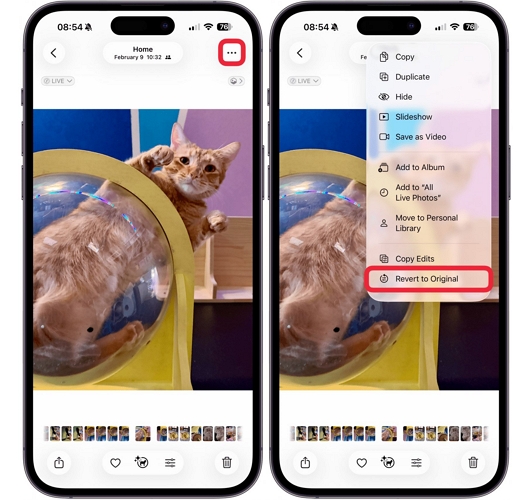
And if you ever want the sound back, jump into menu options and use the Revert to Original option. One tap and the original audio will be added back.
Way 2. Use TikTok
You want to mute the lower volume without killing it completely or replace it completely with a new sound.

TikTok features a volume slider. So you can adjust the original sound anywhere between 0 and 100. This way, you can choose to lower the original sound, keep parts of it, or reduce it all the way to zero.
The trade-off is that TikTok will compress the video file, meaning that the file you save back to your Camera roll will lose its original quality.
Steps to Use TikTok Video Editor to Mute Original Sound
Step 1. Launch the TikTok app. Tap the + (Create) button at the bottom.
Step 2. Tap Upload. Pick the video from your camera roll. The video will load into the editor.

Step 3. On the right side, tap the downward arrow to expand more options. Select Edit.
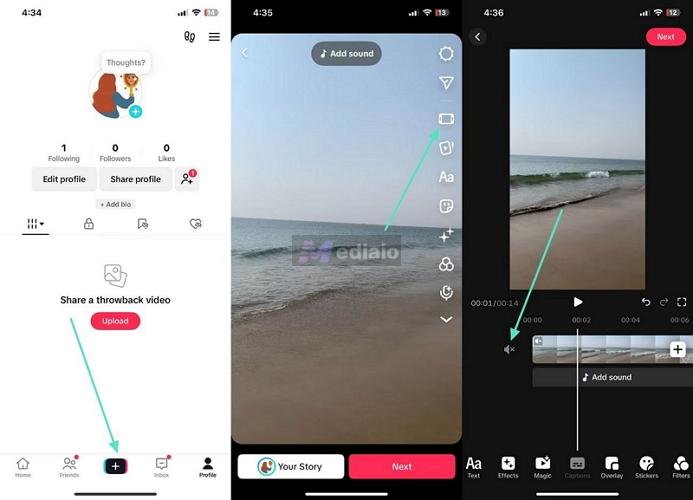
Step 4. The video will now appear on the timeline. You will see a speaker icon just before it — tap it once. And the volume will be muted.
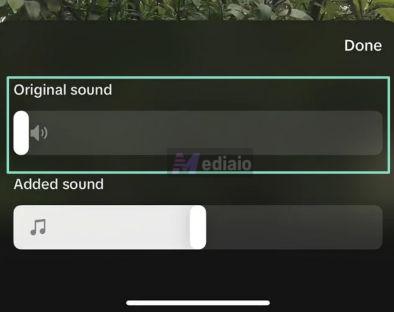
If you want control, open the Volume option and drag the Original sound slider all the way to 0. Or you can also keep it somewhere in between if needed.
To replace the sound, use Add sound or the Voiceover option and layer a new track.
Step 5. Tap Next to move forward.
Step 6. On the video settings page, tap Who can watch this video option. Set it to Only me(Private).
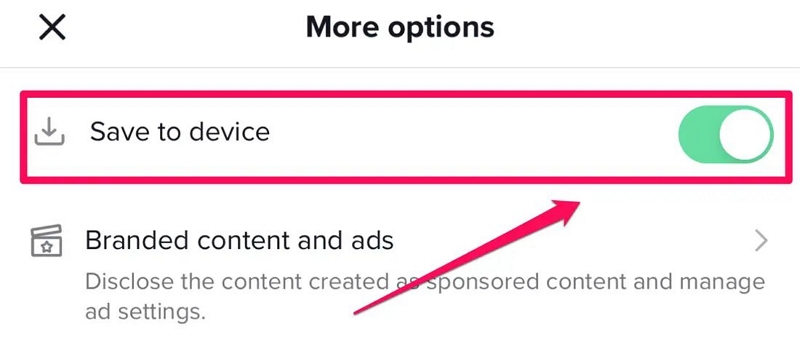
Step 7. Scroll down. Tap More options (three dots). At the top, turn on Save to device.
Step 8. Go back, then tap Post.
Step 9. Open the Photos app. The video will be saved there with the audio muted. You can keep it or share it anywhere.
Way 3. Use Instagram
Use Instagram when you quickly want to mute, lower, or replace the audio of a video. You will also get access to social-style editing tools at the same time.

Instagram actually gives you two different editors for this — Stories and Reels. And both come with their own style of audio controls. So let’s look at both of them one by one.
Option 1. Mute Videos with Instagram Stories Editor
The Stories editor only works properly for clips under a minute. Even if you try to upload a longer video, Instagram will import the first 60 seconds into the editor. And like the iPhone’s Photos app, you’ll get a simple ON/OFF sound toggle here. So there is no way to control or trim specific parts of the sound.
Here’s how quick and convenient this method is:
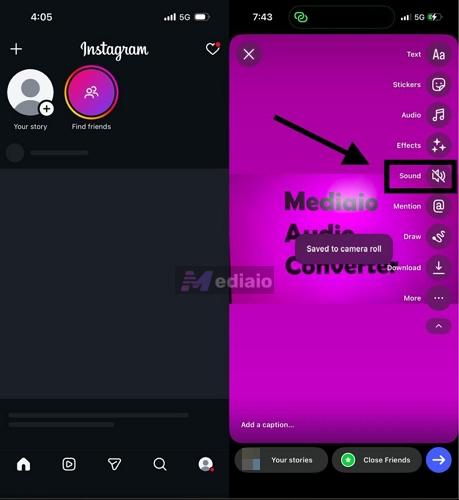
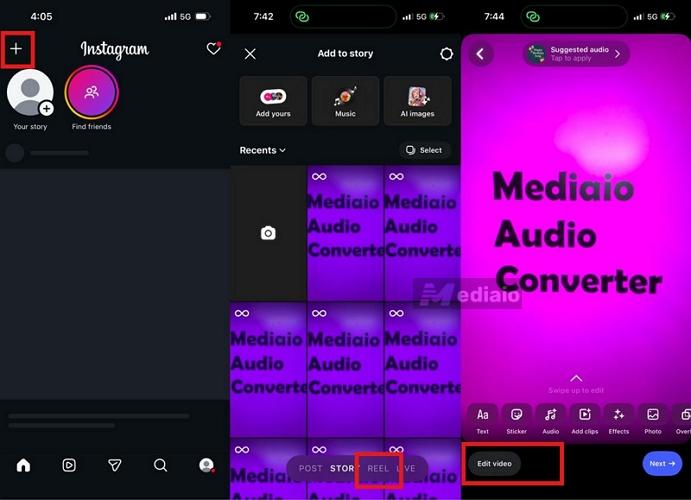
Step 1. Open the Instagram app. Tap the + button at the top left or swipe right from the main feed to open the Story camera.
Step 2. Tap the square gallery icon sitting in the bottom-left corner and choose the video you want to silence from your camera roll.
Step 3. Here, all the editing tools will appear in a vertical stack on the right. Tap the Sound icon. It will immediately switch to a slashed speaker, confirming that the video has been completely muted.
Note: You can also add text, stickers, filters, and other Story effects. But Instagram will block the download if you use copyrighted music.
Step 4. Once a segment is muted, tap the Download button. Instagram will show a “Saved to camera roll” notification. You can then move to the next Story segment and repeat the same process if needed.
Option 2. Edit Video Audio with Instagram Reels
Reels give you much more control over the audio. It gives a 0–100 volume slider. On top of that, the timeline lets you layer multiple audio tracks (music, sound effects, or even voiceover).
The biggest advantage here is the video length. You can upload much longer (up to 20 minutes) videos directly from your Camera Roll.
Here’s how to mute your video using Instagram Reels editor:
Step 1. Tap the + button at the top-left inside Instagram. You will see options like Post, Story, Live, Reel — make sure Reel is selected.
Step 2. Upload the video from your camera roll.
Step 3. Tap Edit video at the bottom left.
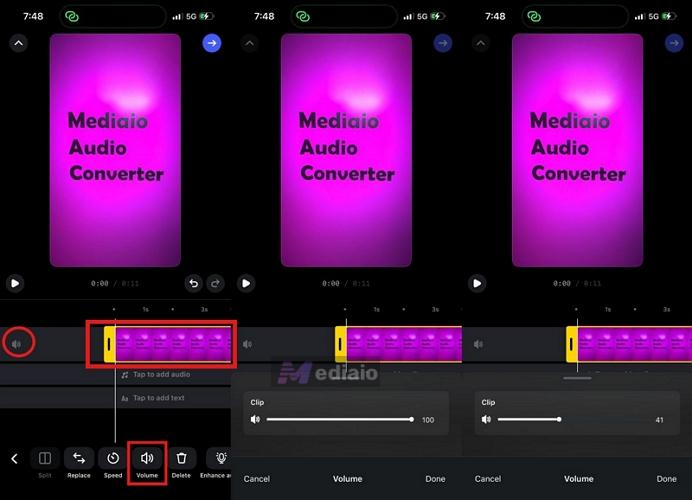
Step 4. You will now enter the timeline editor. Tap the video clip layer. A yellow outline will appear around it, confirming that the clip is selected.
Step 5. Access the Volume option from the bottom. This will bring up the granular 0–100 audio slider. Drag it to the level you want.
Step 6. Tap Done. You can then add music or insert voiceovers.
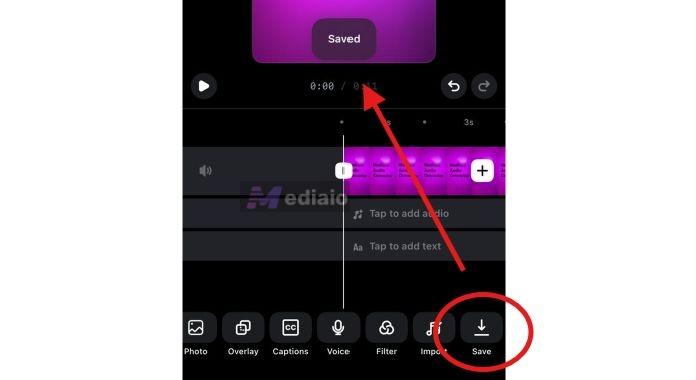
Step 7. Scroll all the way to the end, then tap Save. The video will be saved to the Photos app.
Way 4. Use Facebook
When you want Instagram-like audio controls but prefer Facebook’s editing environment or already manage your videos there.

Just like Instagram, Facebook also gives you both Story and Reel editors for audio editing. And both of them work very similarly when it comes to muting or lowering your original camera audio. You will get granular volume controls in both. So you can reduce the original camera sound to any level or drag it completely to zero if you want full mute. Both editors also allow you to add music and other effects.
How to mute your video using Facebook’s Reel or Shorts editor:
Step 1. Open Facebook and enter either the Story or Reel editor. Choose Reel if you want to replace the original sound layer with a voiceover. Otherwise, both work almost in the same way for muting audio.
The main difference is the video length limit. The Story editor only imports up to 120 seconds of the clip while Reels supports longer videos.
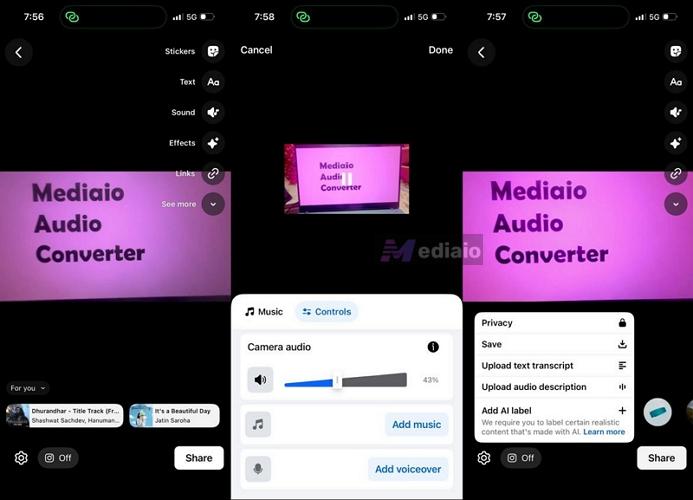
Step 2. Upload the video from your camera roll. The editing tools will appear in the vertical toolbar in both Reels or Shorts editors.
Step 3. Open the Audio option.
Step 4. Switch to the Controls tab. Drag the slider in the Camera audio section to lower the original sound level. You can pull it fully to zero if you want to mute the video.
Step 5. Tap Done to return back to the main editing screen.
Step 6. Finally, use the Setting near the bottom left and tap Save. Facebook will export the edited video directly back to your device.
How to Remove Audio from iPhone Video (Partially Mute)
Apple iMovie gives you much deeper control over the audio layer than the apps above. What really makes iMovie stand out, though, is its partial muting feature. You can silence only a portion of your video while keeping the original audio intact everywhere else. This is incredibly helpful when you want to hide something sensitive, remove a few seconds of copyrighted music, or clean up a noisy part.
Plus, iMovie is an advanced editor. So you can even fill that newly silenced gap with sound effects, custom background tracks, or a voiceover.

Steps to Remove Sound from iPhone Video with iMovie
Step 1. Open the iMovie app. Start a new Movie project. Then, select the video from your camera roll.
Step 2. Position the playhead (the vertical white line) where you want the muted section to begin.
Step 3. Tap the video clip, open the Scissors icon and choose Split to create the first cut.
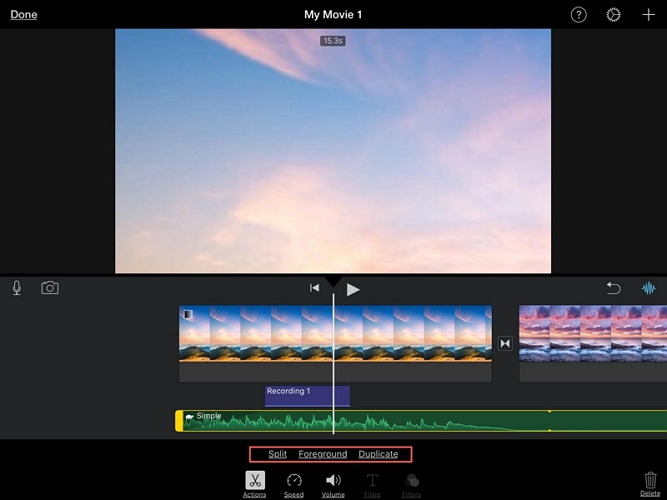
Step 4. Scrub the playhead again to the exact point where you want the original sound to return.
Step 5. With the clip selected, press Split one more time. The portion between the two cuts will now become its own isolated segment.
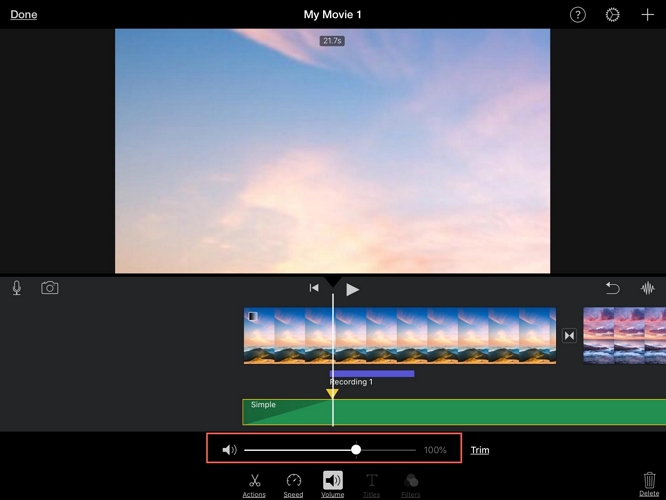
Step 6. Tap this newly isolated middle portion. Open the Audio controls using the speaker icon, then drag the volume slider all the way down to zero.
Step 7. Press play to check the result. You will notice that the sound plays normally but becomes muted only in that selected portion and returns again afterward. You can then continue editing further — add background tracks, cinematic fade-ins/fade-outs, voiceovers.
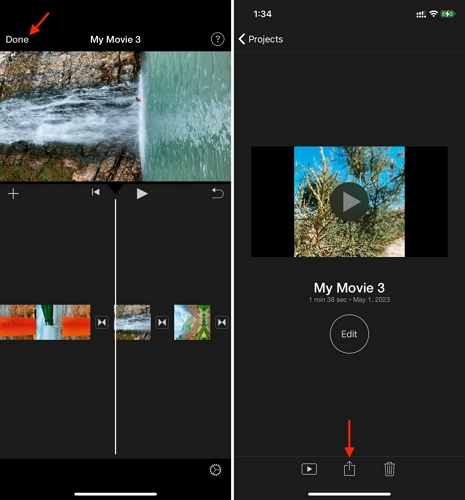
Step 8. Finish by tapping Done. Then use the Share > Save Video.
How to Remove Audio from iPhone Video (Remove Vocals/Noise/Music)
Now let’s come to the tools that allow you to target specific parts of the audio instead of muting the entire thing. Sometimes the problem is not the full audio layer itself. Perhaps you only want to remove background noise. Or separate vocals from instruments so you can replace them with a new voiceover or non-copyright music.
So let’s see the tools that allow you to target specific parts of the audio instead of muting the entire thing.
To Remove Noise: Use Eassiy Video Converter Ultimate
When to Use When you need to remove background noise, like heavy wind, traffic, or a static hum from the video.
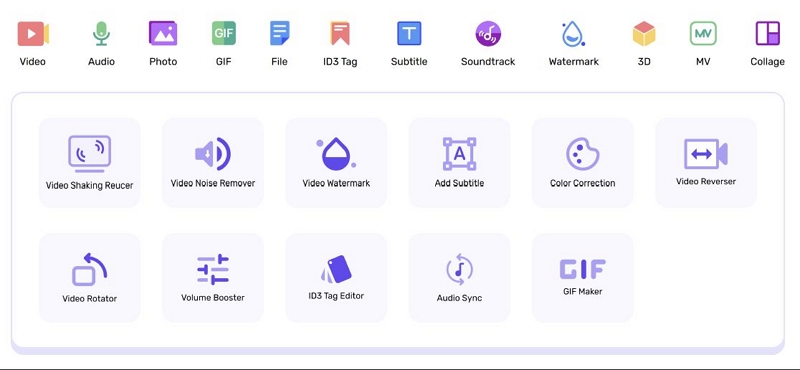
Sometimes your video’s core audio is perfectly fine, but it is the background noise that makes you think you need to re-record the audio layer. Actually, you do not have to remove the entire sound layer for that. You just need to use Eassiy Video Converter Ultimate. Eassiy comes with a dedicated Remove Video Noise feature that can intelligently scrub unwanted background noise while keeping your vocals and important audio much cleaner. And because it is a full desktop editor, it can handle long videos, supports up to 8K footage and works with more than 1000 file formats.
Beyond denoising, you also get access to a complete editing toolkit — volume booster, watermark remover, video upscaler, stabilization tools, and many other utilities inside the same software.
The only limitation is that it is available only on Windows and Mac. So you will first have to transfer the iPhone video to your computer. But in return, you get far more control and much cleaner results.
Steps to Remove Video Noise Using Eassiy Video Converter Ultimate
Step 1. Transfer the noisy video from your iPhone to your Windows or Mac computer. (You can use AirDrop, iCloud, or a USB cable.)
Step 2. Launch Eassiy Video Converter Ultimate. Head into the Toolbox section. Then, open Video Enhancer.
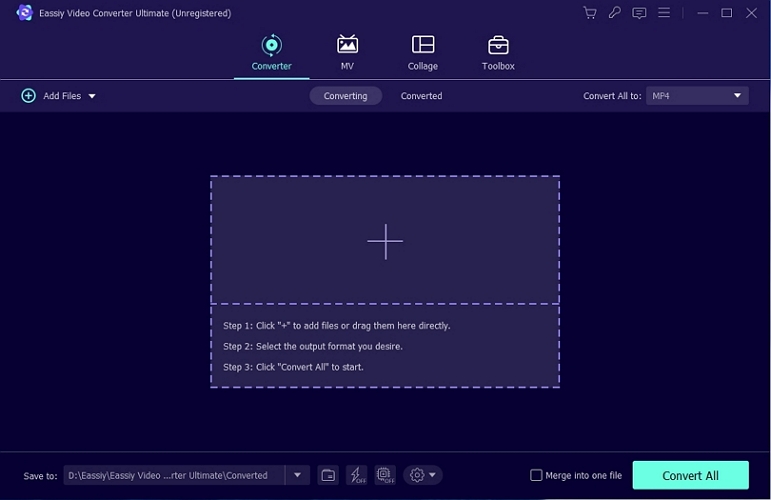
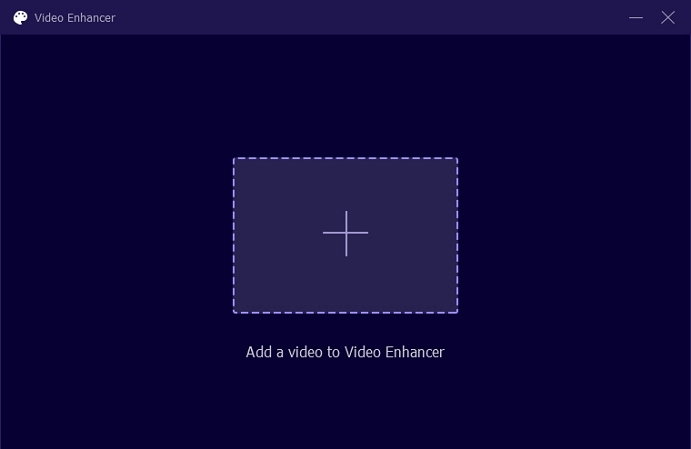
Step 3. Drag your video file into the + window.
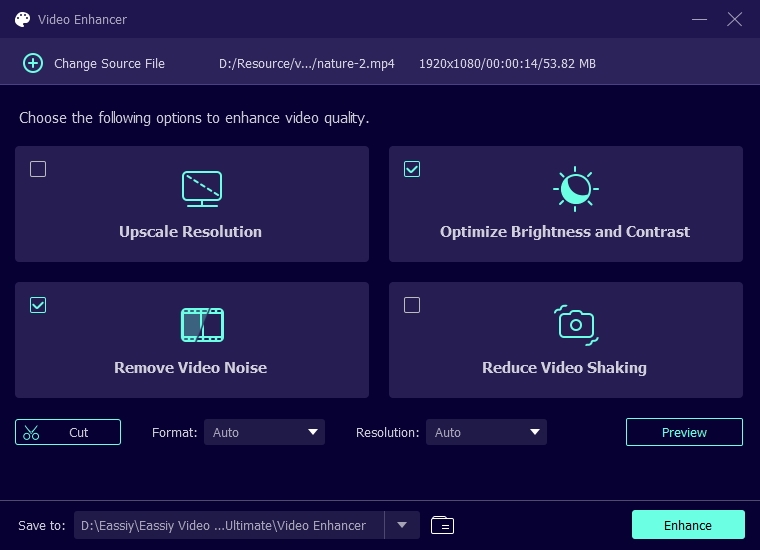
Step 4. You will see four different enhancement options. Choose Remove Video Noise to activate the intelligent video noise remover.
Bonus: You can also enable Reduce Video Shaking here if the footage itself looks slightly shaky.
Step 5. Press Preview to see the result.
Step 6. Click Enhance. That’s it! Eassiy will save the cleaned version back to your computer.
To Remove Music: Use BandLab Splitter
Use BandLab when you want to remove the background music, drums, or bass from your video without paying a dime.

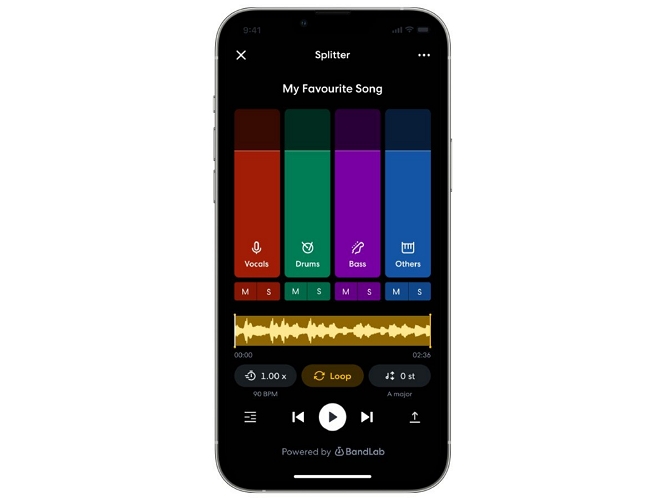
BandLab’s AI Splitter lets you instantly divide your video’s audio into four standalone interactive layers: Vocals, Drums, Bass, and Other (which lumps in guitars, keyboards, etc.). And you can lower or completely remove these elements even with the free version. More advanced separations, like guitar and piano isolation, are available only with the premium upgrade.
Steps to Remove Music from Video via BandLab Splitter
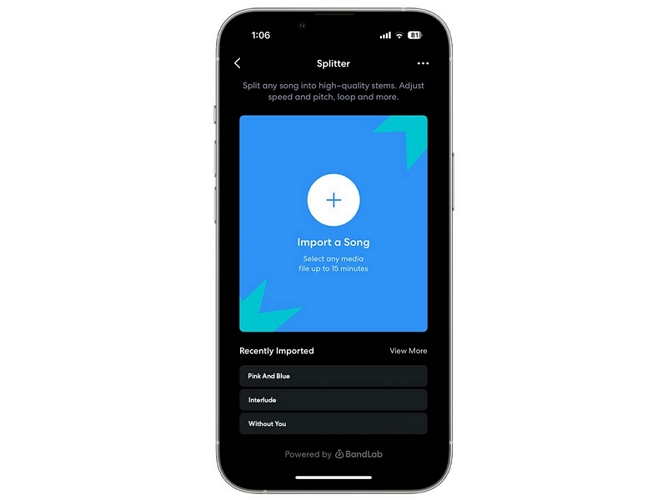
Step 1. Open the BandLab app and head into the Create tab. Under the tools section, open Splitter.

Step 2. Tap the + button to open the iPhone file picker. Choose the video (up to 15 minutes long) from which you want to remove the music layers.
Step 3. BandLab’s AI will automatically begin separating the stems. You’ll see separate layers like Vocals, Drums, Bass, and Others.
Step 4. Use the slider on each stem to lower or mute specific music elements.
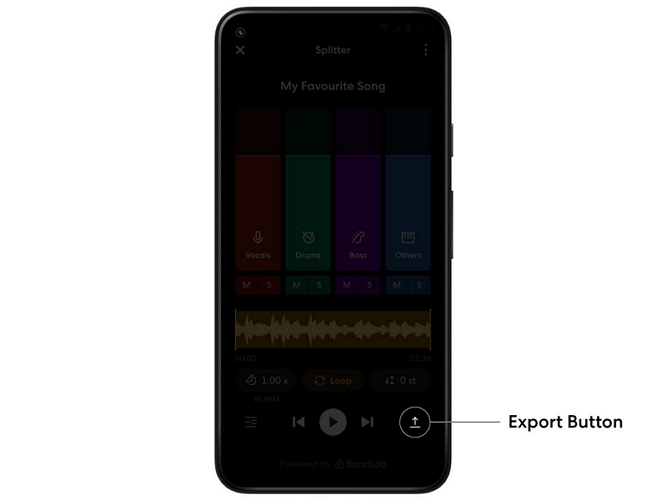
Step 5. Tap Done. Then, use the Export option to save the processed video.
To Remove Vocals: Use Lalal.ai
Use LALAL.ai when you need professional-grade, surgical vocal separation.

Lalal.ai uses its own proprietary neural network models to isolate vocals and instrumentals with very high precision. The good thing is that Lalal.ai works directly with video files. Once it isolates the vocals, it will also re-embed the edited audio into the final video file and export it in the original format.
Steps to Remove Video’s Vocals with Lalal.ai
Step 1. Open Lalal.ai and tap Add Files. Then choose the video from your Files app, gallery, or iTunes storage.
Step 2. Once the upload finishes, select Vocal and Instrumental from the stem separation options.
Step 3. Continue to the neural network selection screen and choose the appropriate model. The newer V6 Andromeda model is optimized for vocal and instrumental separation.
Step 4. Enable Preview if you want to hear a sample before processing the entire file. This is useful if you want to see it in action before upgrading (otherwise it won’t allow exports).
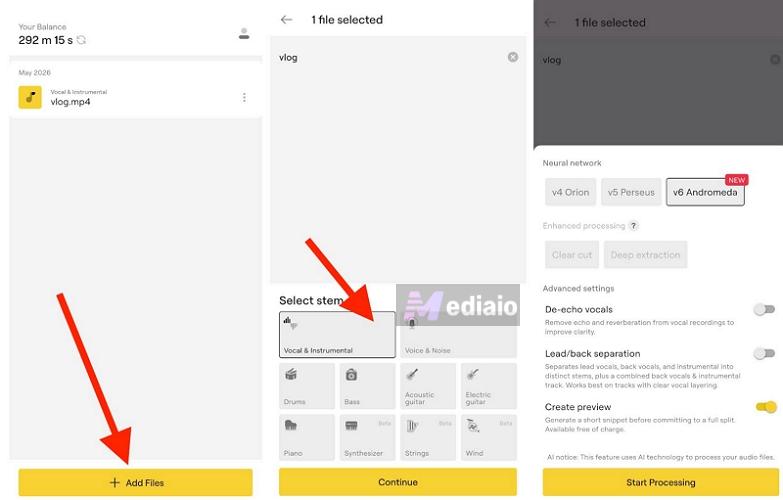
Step 5. Tap Start Processing. Lalal.ai will now separate the vocals and instrumental layers using its AI engine.
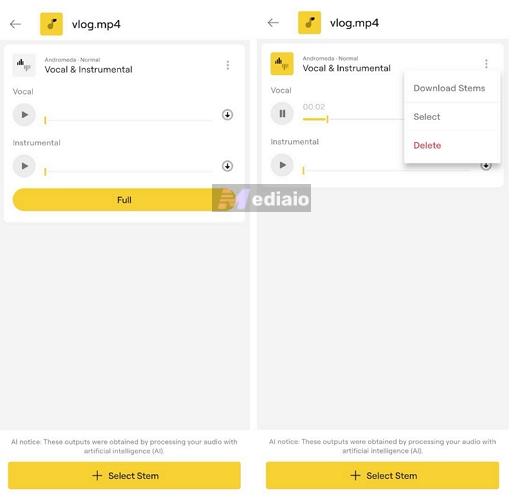
Step 6. After processing, preview the generated stems. The app will present you with two versions of your video: one version will contain isolated vocals and the other will contain only instrumental backing (with the vocals completely removed).
Step 7. Tap Download icon next to the stem you want.
Conclusion
That wraps up the guide. You have seen different ways to remove audio from iPhone video.
- For a quick full mute, the Photos app itself is enough. Instagram and Facebook become useful when you want more flexible volume controls.
- iMovie really excels for partial muting or timeline-level audio control.
- BandLab and Lalal.ai become useful for separating vocals and music layers independently.
Eassiy Video Converter Ultimate is for removing aggressive background noise. It can also clean the audio track, enhance the overall sound quality, and even give you the tools to visually upgrade the video.