Recording audio on your PowerPoint slides can completely uplift how you present your content. It’s no longer just slides with text. You can explain things in your own voice and even export the presentation as a video to share it easily.
PowerPoint offers multiple audio recording options, but it doesn't make them easy to figure out. This guide shows you how to record audio on PowerPoint in every practical way, across Windows, Mac, mobile and the web. You can follow the best method, depending on whether you want to add a quick voice note or narrate a full webinar.
What You Need to Know Before Recording Audio on PowerPoint
Before moving into the menus and buttons, keep one thing in mind. The recording behavior changes depending on where you’re using PowerPoint — mobile, web, or desktop (macOS or Windows). And on top of that, the features and layout also vary based on the version you’re on — Microsoft 365 or older builds like Office 2016 or 2019.
We will walk through the exact steps for each setup below. But first, here’s a quick overview of how the core features compare across platforms.
How to Record Audio on PowerPoint on Mac
On Mac, you have two ways to record audio in PowerPoint. You can add a quick voice note to a single slide or switch to the recording studio and narrate your entire presentation slide by slide in one continuous flow.
Prep:
There are a couple of quick checks to do first. These will prevent silent recordings and missing tools inside PowerPoint.
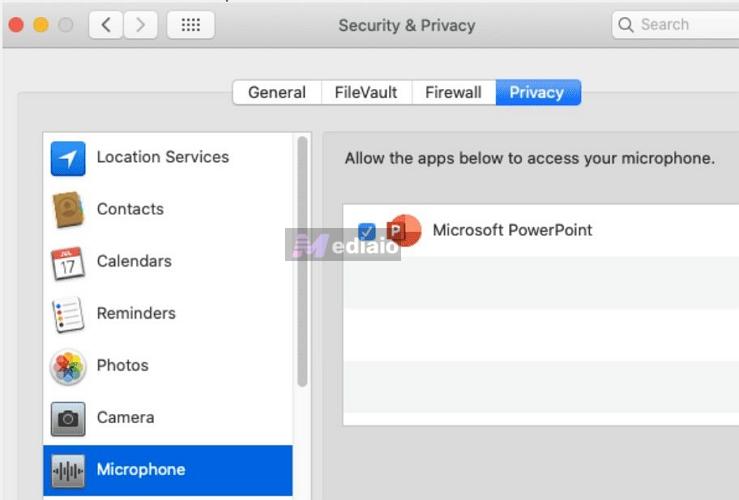
Grant PowerPoint Permission to Access Microphone
On macOS, PowerPoint cannot access your mic unless you explicitly give permission. If you ever hit a record but the timer stays at zero or playback is dead silence, this is the culprit. Here’s how to give this permission beforehand:
- Click on the Apple logo in your top menu bar.
- Open System Settings.
- Go to Privacy & Security and select Microphone.
- Turn on the toggle next to Microsoft PowerPoint.
- Restart PowerPoint if it was already open.
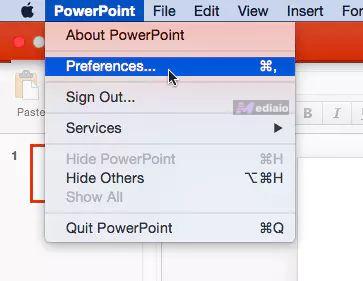
Unhide the Record Tab
The next thing is making sure the Record tab is visible. You need to enable it once. Here is how to do that:
- Click PowerPoint in the top Mac menu bar.
- Open Preferences and select Ribbon & Toolbar.
- Under Customize the Ribbon on the right, check the box next to Record.
- Click Save. The Record tab will now appear at the top of your PowerPoint window.
Steps to Record Audio on PowerPoint on Mac
You can record the audio depending on how you plan to present. Let’s go through both the methods available.
For a Slide
Sometimes you only want your voice on one slide, not across the whole presentation. For instance, you might want to explain a chart or add a short intro. This method works well in those cases.
Now follow these steps:
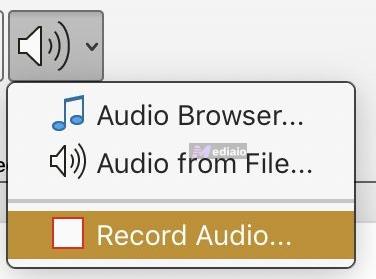
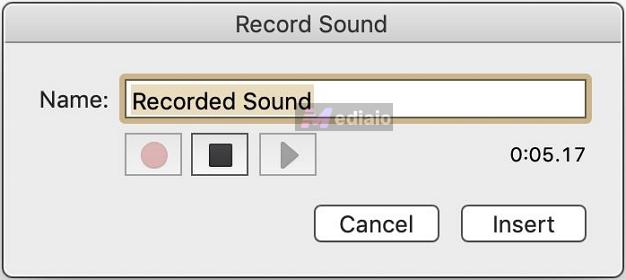
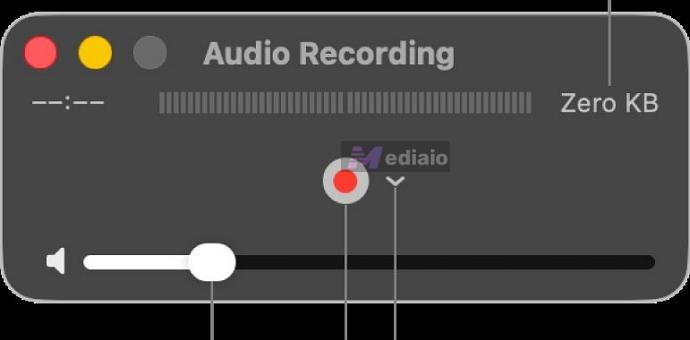
Step 1. Open your presentation. Go to the slide where you want the audio. Select Insert from the top menu, open Audio and then choose Record Audio.
Step 2. A small recording window will appear. Enter a clear name for your recording, so it’s easy to identify later.
- Click the red Record button and start speaking. The timer will track the duration in MM:SS.
- Click Stop when you are done.
- Use Play button to preview your recording.
Once satisfied, click Insert.
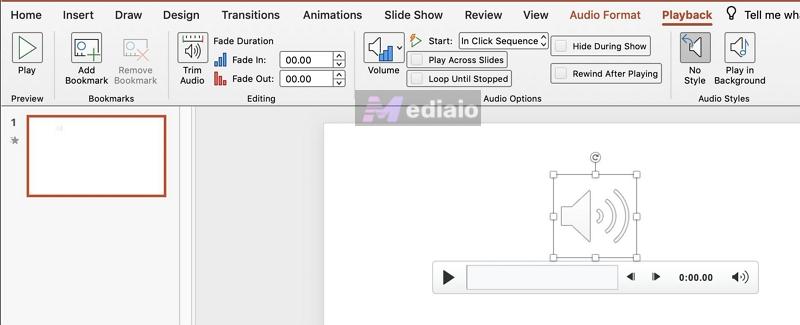
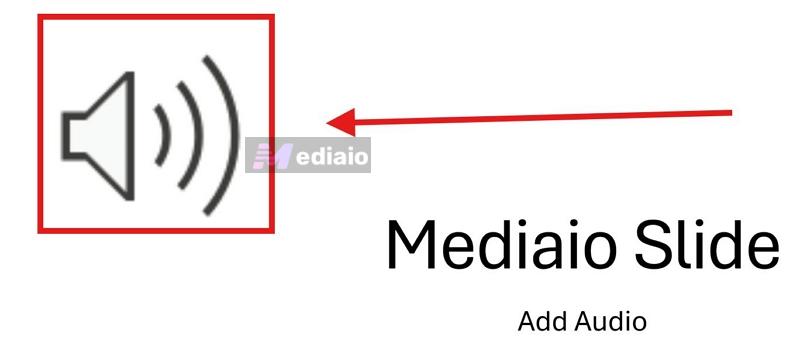
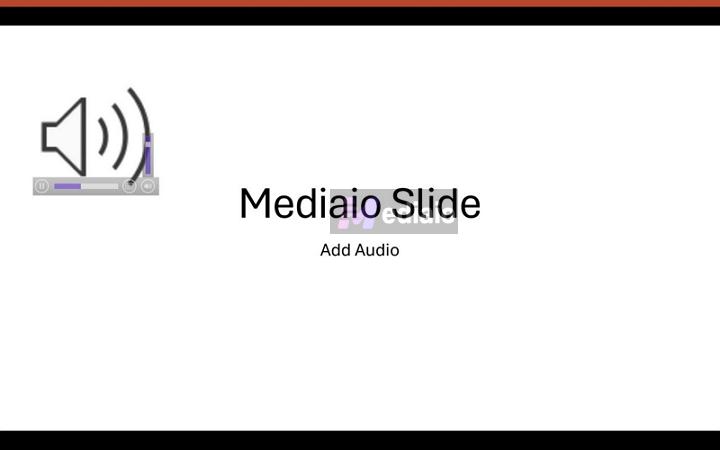
Step 3. The audio will be placed on your slide as a speaker icon. You can reposition it as needed. And when you select the grey speaker icon, two tabs will appear in the ribbon: Audio Format and Playback.
In Playback, you can:
- Adjust volume
- Set Start options (On Click, Automatically, or In Click Sequence)
- Add fade-in or fade-out effects
- Trim the audio from the beginning or end
- Choose whether it should loop or play across slides
If you want the audio only on this slide, leave the “play across slides” option unchecked. You can also add bookmarks while previewing to sync your narration with animations.
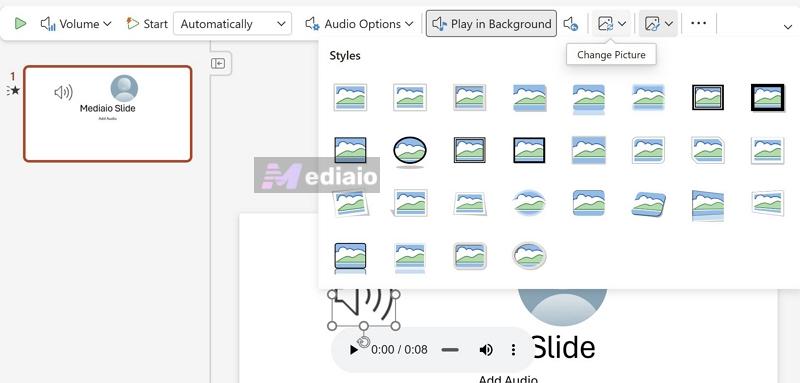
In Audio Format, you can:
- Replace the speaker icon with an image or logo
- Apply visual styles or effects
- Resize and style it like any other object
That’s it. Your audio will now be attached to that slide and ready to play during your presentation.
For All Slides
This feature is helpful when you’re creating online lessons or webinars. And the best part is that PowerPoint gives you a surprising amount of control while doing this.
For one, recording across all slides doesn’t mean PowerPoint will create one long audio track and lay it over your slides. It will actually record slide by slide. So your voice can stay in sync with each slide.
And on top of that, you also get a few extra tools. You can turn on Cameo to show your face using your webcam. You can use markup tools to highlight things while speaking. Or you can choose to just keep your voice in the background while the slides play.
Here’s how to do all this:
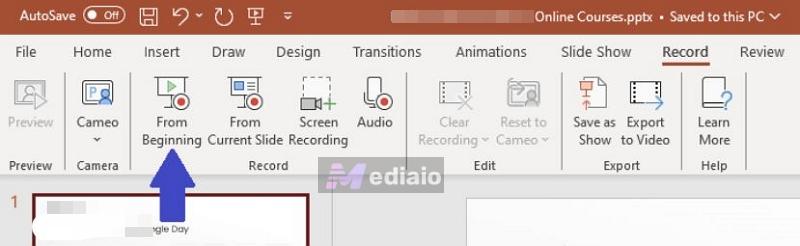
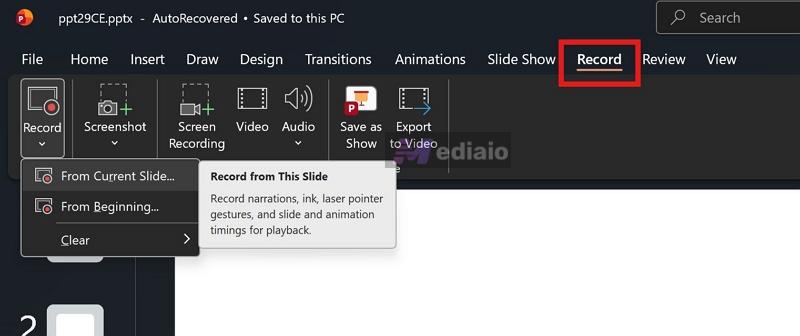
Step 1. Head to the Record tab on the top ribbon. On the left side, you’ll see two starting points.
- Pick From Beginning if you want your voice to start from slide 1.
- Or go with From Current Slide to start from a particular slide. For example, if you’re on slide 4, recording will begin right there.
After you choose, PowerPoint will pull you out of the normal view and shift into a dark recording workspace.
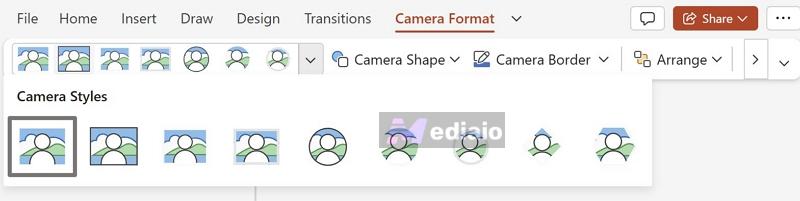
Note: You can use the Cameo option to drop your camera feed. It will add a small circular or rectangle format onto the slide. But you can resize it, move it, or use the Camera Format tab to change its shape and apply styles.

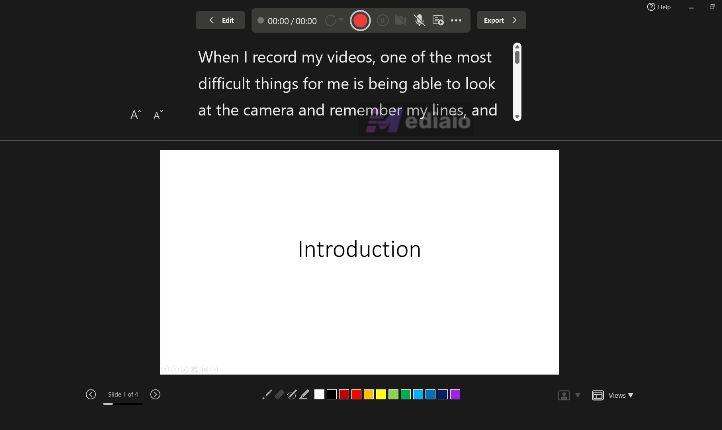
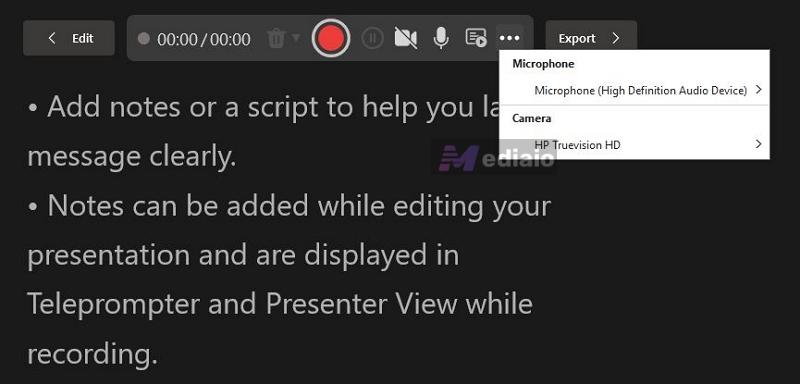
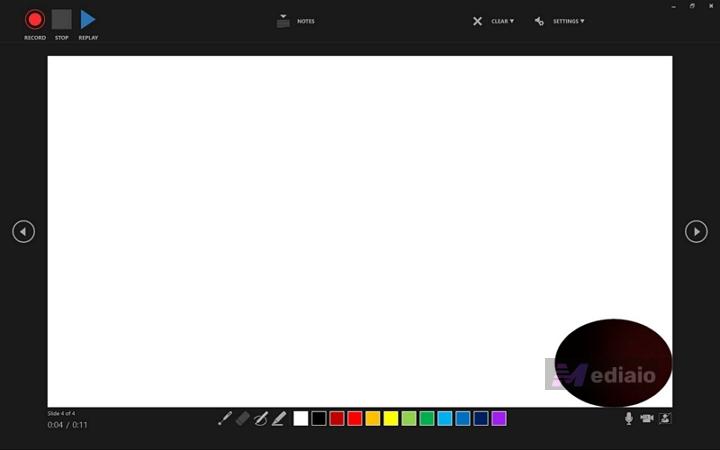
Step 2. You’ll see the Recording Controls at the very top. On the far right, there’s a small Views icon.

You can use it to decide how you want to see your content while speaking.
- If you choose Teleprompter, your slide notes will appear close to the camera area. So you can read line by line while maintaining eye contact with your webcam. You can even adjust text size.
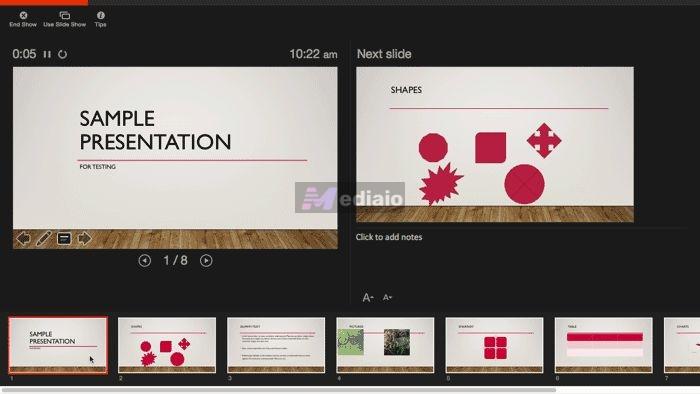
- Switch to Presenter View when you don’t want to read line by line. This layout will show your current slide and a preview of the next slide. And your notes are placed in a smaller section, so you can refer to the content while speaking naturally.
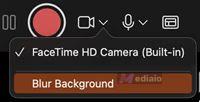
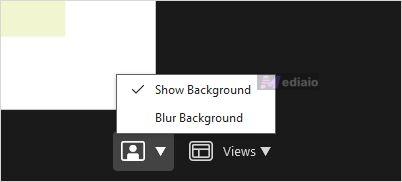
Step 3. You can click on the tiny drop-down arrow on the Microphone to select the correct input (built-in or external mic). Then open the Camera menu the same way if you’re using Cameo. It will allow you to select the right webcam and turn on Blur Background.
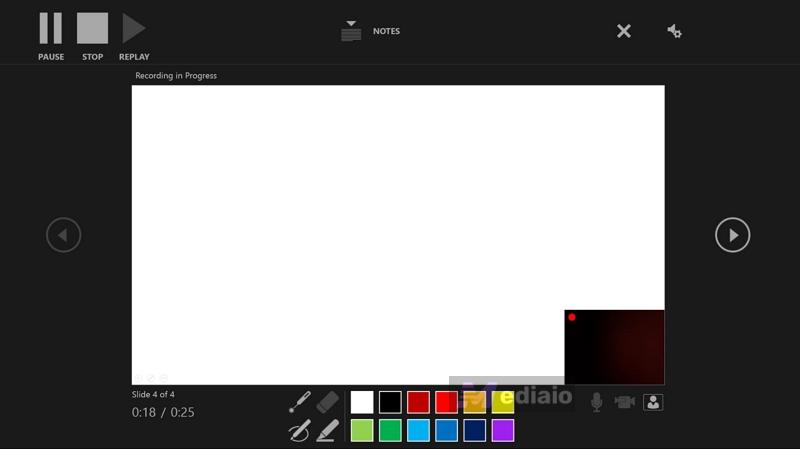
Step 4. Hit the red Record button and you’ll be live after the 3-sec countdown. As you speak, keep an eye on the two timers:
- The left shows your narration time on the current slide.
- The right timer tracks the total recording duration.

Keep in mind that PowerPoint mutes the mic during slide transitions. To ensure a seamless recording: finish your sentences on each slide and pause. Hit the Next arrow. And resume speaking only the new slide is fully visible.
You’ll also find annotation tools (pens, highlighters, laser pointer) at the bottom. Use them to guide your audience’s focus.

💡 Pro Tip: How to Fix a Mistake
You don’t have to start your entire presentation over just to fix one mistake. For instance, if you mess up on Slide 12, simply follow these steps:
- Hit Pause in the recording controls.
- Click the Trash icon. Then select Clear Recording on Current Slide option.
- Start recording again for just that slide.
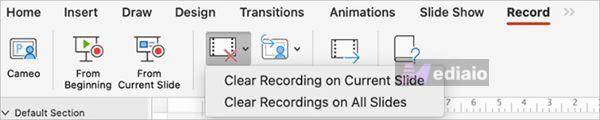
You can also clear the Cameo recording for individual slides or all slides.
Step 5. Once you’re on the last slide, hit Stop. Then press Esc to return to the normal editing view. You’ll see a speaker icon on every slide, confirming that your narration is attached.

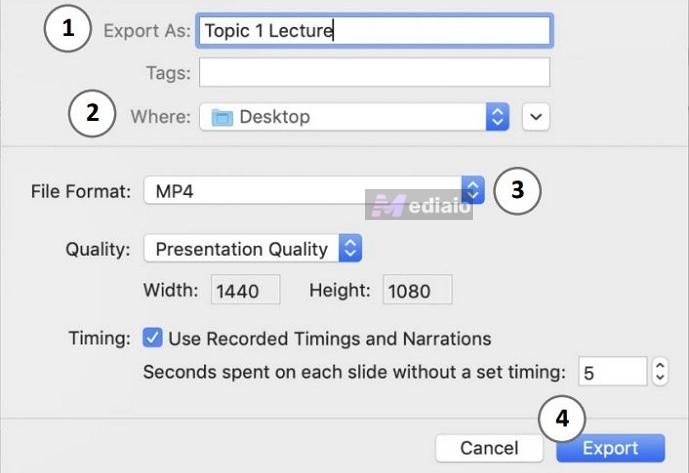
Step 6. Hit cmd+S to save audio into your file or click File > Export... in the top Mac menu bar.
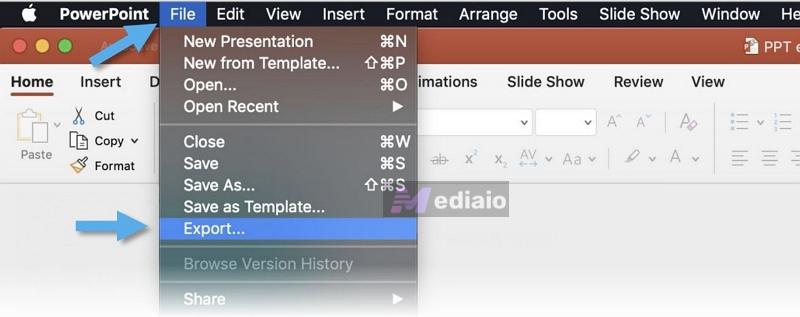
Choose the file format and hit Export again.
Tip: Add Music to PowerPoint
Recording music is not the ideal way to add background music to your slides. The built-in record option is meant for voice, so the recorded music will not sound high quality and it will feel distorted. A cleaner way to do this: you can export high quality tracks from music streaming services like YouTube Music in a compatible PowerPoint format and then add them to your slides as a normal audio file. Mediaio Audio Converter helps you do that.
Mediaio connects you directly to YouTube Music, Spotify or Apple Music using your own account via its embedded web players and lets you export the tracks that you want in MP3, M4A or WAV. All of these formats are compatible with PowerPoint.
And since these files are saved locally, you can play them on your slides without depending on the internet or buffering. Even better, PowerPoint lets you adjust the volume, so you can even drop the narration on top without your voice fighting the music.
How to Record Audio on PowerPoint on Windows
On Windows, PowerPoint is more deeply integrated, so you’ll notice a few features and controls that are simply not present on the Mac version.
However, what you see on your screen will depend heavily on your Office version. For instance, Microsoft 365 introduced the “New Experience” — the Record tab here is very much similar to the macOS version itself. Still, you’ll find a few subtle but highly useful upgrades here, like an auto-scrolling teleprompter that the Mac version lacks.
The "Classic Experience" gives you similar controls, but the options are more fragmented. If you’re on older versions (PowerPoint 2016 to 2019), the layout will change even more noticeably.
We’ve mapped out the exact steps for each layout below.
Steps to Record Audio on PowerPoint on Windows
You still get two ways to work with audio here. You can place a separate audio clip onto specific slides or you can record a full voiceover across the entire presentation.
For a Slide
If you just want to attach a quick explanation to a single slide, here’s how it works. The process is practically identical regardless of which Office version you are using.
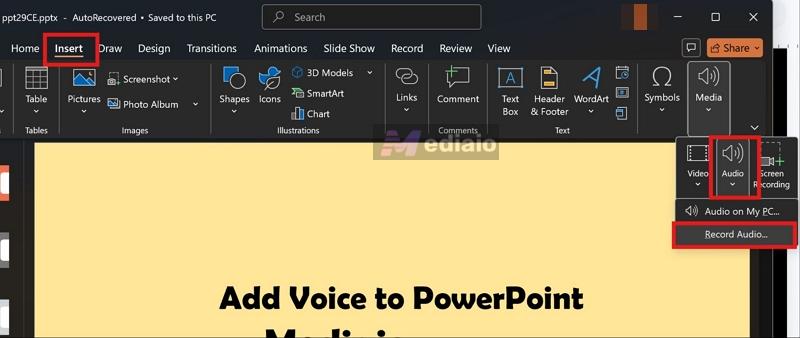
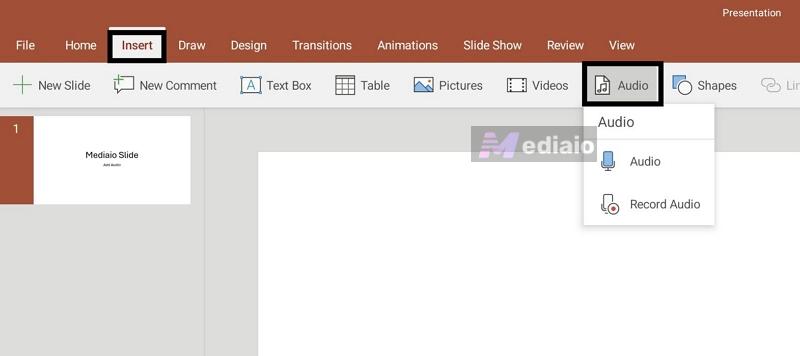
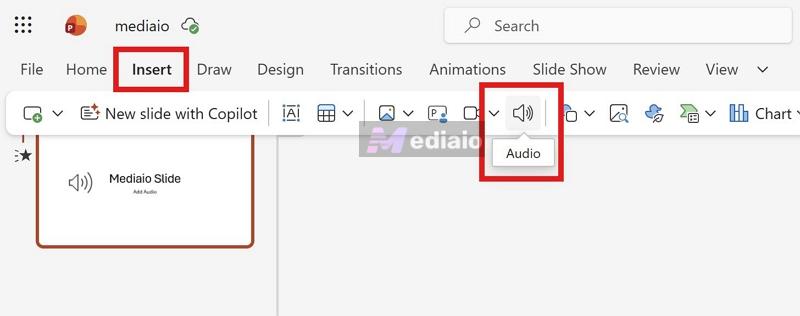
Step 1. Move to the slide where you want the audio. From the top ribbon, open the Insert tab. Look toward the far right, expand the Audio dropdown, and choose Record Audio….
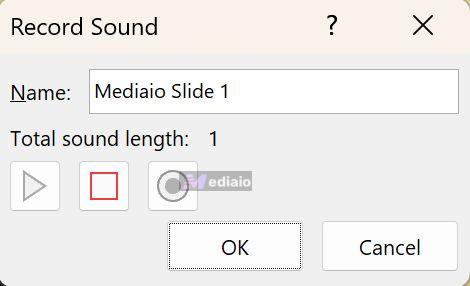
Step 2. A small recording window will pop up. Give your clip a clear name. Press the red Record button and start speaking.
- Once you’re done, hit the Stop button.
- You can quickly listen to it using the play button. If everything sounds fine, click OK to confirm.
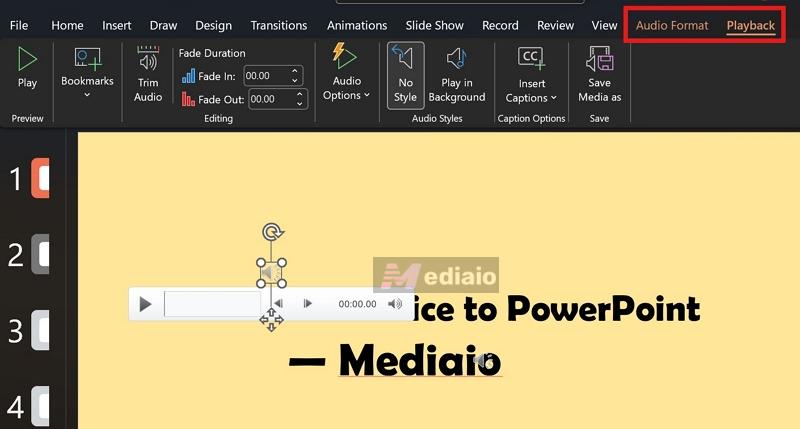
Step 3. The audio will get placed on your slide as a speaker icon. Click it once and you’ll notice two tabs appear on the ribbon: Audio Format and Playback. Adjust the settings based on your needs.
For All Slides
When you’re narrating across the full presentation, the flow depends on your Office version. Here are the exact steps to navigate the New Experience, the Classic setup, and the older 2016–2019 menus.
New Experience (Microsoft 365/2022+)
Here, everything sits inside a clean dark recording studio.
Step 1. Head to the Record tab. Choose From Beginning or From Current Slide.
Step 2. The screen shifts into the recording workspace. At the bottom-right, switch your view.
Step 3. Click on the three dots at the far end select the right devices: mic and camera inputs.
If you’re using Cameo, you can use the Background Blur option from the bottom-right.
Step 4. Click Start recording to trigger the 3-second countdown. Once it finishes, start speaking. You can use the on-screen arrows to navigate through your deck.

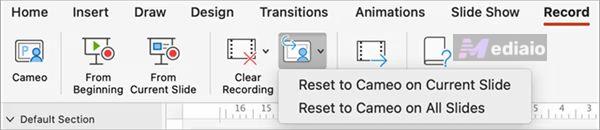
Note: If you make a mistake, hit pause. You can use the Trash icon to remove the recording for Current Slide or On All Slides. You can even reset your Cameo appearance and record again.

Step 5. Click the Export button while in the recording workspace itself. Or, you can return to the document by selecting the Edit button.

Classic Experience (PowerPoint 2021)
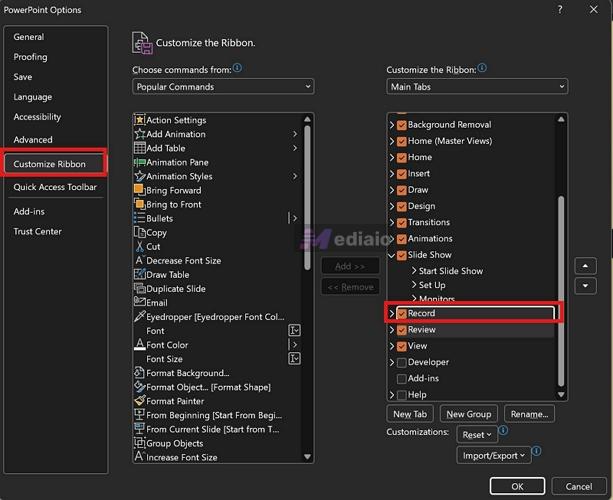
Here, the Record tab is hidden by default. So first, bring it into view.
- Head to File and pick Options from the bottom-left corner.
- Select Customize Ribbon on the left sidebar.
- On the Main Tabs list on the far right, check the box next to Record. Then, hit OK.
Now here are the steps for the recording part.
Step 1. Head to the Record tab. Choose to start from the beginning or from your current slide. The screen will shift into the recording workspace.
Unlike the newer version, the Classic layout is more spread out. Controls sit in different corners. Here is exactly where everything lives.
Step 2. Hit Record. Use the side arrows to navigate through your deck as you speak.
Step 3. Once you are done, hit Stop and exit the screen. Each slide will now hold its own perfectly synced audio clip.
PowerPoint 2016–2019 Experience
Here, the recording setup is much simpler. You still record slide by slide, and you will also get basic annotation tools — just without the newer interface, Cameo feature, or extra controls.
One thing to note. Tools like pen, highlighter, and eraser are only available if your version includes the 2015 updates and beyond). If not, those options will not show up. Now, here’s how it works.
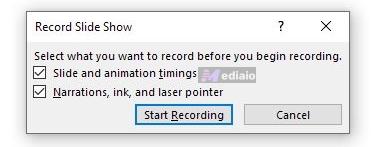
Step 1. Head to the Slide Show tab. Choose Record Slide Show.
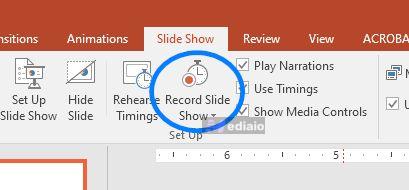
A small pop-up appears before recording starts. You’ll see two main options here.
- Slide and animation timings: this records how long you stay on each slide and captures any animation triggers
- Narrations, ink, and laser pointer: this includes your voice along with any drawing or highlighting you do
Turn these on or off based on what you need, then hit Start Recording.
Step 2. The audio recording will start immediately and the presentation will switch to a full screen. You’ll see the recording toolbar at the top-left. It features three simple controls:
- Right Arrow: Advances to the next slide.
- Pause (||): Temporarily pauses your recording.
- Curved Arrow (Undo): Re-records your current slide. If you mess up a line, hit this button. It will instantly erase the audio and ink you just recorded for that specific slide, allowing you to start over.
Step 3. You can right-click anywhere on the slide to open Pointer Options. This will let you switch between tools like:
- Laser pointer
- Pen
- Highlighter
- Eraser
Click on Ink Color to see the spectrum.
Step 4. Click End Show to stop recording. PowerPoint will save the narration and timings directly into each slide.
How to Record Audio and Add It to PowerPoint on Phone and Web (Workaround)
Things are much more limited on both the mobile and the web version.
On mobile, you do get a record option that only works for adding audio to a single slide. On the web version, the native recording option doesn’t exist at all. So in most cases, you’ll be working with pre-recorded audio. That also means dealing with PowerPoint’s format requirements and file size limits. Your flow will usually look like this:
- Record the narration using the built-in recorder on your phone or computer.
- Add it to your slide through the Insert > Audio option.
Let’s break it down properly. First, how audio works inside the PowerPoint app on iOS or Android. Then we’ll look at what’s actually possible on Microsoft 365 on the web.
On iPhone/iPad
Recording audio on the PowerPoint mobile only works well for quickly recording or adding audio. It is not good when you want advanced control. Still, PowerPoint gives you two options here:
- Add audio from your device.
- Record audio directly inside the app.
Here’s how both of them work.
Step 1. Go to the slide where you want the audio. Tap Insert and then choose Audio.
You’ll see two options.
Option 1. Record Audio
So this is the option that lets you add your voice on the spot. Tapping this opens a recording panel at the bottom.
- Hit the microphone button to start.
- Tap it again when you’re done.
- Then choose Insert to place the recording on the slide.


Option 2. Audio (from device)
This is for uploading a pre-recorded file. Before using this, keep a few limits in mind:
Clicking on this option will open up your phone’s file picker. Select the audio file. And it will be placed on the slide as a speaker icon.
On Web
Microsoft 365 web version is built for live presenting: it does not let you record audio at all. Instead, it allows you to present with your voice in real time. So depending on what you want to do, you will handle it in two ways.
Option 1. Add Audio
The Insert > Audio option does not let you record anything. It only opens a file picker so you can choose an existing audio file and place it on your slide for narration.
So the idea is simple. You’ll have to record your voice outside PowerPoint, then bring it in. For this:
- You can use your system tools like QuickTime Player on Mac or the Sound Recorder app on Windows.
- Or you can also use advanced tools like Eassiy Screen Recorder Ultimate which gives you better microphone control, such as reducing background noise, if you need that.
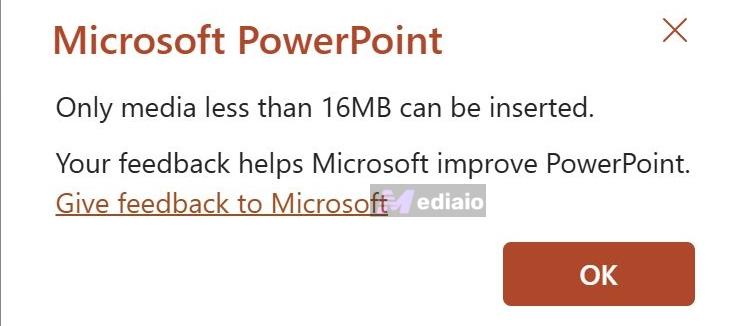
But make sure to export the recording in supported formats: MP3, WAV, M4A, AAC, or OGA. Also keep each file under 16 MB.
Step 1. Go to the slide where you want the audio. Click Insert and select Audio.
Step 2. The file picker opens immediately. Choose your recording. It will be placed on the slide as a grey speaker icon.
Click that icon once, and you will see the Audio tab. This is where you control how the audio behaves and how it looks.
Option 2: Cameo
Cameo lets you bring in your camera and microphone while presenting live. So you narrate in real-time. So you can speak naturally, pause, respond, and adjust as you go. And this setting really makes it a better fit for online classes, walkthroughs, or any situation where you want the presentation to be more interactive. Here’s how it works.
Step 1. Go to Insert, then choose Cameo. This will add a camera placeholder onto your slides.
Step 2. Click that placeholder. You will see the Camera Format tab. You can change how your camera appears from there.
Step 3. Start your presentation using Present.
Note: If it’s your first time to use the option, you’ll see a permission prompt. Allow access to both camera and microphone. And if you skipped that:
- Go to your browser Site Settings menu.
- Turn on Microphone and Camera for onedrive.live.com.

That’s it. Your camera feed will appear automatically inside the placeholder during the presentation. When you exit, it will go back to the static placeholder. So instead of recording and syncing audio, you can use Cameo to present live with your voice.
Final Words
Now you know how to record audio on PowerPoint. If you want full control — proper recording, syncing, and exporting, stick to the desktop apps on Mac or Windows. Mobile and web have their own benefits.
You can even make your presentation more captivating by adding background music alongside your voice. For that, you can use Mediaio Audio Converter to export your favorite streaming track in a PowerPoint-compatible format. Then add it to your slides easily.