When people search for “how to make a playlist public on Spotify,” they’re trying to solve different problems. Some want their playlist to show up in search so friends and family can find it. Others expect it to appear on their profile. This guide will clear all your doubts. You’ll learn how to make a Spotify playlist public on both mobile and desktop, whether you want the playlist to show up in search results or on your profile.
What Are Spotify Private and Public Playlists
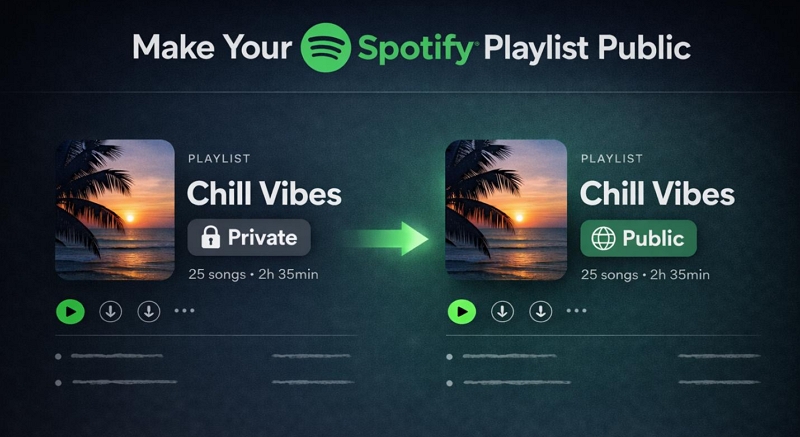
In simple terms, a public playlist is open to everyone—anyone can view, follow, and add it to their library. A private playlist, on the other hand, gives you full control over its access—you decide who can view or listen to it.
But there’s a bit more to it. Here’s a simple table that breaks down how Public and Private playlists differ across visibility, sharing, and discoverability:
It stays hidden from Spotify’s search. Anyone on Spotify can view, play, and even save it to their library.
It is open and discoverable.
It works like a temporary invite (usually expires after some time). You can share the link freely.
It doesn’t expire and works for anyone.
Tip: How to See If Your Spotify Playlist Is Public or Private
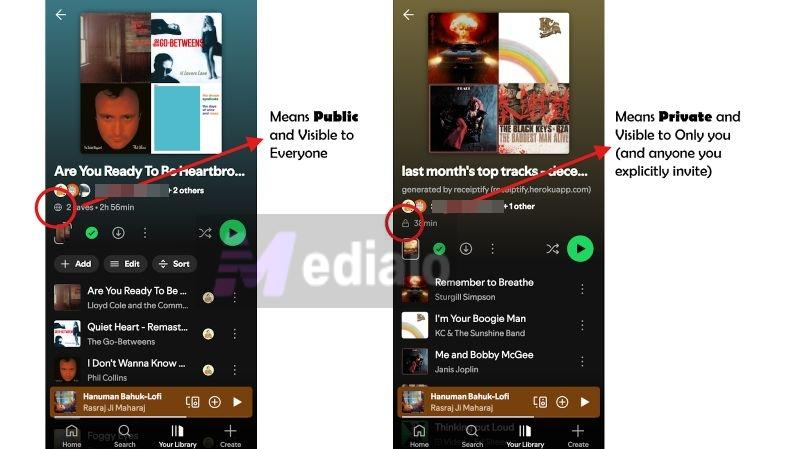
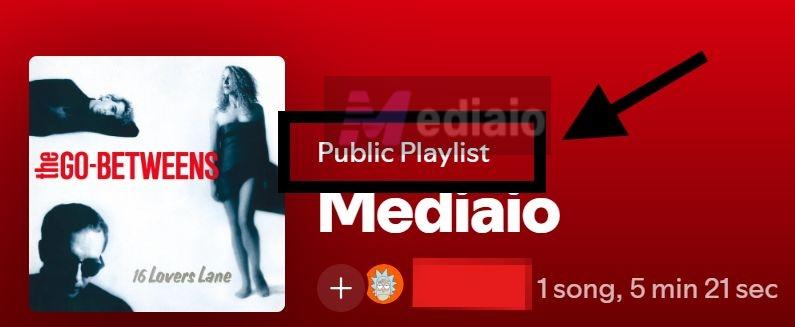
Spotify makes this part simple. A clear label is shown right on the playlist itself, so you don’t have to guess.
Just open your playlist and look at the banner area.
On desktop:
The label appears inside the playlist banner, just above the playlist name. You will see it written clearly as Public Playlist or Private Playlist.

On mobile:
Instead of text, Spotify uses small icons just below the playlist creator’s name to show its current visibility:
- A globe icon along with the playlist details, like total runtime, means the playlist is public.
- A padlock icon in that same spot means the playlist is private.
How to Make a Playlist Public on Spotify Mobile
Before moving on to the steps, keep in mind that only the playlist creator can change its privacy status. So if someone has shared their private playlist with you, you can’t make it public, even if you have “Collaborator” access.
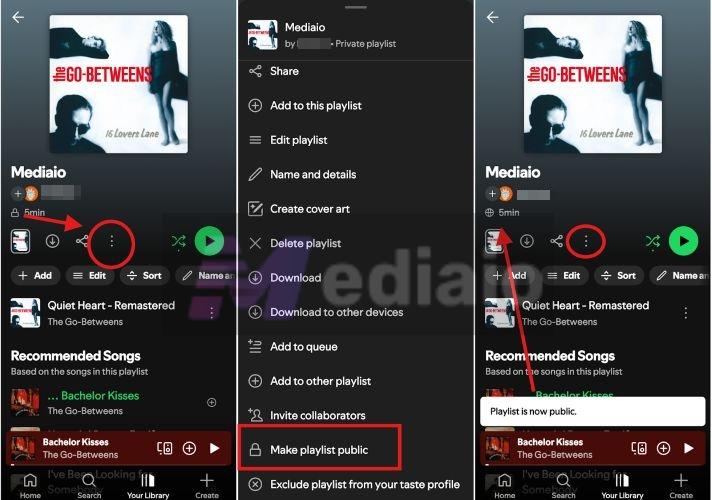
Steps to Unprivate Your Playlist on Spotify Mobile
You can follow these steps on both iOS and Android:
Step 1. Head into Spotify's Your Library section. Open the playlist you want to update.
Step 2. Tap the three-dot menu.
Step 3. Select Make playlist public.
That is it. You’ll see a pop-up at the bottom confirming "Playlist is now public." Even the small padlock icon will instantly change to a globe.
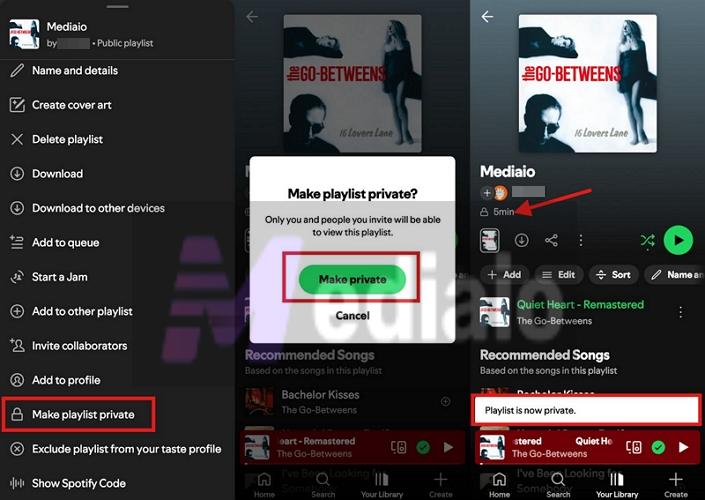
To switch its status back to private:
- Open the menu again and choose Make playlist private.
- A confirmation pop-up will appear. Tap Make private and you will see the banner update again.
- And the globe icon will change back to a padlock, showing the playlist is private now.
How to Make a Playlist Public on Spotify Desktop
Creator-only rule applies here as well — only the original creator can change the playlist’s visibility. If the playlist isn’t yours, the option won’t appear.
Steps to Change Your Spotify Playlist to Public on Computer
There are many ways to switch the visibility setting on the desktop — the quickest option is this:
Step 1. Open the playlist page.
Step 2. Click directly on the playlist title/banner area. This will open the Edit details pop-up.
Step 3. In that window, look below the name and description. You’ll find the Make public option. Click it.
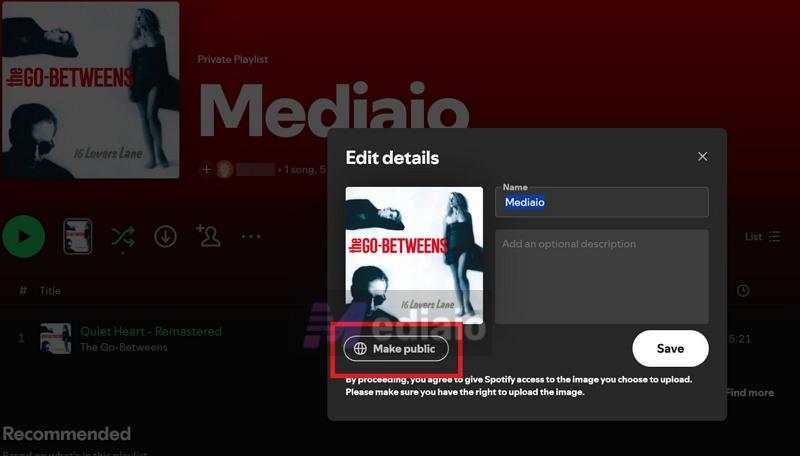
You’ll notice the button instantly switches to Make private, which confirms the playlist is now public. Click Save and the label at the top will update to Public Playlist. That’s the quickest way.
There’s another way as well:
- Open the playlist.
- Click the three-dot menu.
- Choose Make public from the list.
The result will be the same. To switch it back, use the same menu and select Make private.

Why Is My Spotify Playlist Not Public
You’ve made your playlist public. The label even shows “Public Playlist.” Yet it doesn’t appear in search? Or it doesn’t show up on your profile?
So what’s causing this?
Let’s break down the real reasons behind it and how you can fix each one easily so your playlist shows up exactly where it should.
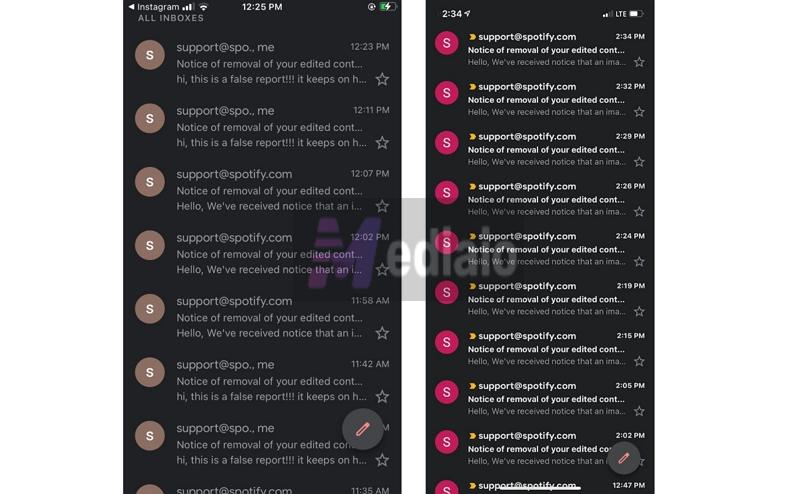
1. Your Playlist Was Reported
Check your registered email and see if you’ve received any message from Spotify. That is the clearest signal to identify if your playlist was reported or restricted.
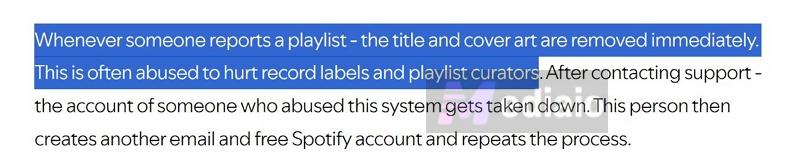
One common reason for reported playlists:
- Some playlist curators use bots to mass report popular playlists under false claims.This helps them push their own playlists higher in search.
But sometimes the issue comes from your side:
- Using a name like “Official Drake Playlist” can get it flagged for impersonation.
- Your cover art shows sensitive visuals.
- Your title or description could contain hate speech or something offensive.
How to Fix Reported Playlist to Get It Public Again
The fix is straightforward. Reset everything tied to your playlist. That means: change the Title, description, and playlist image. Follow these steps:
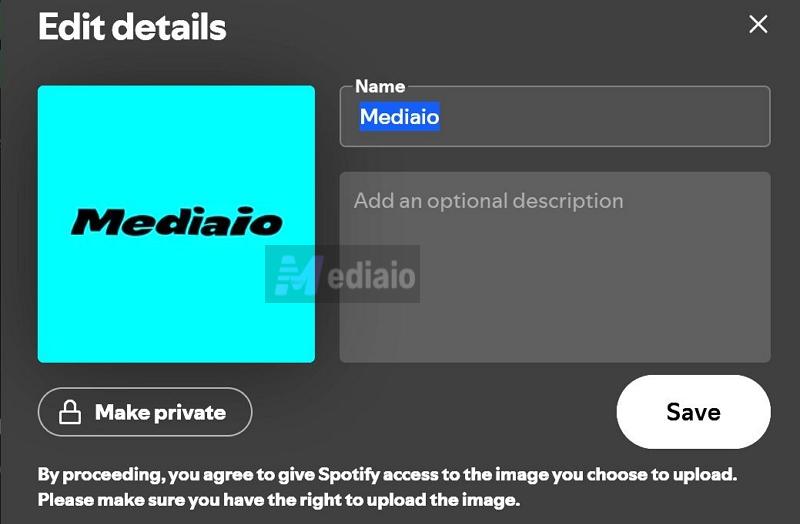
1. Open your playlist on the desktop.
2. Click on the playlist title or image to open Edit details.
3. Click Choose photo and upload a new image.
4. Update the playlist name to something clean and neutral.
5. Remove or rewrite the description if anything feels questionable.
6. Click Save.
Keep it simple. Avoid misleading words like “official”. Use neutral names and safe visuals.
If you didn’t violate any rules and still got flagged, contact Spotify support. In the message, ask them to review and reinstate your playlist.

2. Your Playlist Wasn't Indexed
You make your playlist public, give it a one-of-a-kind name, and ask your friends to search for it. But it just doesn’t show up. This usually means your playlist hasn’t been indexed yet. In simple terms, Spotify hasn’t added it to public search.
Your playlist is still live. If you share the link, your friends can open it and even follow it without any issue. The only problem is that the search cannot find it yet.
Now why does this happen? Well, Spotify doesn’t index every playlist instantly. Millions of playlists are created every day, and indexing all of them would take massive server space. So the platform filters what actually gets added to search.

How to Get Your Spotify Playlist Indexed
A quick fix here is to share the playlist URL. This way, your friends can access and follow your playlists immediately, because there isn't an instant switch that gets your playlists indexed.
To get your playlist indexed: well, there’s no guaranteed shortcut. Still, here are some tips to increase your chances:
- Avoid generic names.
- Keep your playlists alive, such as keep updating it, adding or reordering songs.
- Share the playlist URL in forums, like Reddit, online communities, or group chats so it starts getting some interaction.
3. Your Account Isn’t Synced
You just switched your playlist status to “Public” on your computer. But when you check it on your phone, it still shows as “Private”.
The simple cause for this is that your account hasn’t synced. Such syncing issues can happen because of simple glitches.
Here’s How to Fix Account-Related Glitches
You just have to force your mobile and desktop apps to talk to Spotify’s servers and fetch the latest data. Do these:
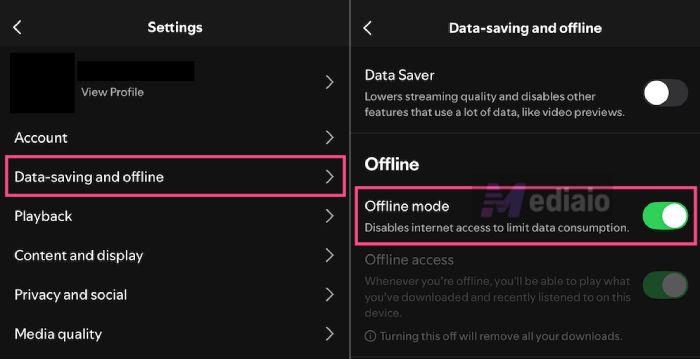
1. Disable offline mode on your phone (if enabled).
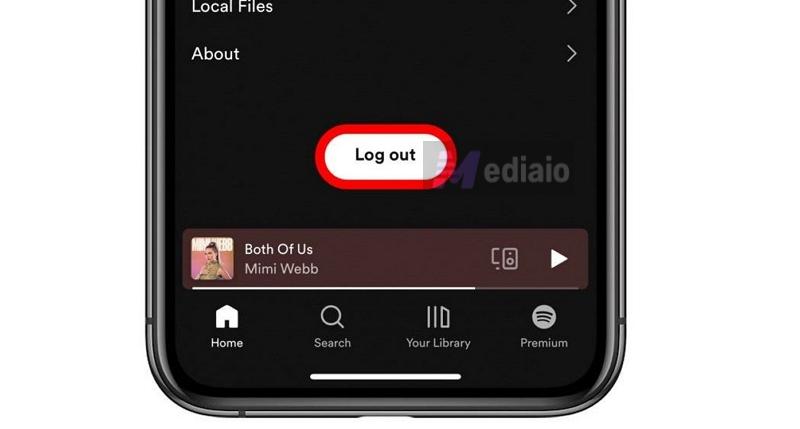
2. Log out of Spotify. Then, log back in.
3. Clear the Spotify’s app cache.
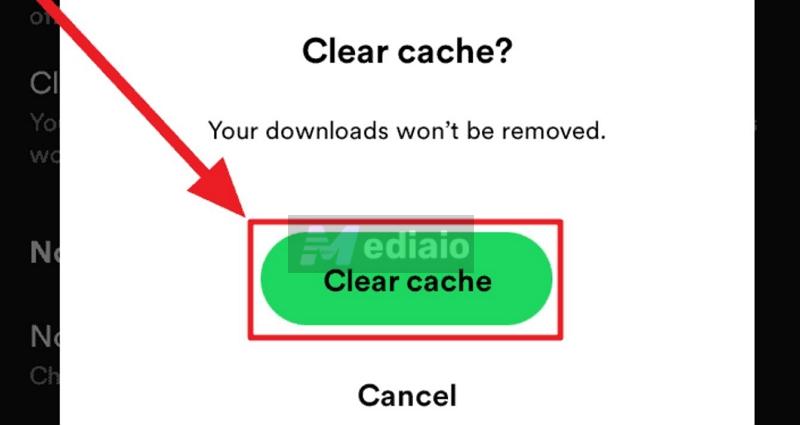
4. If the issue persists, reinstall the Spotify app.
4. Maximum Profile Playlists Reached
Spotify lets you manage whether a playlist appears under your profile or not. By default, it happens automatically. But if isn’t, it comes down to two reasons:
- You didn’t turn on the toggle that tells Spotify to list your playlist to your profile.
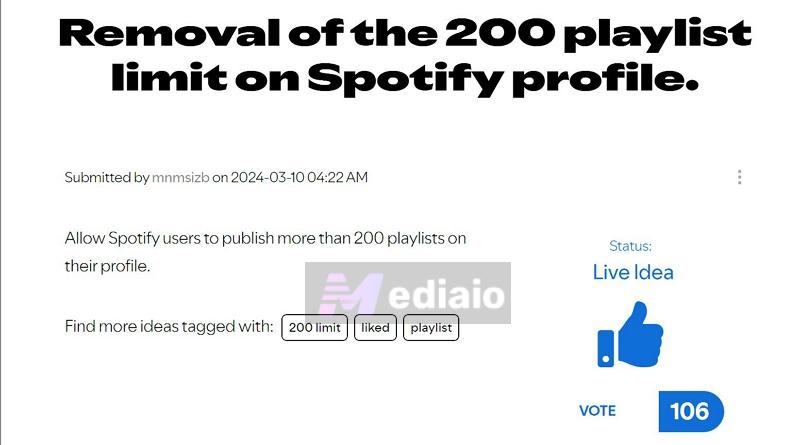
- Only 200 public playlists can be shown on the profile. If you have more, Spotify will simply not display them.
Fixes to Force Your Playlist Back on Your Profile
Turn on the Master Toggle:
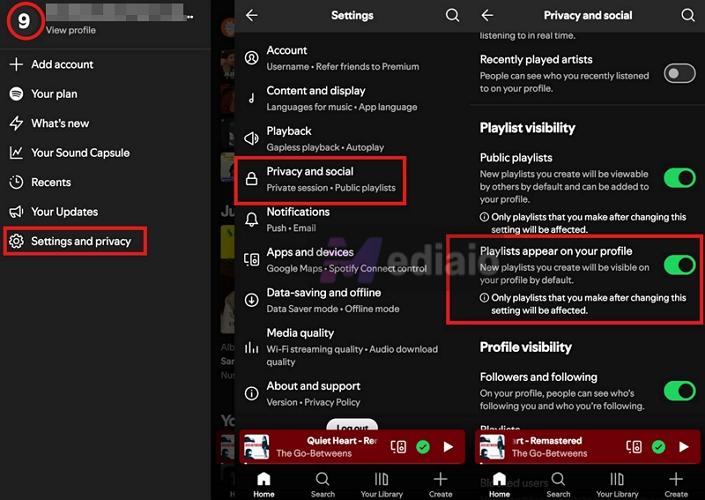
- Open the Spotify mobile app.
- Tap your profile icon. Then open Settings and privacy.
- Head into Privacy and social.
- Under playlist visibility, make sure both toggles—Public playlists and Show on profile, are turned on.
And one more thing.
If you already have more than 200 playlists on the profile, new ones will not render. You can remove the older additions to free up space for new playlists.
You can even vote to remove this limit by voting on this idea.
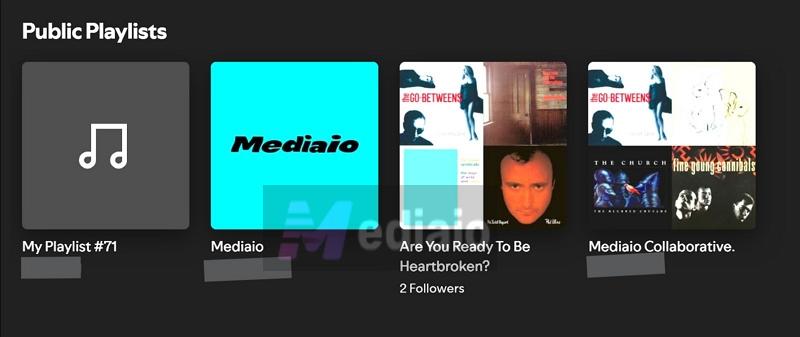
How to Add Playlists to Your Spotify Profile or Vice Versa
As long as the “playlists visibility on profile” toggle is turned on, your public playlists will appear on your profile automatically, but only up to the first 200. Spotify also follows a simple order. It’s based on recency (most recently created). The newest playlists will appear at the top, and older ones will get pushed down.
You can even choose to add or exclude a playlist from your profile. Here’s how to do it from the mobile or desktop:
Step 1. Go to the playlist.
Step 2. Open the menu options.
Step 3. Choose Add to profile/Remove from profile. On mobile, you can also long press the playlist to find the same option.

That’s it. The playlist will appear on your profile. Its position will still follow the same order—newer ones place at the top while older ones will be pushed lower.
How to Prevent Losing Access to Other Public Playlists on Spotify
You can always lose access to playlists that are made by someone else — the owner can make it private or delete it altogether. So it’s better to create a backup for your favorite public playlists. Here are two simple ways to do it:
- You can create a copy of the playlist inside Spotify (create your own version).
- Or download the songs as local files using Mediaio Audio Converter.
Here’s how both methods work.
Method 1: Copy the Playlist as Your Own Playlist
Copying a playlist on mobile is slow because you have to add songs one by one. On desktop or the web, you can create a clone in seconds. Follow this trick:
1. Head into the playlist. Highlight on the first track using the empty area so it highlights.
2. With the file song selected, hold Shift and move down the list. Click on the last track so it gets highlighted while still holding the Shift key, so everything in between will also get picked.
3. Now bring up the options by right-clicking anywhere on the highlighted list.
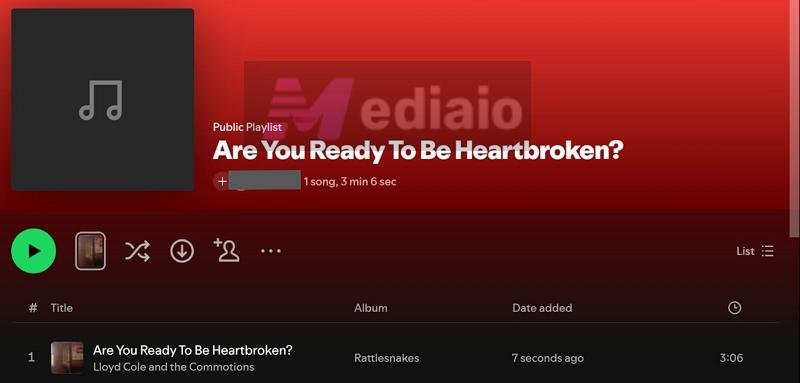
4. Choose Add to playlist. Then, go with New playlist.
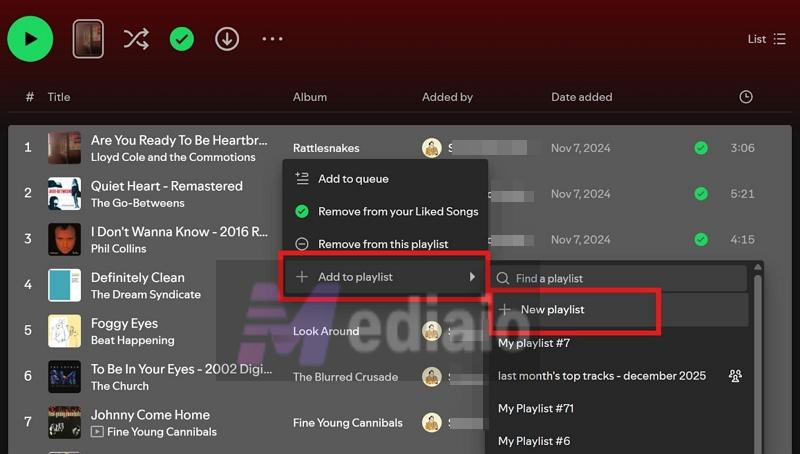
Navigate to Your Library. Find the freshly added playlist. But this version is fully yours, so even if the original gets edited, hidden, or removed, your copy will stay untouched.
Method 2: Save Playlists as Local Files Using Mediaio Audio Converter
A reliable option is to save your Spotify playlist as local files (like MP3 or MP4) on your computer, so it becomes completely independent of its Spotify version. The problem is that Spotify doesn’t offer any native feature for this, so you’ll need a tool like Mediaio Audio Converter to get it done.
Mediaio is designed to export Spotify playlists to your computer in MP3, M4A, FLAC, WAV, etc. The exported playlist will retain its original structure and every song also keeps its original metadata, so the playlist is automatically organized and looks good in any local song player. You can enjoy the songs offline without ads and don’t have to worry about losing its access due to subscription expiration.
Conclusion
So that's everything about this simple topic. You can now control the privacy settings of your Spotify playlists, and even deal with errors when your Public playlist is not indexed, reported, or doesn't appear on your profile.
To create a permanent backup of any Spotify playlist, you can use Mediaio Audio Converter and easily save the tracks offline in local formats like MP3 or M4A.