Apple Music's streaming catalog has over 100 million tracks, but there's always music that isn't in it: regional releases that never got licensed internationally, demo recordings from independent artists, live recordings you captured yourself, or albums you ripped from CDs years ago. The good news is that Apple Music fully supports importing local files—and those files sync across your devices just like anything else in your library.
This guide covers every method: adding files from a Mac, from a Windows PC, from your iPhone directly, and from the Files app on iOS. It also explains the sync behavior that catches most people off guard, and the troubleshooting steps for the issues that come up most often.
What Apple Music Does With Your Local Files
Before importing, it helps to understand what actually happens when you add a file.
When you import a local track, Apple Music first tries to match it against its catalog. If it finds the same song, it links your library entry to Apple's cloud version—no upload needed, and the track is instantly available on all your devices. If no match is found, it uploads your actual file to your personal iCloud Music Library, which then syncs across devices.
This match/upload process happens automatically in the background. The practical effect: most common tracks appear on your other devices within minutes, while rarer files may take longer as they upload.
Important: Sync Library (iCloud Music Library) requires an Apple Music subscription or an iTunes Match subscription ($24.99/year). Without one, imported files are local to that computer only.
Supported File Formats
Apple Music imports these formats without conversion:
- MP3
- AAC (.m4a, unprotected)
- ALAC (Apple Lossless)
- WAV
- AIFF
Files in other formats (FLAC, OGG, WMA) need to be converted first. On Mac, you can convert within Apple Music: select the file → right-click → Create MP3 Version (or AAC version, depending on your import settings). For batch conversion of FLAC files, a tool like XLD (Mac, free) or fre:ac (Windows, free) works well.
Method 1: Adding Files on Mac (Apple Music App)
Easiest method — drag and drop or File menu import
Option A — Drag and drop
Open Finder and navigate to your music files. Drag them directly into the Apple Music window. Drop them onto the Songs list or a specific playlist. Apple Music imports them immediately.
Option B — File menu
Open Apple Music → File → Import → navigate to your file or folder → click Open.
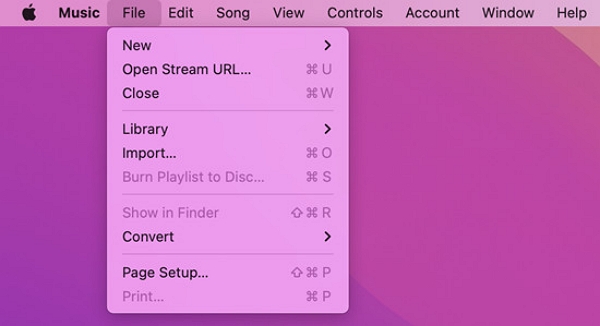
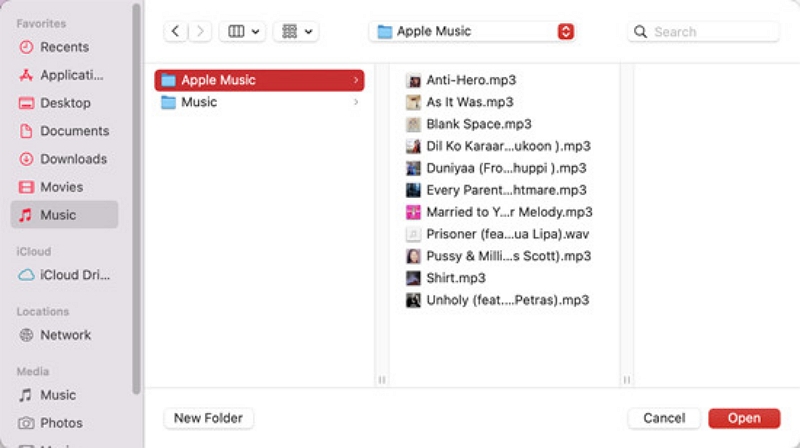
Both methods work identically. Dragging a folder imports everything inside it, including subfolders, which makes it the faster option for adding an entire album or artist's discography at once.
After import, the tracks appear in your Library under Songs. If Sync Library is enabled, they'll start matching or uploading automatically—you can see the progress by checking the status bar at the top of the Apple Music window.
Real experience: Adding a folder of 200 CD rips takes about 30 seconds for the import itself. Matching typically finishes within a few minutes. Uploads for rarer tracks can run overnight for large libraries on slower connections—this is normal.
Method 2: Adding Files on Windows
Using the Apple Music app (Windows 10/11) or iTunes
Apple released a standalone Apple Music app for Windows in 2024, available from the Microsoft Store. It's the recommended option for Windows 10/11 users. If you're on Windows 7/8 or prefer the older interface, iTunes still works.
Apple Music app (Windows): Open Apple Music → File → Import → select your files or folder → Open. Alternatively, drag files directly from File Explorer into the Apple Music window.
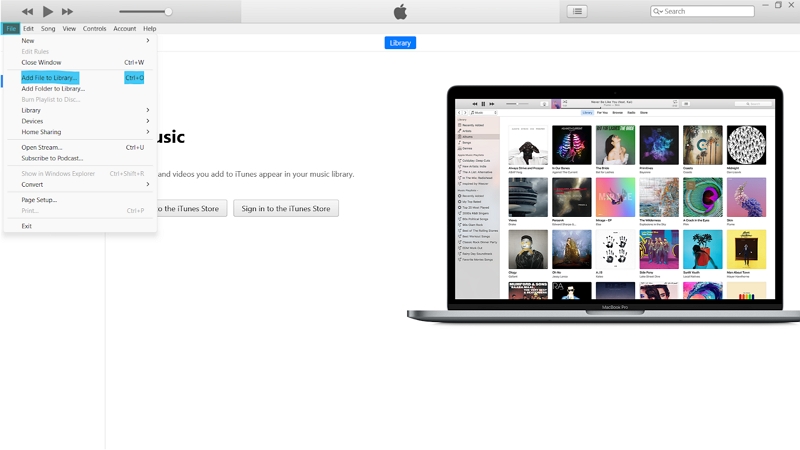
iTunes: Open iTunes → File → Add File to Library (for individual files) or Add Folder to Library (for folders) → navigate to your files → Open.
The import process and sync behavior are identical to Mac. Enable iCloud Music Library in iTunes via Edit → Preferences → General → iCloud Music Library.
Method 3: Adding Files from iPhone — Directly, No Computer Needed
This is the method most guides miss, and the one real users ask about most.
Apple added native support for importing local files on iPhone in iOS 16. You can add audio files stored in your Files app directly to Apple Music without using a computer.
Steps:
- Make sure the audio file is saved in the Files app (iCloud Drive, On My iPhone, or any connected cloud storage)
- Navigate to the file in Files
- Tap and hold the file → tap Share
- In the share sheet, look for Copy to Music or Add to Music Library
- The file is imported into Apple Music on your device
If you don't see "Add to Music Library" in the share sheet, check that:
- The file format is supported (MP3, AAC, ALAC, WAV, or AIFF)
- Apple Music is installed and you're signed in
- The file isn't DRM-protected
Getting files into the Files app in the first place:
- AirDrop from a Mac or another iPhone — the fastest method for moving files wirelessly
- Files from a cloud service (Google Drive, Dropbox, OneDrive) — open the file in that service's app, then save to Files
- Email attachment — tap the attachment, tap Share → Save to Files
- USB connection — connect iPhone to Mac, use Finder to drag files to the iPhone's Files section
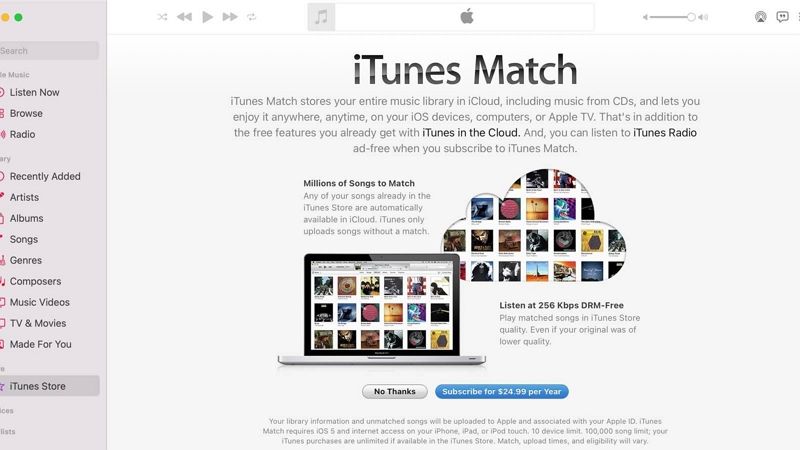
Method 4: iTunes Match (Optional Paid Service)
iTunes Match ($24.99/year) is Apple's older service that predates the full Apple Music subscription. It scans your entire local music library, matches songs to Apple's catalog, and uploads anything it can't match—making your entire personal collection available on all devices through iCloud.
When iTunes Match makes sense: If you have a large library of purchased or ripped music and don't want a full Apple Music streaming subscription, iTunes Match gives you cloud access to your personal collection at a lower annual cost.
When it doesn't: If you already have an Apple Music subscription, Sync Library does the same thing as iTunes Match and is included at no extra cost.
To enable: Music → Account → iTunes Match → Subscribe.
Part 5: How to Sync Your Added Music Files Across Devices
After you add music files to your library, you may want to access those tracks on more than just your computer. The good news is that Apple Music allows you to sync your imported songs across multiple devices, including your iPhone, iPad, and other computers signed in with the same Apple ID. We’ve shared the methods to do this below;
Method 1: Automatic Sync via iCloud Music Library
On Mac
- Open Apple Music on your Mac and sign in to your account using the same Apple ID that you use with other devices.
- Click on “Music” from the menu bar at the top and select “Preferences.”
- Navigate to the “General” tab and toggle on the “Sync Library” option. Then, click “OK” to finish.
On iPhone:
- Open the “Settings” app and tap on the “Apple Music” app icon.

- Toggle on the “Sync Library” option.
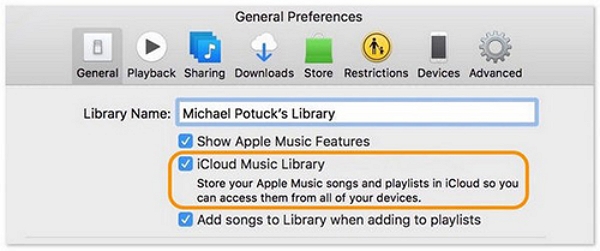
On Windows
- Open the “iTunes” app on your Windows computer and sign in to your account.
- Click on “Edit” from the menu bar at the top of the screen and select “Preferences.”
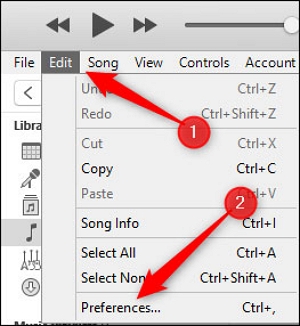
- Go to the “General” tab and turn on the option for “Apple Music Library.”
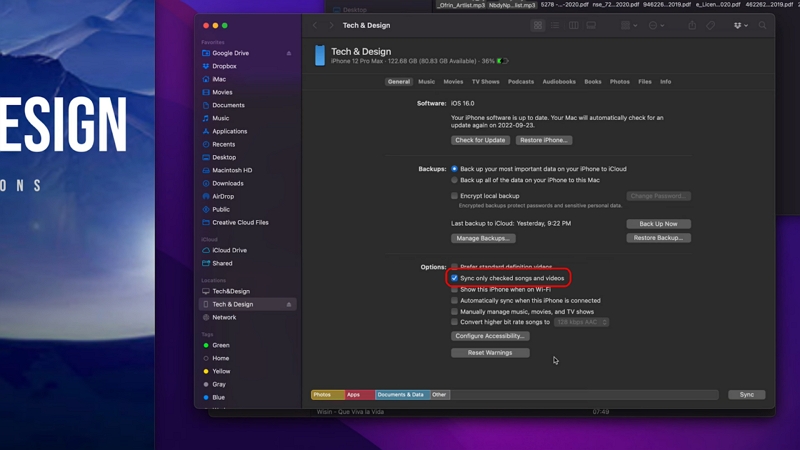
Method 2: Manual Sync via USB Cable
Option 1. Syncing Music Using Finder on Mac
Step 1: Open the “Finder” app on your Mac and connect your device using a compatible USB cable.
Step 2: Navigate to “Locations” and select your device.
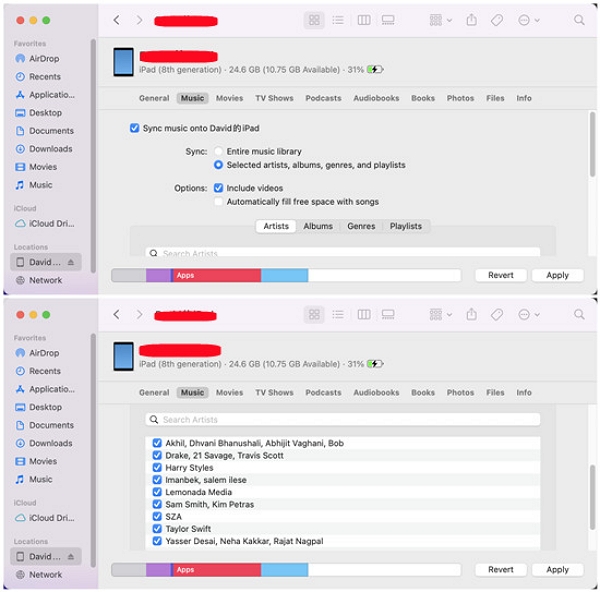
Step 3: Go to the “Music” tab and tick the box next to Sync music onto [device].
Step 4: Select your preferred sync option. Then, click Apply to start syncing.
- Once you have successfully synced the music, you can access your files on any device.
Option 2. Syncing Music Using iTunes on Windows
Step 1: Launch the iTunes app and connect your device to the PC.
Step 2: Click on your device icon in iTunes and select “Music” from the sidebar.
Step 3: Check the “Sync Music” option and choose other relevant options according to your requirements.
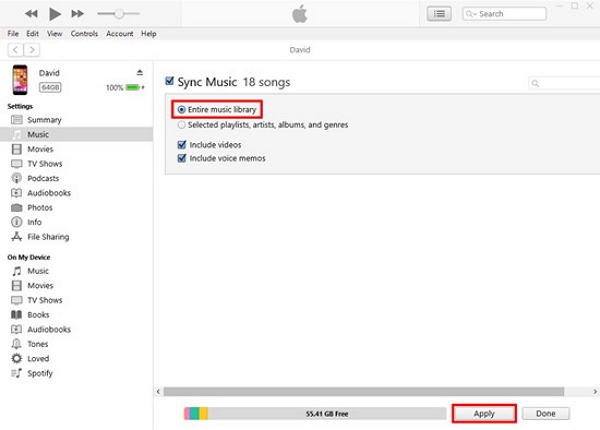
Step 4: Finally, click on “Apply” or “Sync” to sync Apple Music across your device.
Match vs. Upload — what you'll see: Tracks matched to Apple's catalog show a cloud icon with a down arrow (streaming available). Tracks being uploaded show a progress indicator. Once complete, uploaded tracks show the same cloud icon. Both behave identically for playback.
Part 6: How to Play Added Music Files on Different Devices
After importing your songs and syncing them across devices, you can start listening to your music just like any other track in Apple Music. Below is how you can play your added music files on different platforms.
How to Play On Mac (Apple Music):
Step 1: Launch the Apple Music app and navigate to your library.
Step 2: Choose Songs, Albums, or Playlists.
Step 3: Find the local files you imported and click on them to start playing them.
How to Play On Windows PC (iTunes):
Step 1: Open iTunes and click “Library.”
Step 2: Navigate to Songs, Albums, or Playlists.
Step 3: Find the local music file you imported and click on the track to play it.
How to Play On iPhone (Apple Music)
Step 1: Open the Music app.
Step 2: Tap on the Library tab and select “Downloaded” to see your local files.
Step 3: Tap any song or album to start playing.
Part 7: Common Problems and Troubleshooting
While adding local music files to your library is usually straightforward, you may occasionally run into issues when using Apple Music or iTunes. The good news is that most problems have simple solutions. Below are some of the most common issues and practical ways you can fix them.
Files not showing up after import
Check the file format first—unsupported formats like FLAC or OGG silently fail to import. Confirm Sync Library is enabled. Close and reopen Apple Music to force a library refresh. For large imports, wait 10–15 minutes for the background process to finish before assuming something went wrong.
Tracks appear grayed out and won't play
The most common cause is a broken file path—the file was moved or deleted from its original location after being added to the library. Re-import the file. If the track was imported from removable storage (USB drive, external hard drive) that's no longer connected, reconnect the drive or move the files to a permanent location and re-import.
DRM-protected files purchased from older stores will also appear grayed out if your computer isn't authorized for that Apple ID. Check authorization: Account → Authorizations → Authorize This Computer.
"Add to Music Library" not appearing in iPhone share sheet
Update to iOS 16 or later. Confirm Apple Music is installed (not just the Music app—search for it in Settings). Check that the file format is supported. If the file came from a streaming service and has DRM, it won't import.
Duplicate songs after import
This happens when a matched track and your uploaded version both appear. In Apple Music on Mac, check for duplicates: File → Library → Show Duplicate Items. Keep one version and delete the other. Generally, prefer the matched version (Apple's cloud copy) over the uploaded version for faster streaming on other devices.
iCloud sync stuck or taking too long
Large libraries (1,000+ tracks) can take hours on the first sync—this is normal. Keep Apple Music open and your Mac plugged in during the initial sync. For ongoing sync issues, sign out of Apple Music and sign back in to reset the connection: Apple Music → Account → Sign Out, then sign back in.
Part 8: How to Export or Backup Music from Apple Music
If you’ve built a large music collection in Apple Music or iTunes, creating a backup is an important step. A proper backup protects your music files from accidental deletion, device failures, or syncing errors.
Below are several practical ways you can export or back up your Apple Music library.
Find the Location of the iTunes Media Folder
The first step in backing up your music is locating where your audio files are stored on your computer.
On Mac
- Open Apple Music.
- Go to Music > Settings > Files.
- Look for the Music Media folder location.
- Click Show in Finder to open the folder containing your music files.
On Windows
- Open iTunes.
- Go to Edit > Preferences > Advanced.
- Check the iTunes Media folder location displayed in the window.
- Click Show in File Explorer to access the folder.
- Once you locate this folder, you can copy it to an external hard drive or another storage location to create a full backup of your music library.
Export a Playlist
If you want to save the structure of your playlists, you can export them as a file.
Steps to Export a Playlist
- Open Apple Music or iTunes.
- Select the playlist you want to export.
- Go to File > Library > Export Playlist.
- Choose a file format such as XML or M3U.
- Save the file to your computer.
This exported file allows you to restore the playlist later or import it into another music player.
The Best Way to Create a Local Backup
If you want more control over their audio files, a dedicated audio conversion and backup tool like Mediaio Audio Converter can be useful.
This software allows you to convert audio files from popular music streaming websites like Apple Music, Spotify, and a lot more into multiple formats, such as MP3, WAV, AAC, etc., without losing quality.
With Mediaio Audio Converter, you can batch convert music files on popular music streaming websites in a single click and play them across different devices without restrictions.
Key Features
- Download and store local copies of your music files from music streaming websites.
- Preserve high-quality audio formats for offline use.
- Create backups that can be played across different devices.
- Batch convert music files to popular audio formats, including MP3 format.
FAQs
Yes—you can import and play local files in Apple Music on your computer without a subscription. However, Sync Library (syncing those files to your iPhone and other devices via iCloud) requires either an Apple Music subscription or iTunes Match ($24.99/year). USB sync to iPhone works without any subscription.
No. Importing adds your files to the Apple Music library but doesn't move or delete the originals. Your files remain wherever they were on your computer. If you delete a track from the Apple Music library and choose "Delete from Library and Delete File," it removes both—but this requires an explicit confirmation.
Apple allows up to 100,000 songs in your iCloud Music Library (not counting songs available in the Apple Music streaming catalog, which don't count against this limit). For most personal libraries, this limit is never reached.
FLAC isn't a supported import format. Convert to ALAC (Apple Lossless) first—it's lossless quality, identical to FLAC in audio terms, just in Apple's container format. XLD (Mac, free) converts FLAC to ALAC in batch. After conversion, import the ALAC files normally.
Library → Songs → right-click the track → Delete from Library. You'll be asked whether to remove it from the library only or also delete the file from your computer. Choose based on whether you want to keep the original file.
Small batches (under 100 tracks): typically a few minutes. Large libraries (1,000+ tracks): can take several hours on first sync. Subsequent syncs of new additions are much faster. Speed depends on your internet connection and whether tracks need to be uploaded or just matched.
Conclusion
Adding local music files to Apple Music is a great way to combine your personal music collection with streaming content in one organized library. By importing songs from your computer, you can listen to rare tracks, personal recordings, or music purchased from other sources directly within the app. With features like Sync Library, your imported files can also be accessed across multiple devices, making your listening experience more flexible and convenient. As long as your files are in supported formats and properly organized, you can easily manage, play, and back up your music collection while keeping everything accessible in Apple Music.