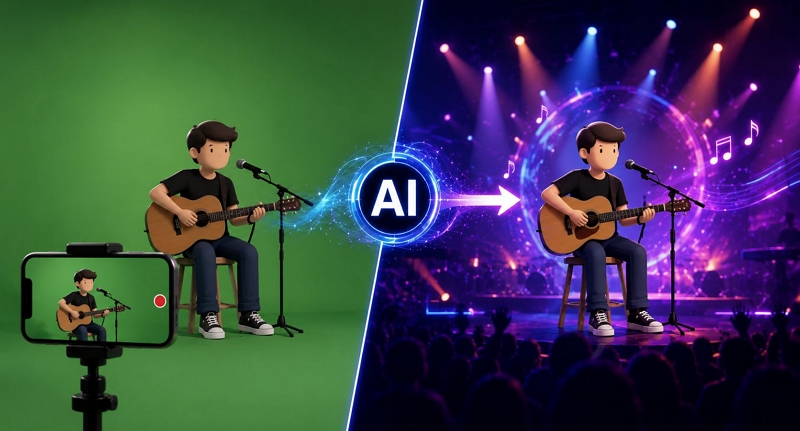
Your incredible music performance should not be held back by a dull background. Today, you can easily add backgrounds to music performances on AI, even while live streaming. Moreover, these AI tools work across mobile, browser, and desktop setups.
Below, we’ll look at both: tools that change backgrounds live while streaming and tools that help you replace backgrounds in already recorded music performances.
How to Add a Background to a Live Music Performance on AI
Earlier, live background replacement used to be the trickiest part. Fortunately, AI-powered live studios make it much easier now.
Below are our favorite options that handle complex background replacements in real time across Android, iPhone, web browsers and desktop setups. These tools are even robust enough to manage the background properly while you perform and sing alongside your friends, even if they are sitting in completely different parts of the world.
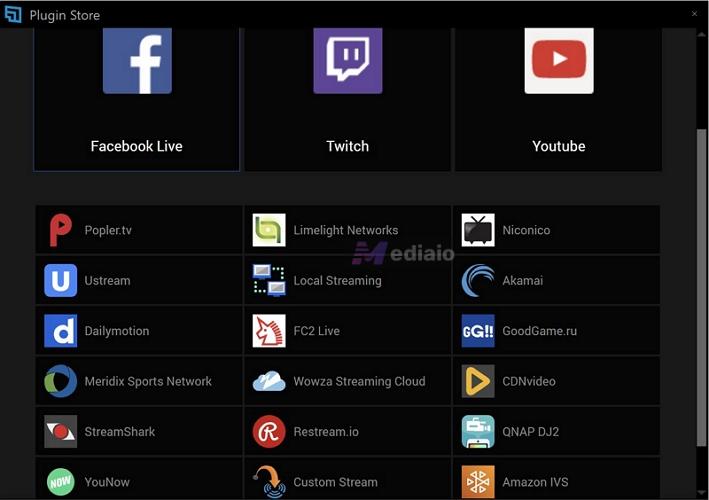
Meanwhile, all of them allow you to multi-stream to major platforms (YouTube, Twitch, Facebook, and more) at the same exact time.
iOS/Android Way: Prism Live Studio
There are many professional-grade mobile live streaming apps now, including Switcher Studio, Streamlabs Mobile, StreamChamp, and others. But the one that really stands out for background control is PRISM Live Studio.
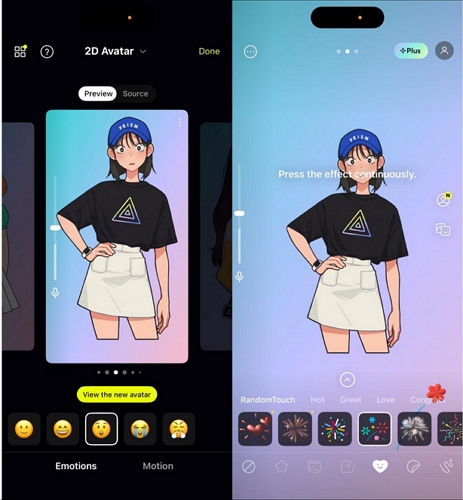
PRISM Live Studio’s standout feature is VTuber Avatar Mode. It lets you create a 2D or 3D avatar version of yourself. So while you are performing music live on camera, the avatar will follow your mouth movements and facial expressions in real time. This is especially useful if you are camera shy.
At the same time, if you do want to appear on camera and only want to replace your room background, PRISM Live Studio can handle that too. You can remove the background and replace it with a solid color, a custom image, or other virtual scenes, even without using a green screen or hanging a green curtain behind you.
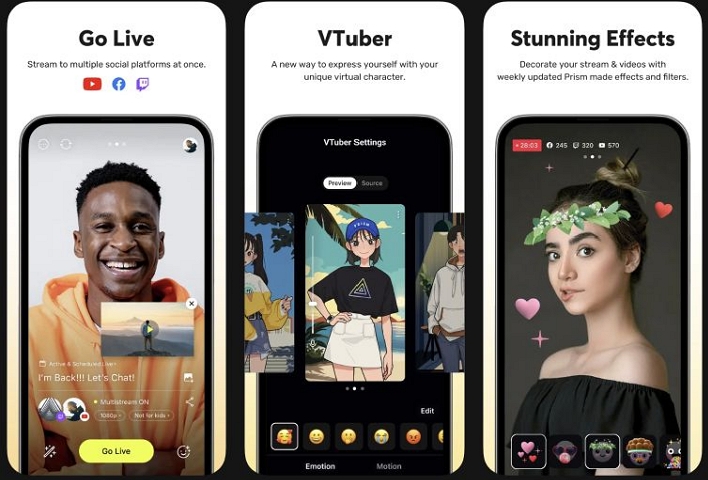
And background replacement is just one part. You will also get solid control over how your stream will look. For instance, you can use Like and Subscribe banners, custom texts, and other overlays. Plus, it also lets you broadcast the live music stream to multiple platforms simultaneously.
Steps to Add Background to Live Music Performance with Prism Live Studio
Step 1. Install Prism Live Studio from the App Store (iOS 16 or later) or Play Store (Android 13 or later recommended). Sign up using your preferred option.
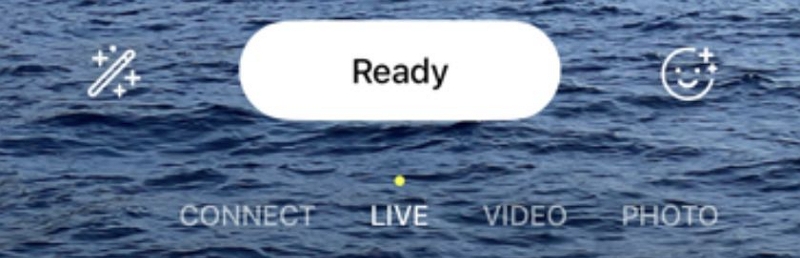
Step 2. On the main screen, choose your live mode:
- Camera: Uses your front or rear camera for a standard live setup with background effects
- Screen: overlays (phone screen, camera, and multiple layers)
- VTuber: Activates the 2D or 3D AI avatar tracking mode
Step 3. Tap the edit icon next to the Ready button to add effects, or use the emoji icon to apply additional expressions and filters.
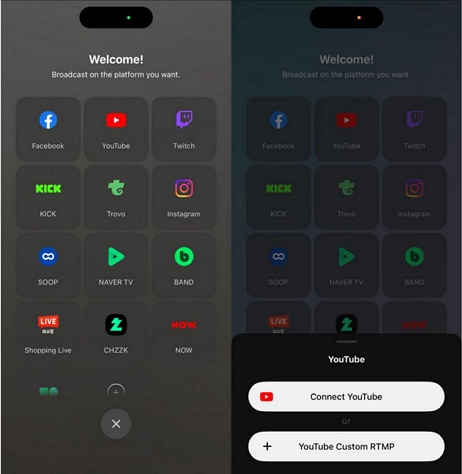
Step 4. Tap Ready once everything is set. Then tap Go Live. Choose the platform and sign in.
Step 5. To stream on multiple platforms, use the Connect option and link all your accounts. You can toggle between connected platforms and select where you want to go live.
After that, tap Go Live, and Prism will push your stream with all backgrounds, effects, and layers to your selected platforms in real time.
Online Option: StreamYard
StreamYard, Restream Studio, Streamlabs Talk Studio, and Riverside.fm are all solid browser-based live streaming studios. And honestly, you can pick almost any one of them because the core controls and workflow are very similar across all of them.
As for background features, you’ll find the Green Room feature in all of them. So you can prepare everything before going live — backgrounds, layouts, visuals, microphones, cameras, and the overall stream setup.
For background visuals specifically, you will find options to change your room with a custom image or use AI-based virtual scenes. So your stream can look like a music studio, a virtual stage, or any custom environment you want without needing an actual green screen setup.
They also support flexible multi-camera layouts. For instance, one section of the stream can focus on your friend playing drums, another on the guitarist, while you handle the vocals in a separate frame.
Beyond that, you can add brand logos, “Starting Soon” messages, crawling banners, pop-ups, overlays, and other stream graphics directly from the browser itself.
The only thing to keep in mind is that most of these platforms place their own watermark on the stream in the free plan, which can look quite unprofessional. So you’ll usually need a premium plan to remove the branding and unlock some of the more advanced AI background features.
How to Add AI Background to Live Music Performance with StreamYard
You can pick any of these tools — StreamYard, Restream, Riverside, or Streamlabs Talk Studio. Here’s how it works in StreamYard, just as an example:
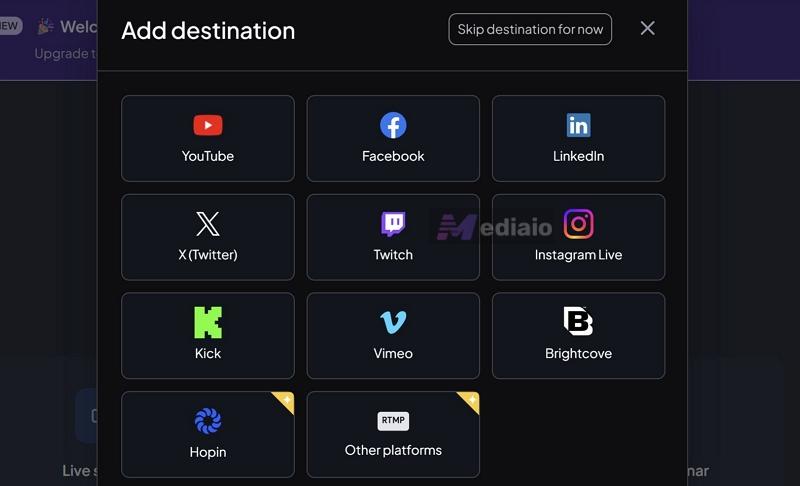
Step 1. Choose Create a broadcast or Start streaming on the main dashboard. If this is your first time, add your destination. You can stream to multiple platforms (depending on your plan).
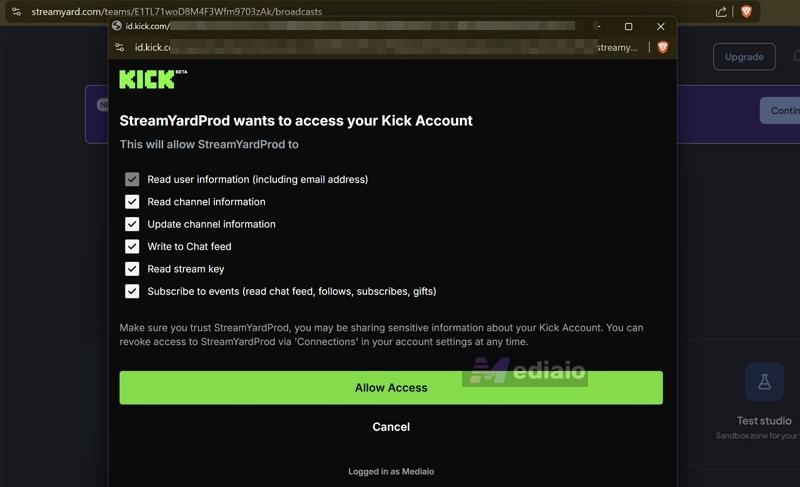
Step 2. Allow all the required permissions.
Step 3. Create the live stream. Choose the source as Studio and fill in the basic details like title, description, and category.
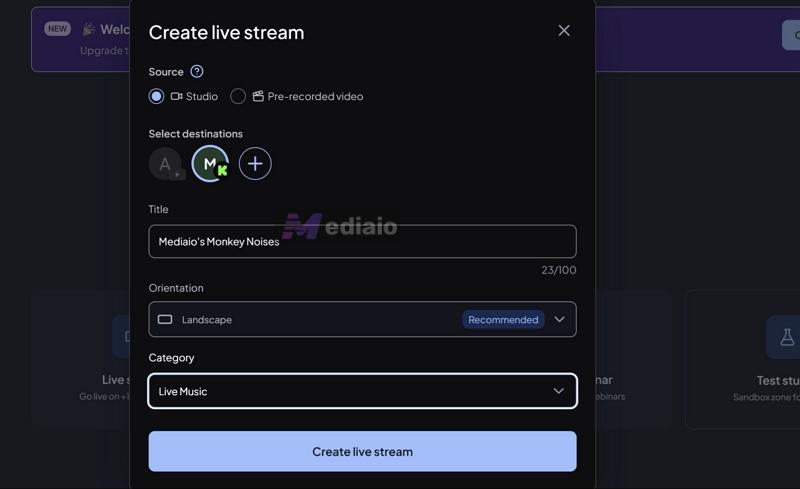
Step 4. You’ll see all the available background controls and visual tools once you’re in the Studio screen. Turn on background removal if needed. You can choose an AI-generated background with upgraded plans.
Step 5. Use the same panel to add other elements: display text, animated presets, logos, etc.
Step 6. When everything looks ready, click Go Live.
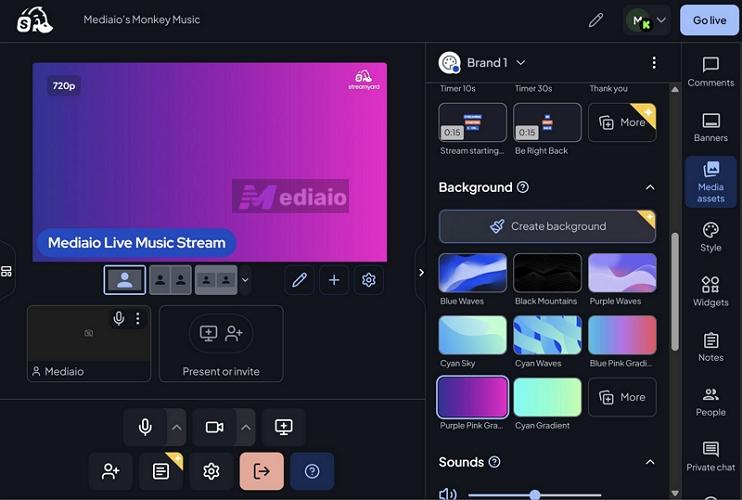
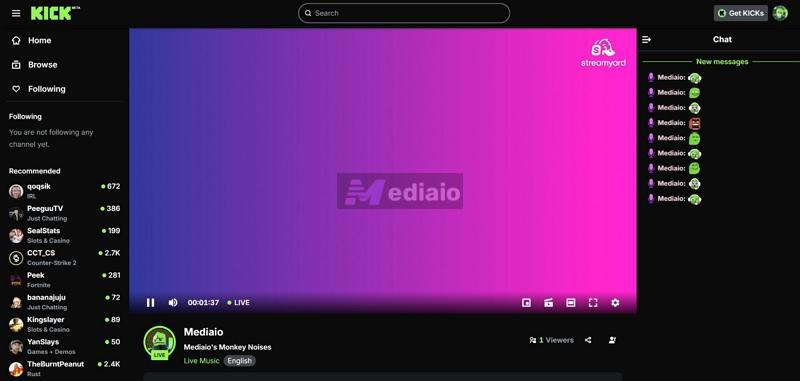
Once you go live, your selected AI background, overlays, and visuals will appear in real time while your music plays, whether you’re performing solo or with others.
Desktop Method: XSplit + VCam AI
XSplit Broadcaster is OBS Studio’s more polished and premium alternative. It now comes with built-in VCam AI, so you can handle your entire live setup, including background changes, inside a single software.
For live music, it offers everything you would expect: ready-made layouts, different audio and video inputs, multiple scenes, etc.
When it comes to changing your background, its VCam AI engine does most of the work.
- Its main feature is AI masking. It creates a clean cut around your body, keeps your face and movements natural, and removes your real background.
- And if you use a green screen, you can use the built-in chroma key and build a virtual stage behind you.
You can even manually fine-tune your frame, like crop out unwanted sections of your room (say, your bathroom door), adjust your size, tweak colors of your instruments, so the background and overall vibe matches the mood of your performance.
Another useful part is scene control. You’re not stuck with one layout. You can switch between different backgrounds while performing. One moment, you can show a full-screen guitar shot. Next, a split view showing your friend playing the drums.
You can also add other usual details like your logo, text, or simple overlays.
Steps to Set Up XSplit Broadcaster and Change Music Performance Background
Launch XSplit, log in and start with one of the ready-made layouts. After that:
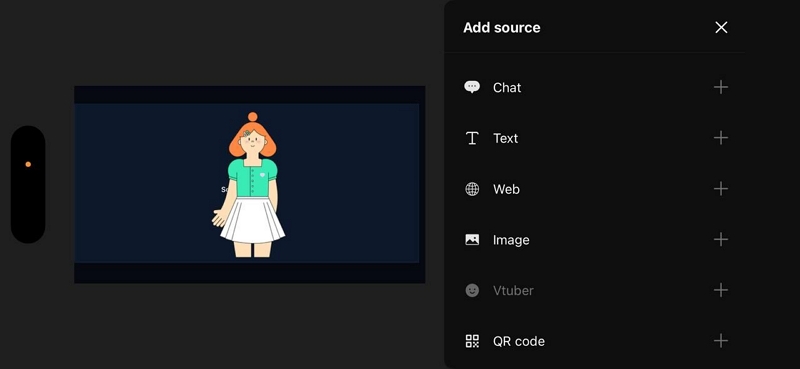
Step 1. Click Add Source at the bottom right. Choose Camera and pick your webcam (camera name). You can add other camera angles as separate sources.
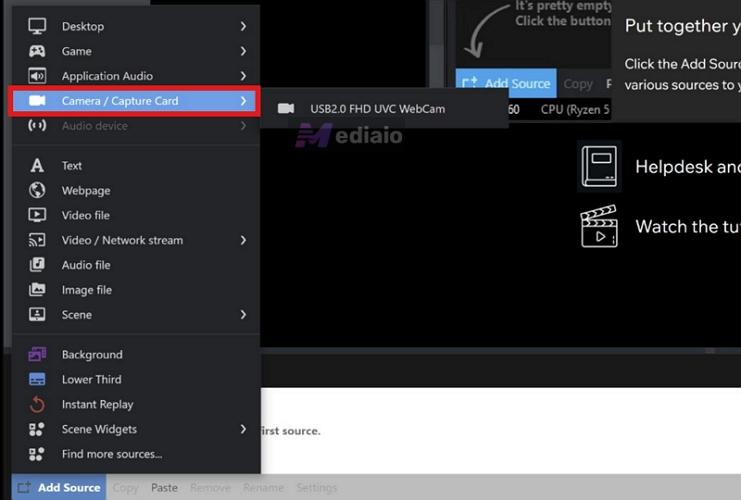
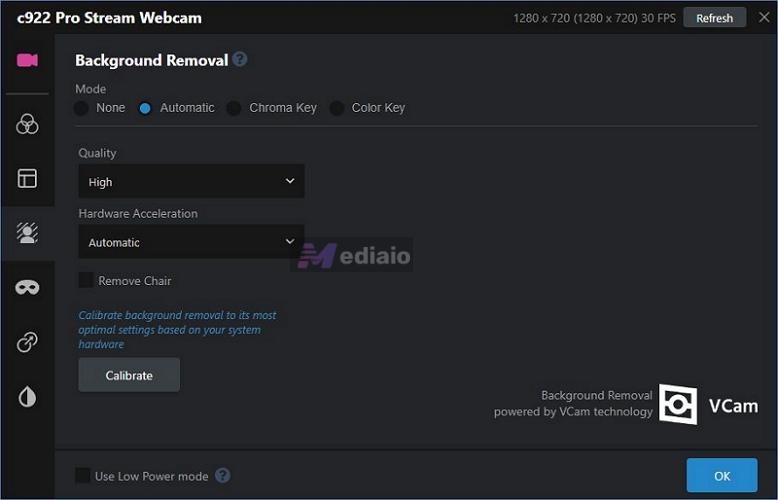
Step 2. Right-click on the camera source in the preview. This will open your Camera Source Settings. Go to the Background Removal tab (person with background icon).
Step 3. Inside that, select Automatic. Under that, you will see Quality. You can choose between Standard, High, or Highest — higher quality will use more hardware resources, so adjust accordingly.
Step 4. Adjust Hardware Acceleration if needed. You can also enable Remove Chair if needed and use Calibrate to optimize the background removal based on your system.
Step 5. Now click Add Source again and choose Background.
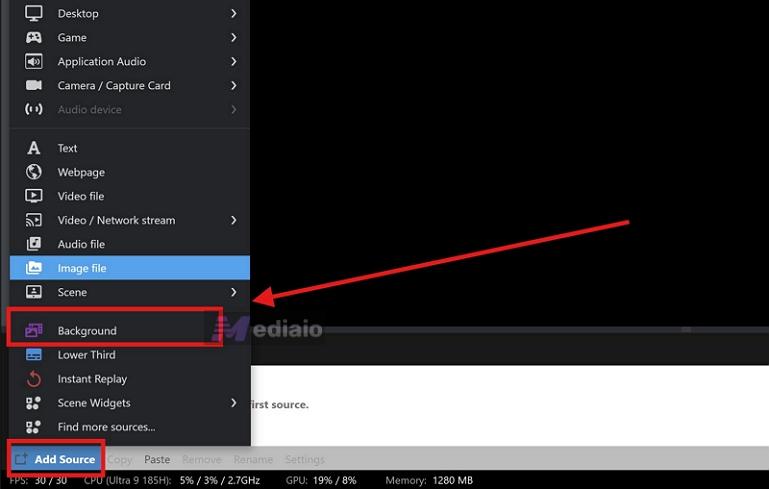
This will allow you to apply a custom background to your overall feed, not just the webcam. You can also add overlays, insert text, or use different visual effects in the same manner.
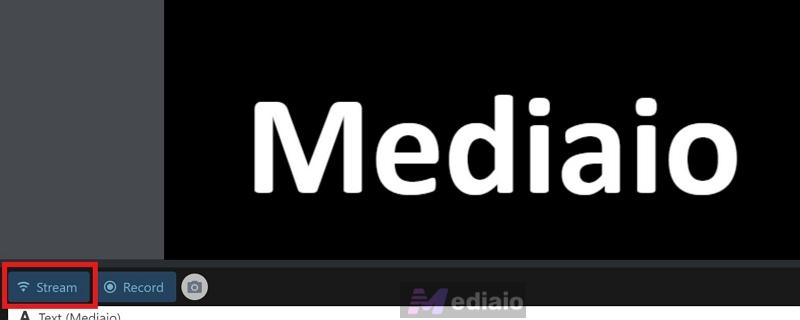
Step 6. When everything is ready, click the Stream option at the bottom left.
Choose your platform, connect your account, and authorize it.
Once done, you can start streaming your live music performance with the background applied.
How to Add a Background to a Recorded Music Performance on AI
Changing the background during post-production has always been possible in video editors. But earlier, it used to involve a lot of manual masking.
Now, however, you can use AI-powered editors to replace the background in just a few clicks. Of course, you will also get all the manual controls afterward.
Here are the best options for AI background replacement on mobile, browser, and desktop.
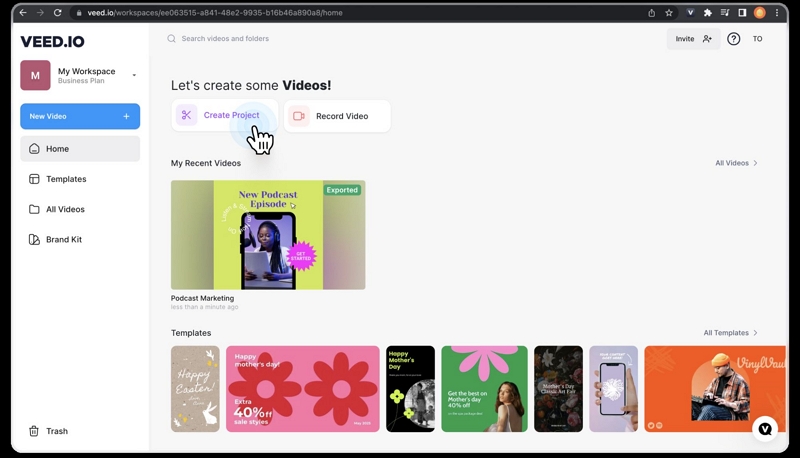
Way 1. Use VEED.io (Online)
VEED packs an entire suite of AI tools and a full manual editing suite into one workspace.
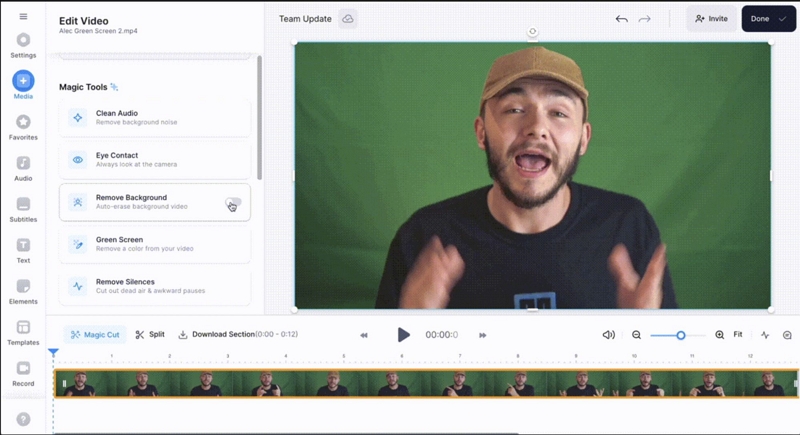
On the AI side, you get one-click options.
- The Remove Background lets you auto-erase your room instantly and replace it with something else. That could manually be a custom image, a video loop, or something more lively, like giving your performance a proper stage setup, a concert vibe, or a more cinematic look.
- The Green Screen toggle can remove a selected color from your video. So if you recorded with a green screen (or even a solid background), you can pick that color and replace it cleanly with something else.
- The AI Background Expand lets you adapt a single shot into different formats without awkward cropping, whether you want it for Instagram Reels, YouTube Shorts, or a proper 16:9 landscape frame.
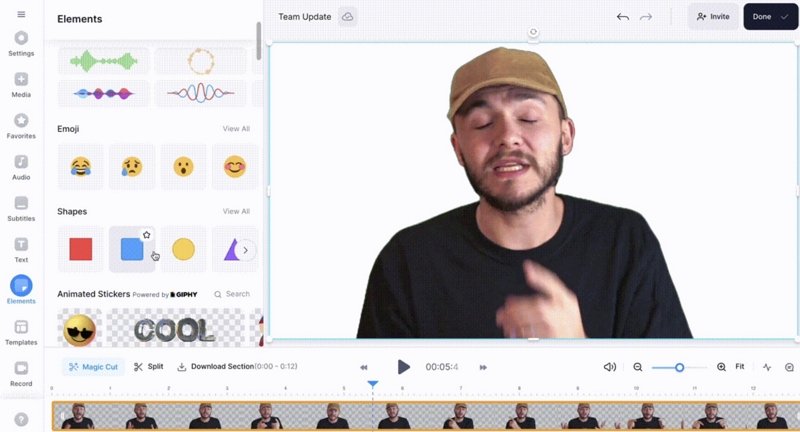
On the manual editing side, VEED lets you control everything else: layer clips, sync audio, add subtitles, insert overlays, or bring in additional footage (like a second angle of your friend on drums). So you can complete the entire music performance editing inside the same workspace before exporting.
Steps to Change Background in a Recorded Music Video Using VEED
Step 1. Log in to VEED.io. Create a new project. Then, upload your recorded music video.
Step 2. Open AI Tools on the left panel. You will see multiple options:
- Remove Background
- Green Screen
- AI Background Expand
You can also switch between these depending on how your music video was recorded.
Step 3. After removing the background, add your new background. Upload an image or video and place it behind your clip. Use the timeline and layers to position everything properly.
Step 4. If needed, continue editing from the timeline, such as add more clips, overlays, text, etc.
Step 5. Click Done. Then use the Export button to render your final video.

Way 2. Use CapCut (iPhone/Android)
CapCut on mobile is often picked for its viral one-click templates. But underneath, it carries a proper timeline editor that gives you a full editing setup when you want. And now it is powered by machine learning and AI engines like NanoBanana Pro and Dreamina Seedance. So a lot of the background work is handled by AI while also giving you manual control.
You get three levels of control for background removal. First is AI auto removal. It can detect the human subject and separate it from the background with a simple tap. If that doesn’t come out clean, you can use stroke/wipe to manually select what you want to keep or remove.
There is also a chroma key to remove solid color backgrounds. Plus, you can use colors, ready-made templates, or built-in visual styles to replace the background.
Steps to Add Background to Recorded Music Performance with CapCut
Step 1. Open CapCut and tap New project. Select your video and tap Add.
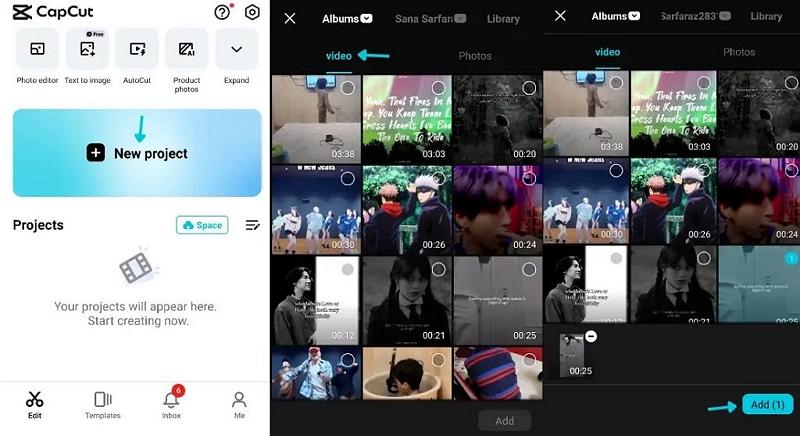
Step 2. Tap on the video clip in the timeline. Scroll to the bottom toolbar and select Remove BG.
Step 3. Choose your method:
- Auto removal: lets AI remove the background instantly
- Custom removal: use brush (stroke/wipe) to refine manually
- Chroma key: pick a color to remove (green screen or solid background)
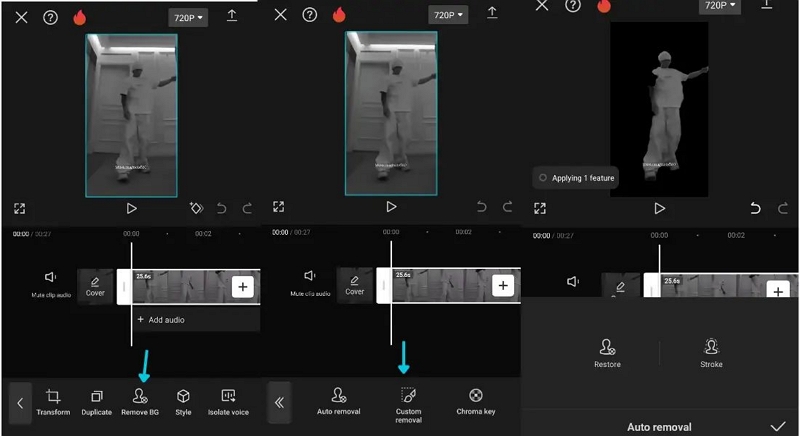
Step 4. Let it process. Once done, your subject will be separated from the background.
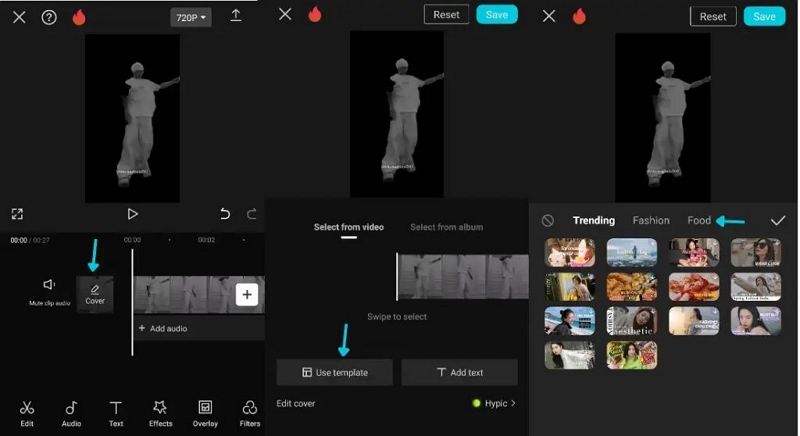
Step 5. Use colors, images, templates, or effects from the editor to add it as the new background.
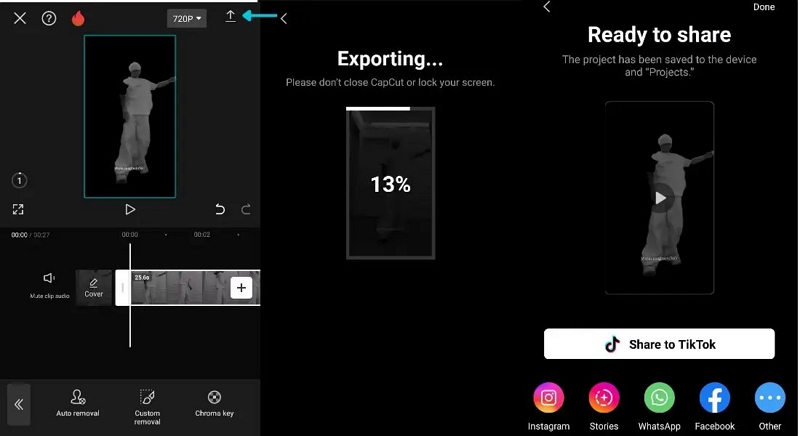
Step 6. Tap the Export icon (top right).
Way 3. Use DaVinci Resolve (Computer)
DaVinci Resolve is used in cinematic productions and advanced music videos. So this is the tool you move toward when you want serious control over your music performance backgrounds.
On the AI side, its standout feature is Magic Mask. Its engine can identify human subjects in the frame — even multiple people performing together and isolate them from the background. So you can completely replace the environment with a different setup, like a virtual concert scene or a cinematic backdrop.
You’ll also find professional chroma key tools inside Fusion and the Color page. So if you already recorded against a green screen or even a solid colored wall, replacing the background becomes much cleaner and more precise.
However, the real strength of Resolve will show in the manual controls you get once the AI work is done. You can fine-tune almost every visual element.
But its complex interface demands some learning. Plus, you’ll get the advanced controls only after you pay the one-time US$299 fee.
Steps to Swap Music Performance Background Using DaVinci Resolve
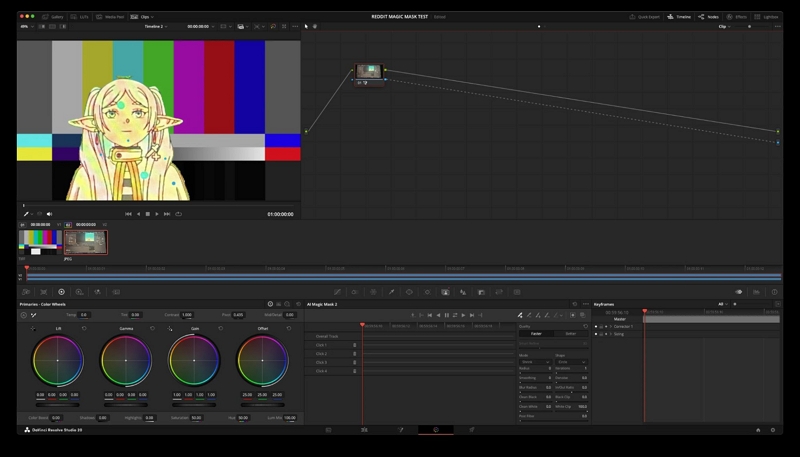
Step 1. Open DaVinci Resolve. Create a new project. Then drag your recorded music performance clip to Video Track 2.
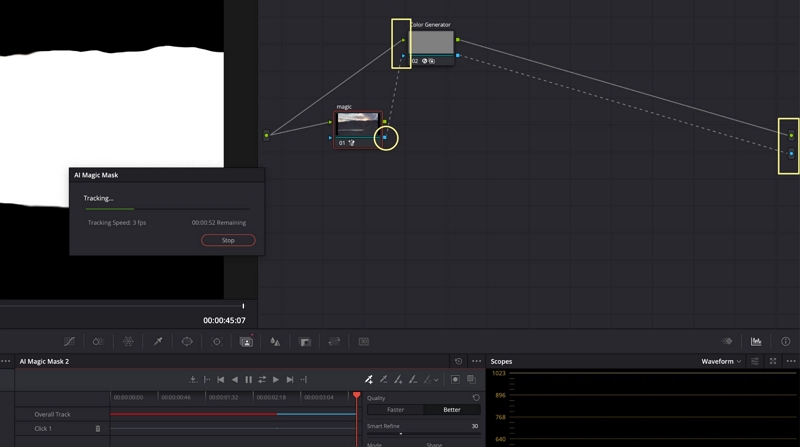
Step 2. Move to the Color page. In the Node area, right-click and choose Add Alpha Output. Then connect the blue output from the node to the new blue Alpha Output point.
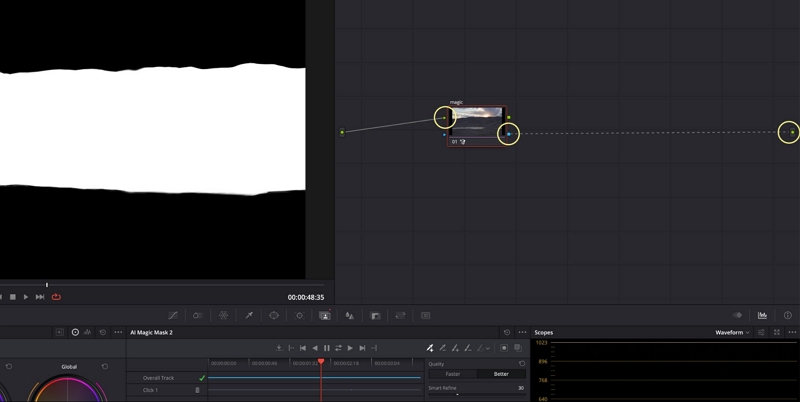
Step 3. Open Magic Mask. Choose Person mode. Then draw a quick stroke over yourself. Resolve will automatically detect and highlight the subject.
Step 4. Start the tracking process and let Resolve analyze the clip. Once tracking finishes, the background will be separated from the subject.
Step 5. Return to the Edit page and drag your new image or video onto Video Track 1 below the performance clip. This becomes your new background.
Step 6. Make any final adjustments: scaling, lighting, subtitles, overlays, or extra effects. Open the Deliver page and export the edited music performance video.
How to Find High-Quality Background Music for Your Performances
All the above tools are helpful for replacing the background. But they are not really built to supply you with good background music. And ultimately, the audio often dictates the entire mood of your live streams and recorded videos.
For instance, during live streams, having a solid background track playing while you step away from the screen prevents awkward dead silence. And if you are editing a music performance later, adding small audio effects, ambient tracks, or transition sounds helps ensure that no moment of the video feels dull or empty.
So it is always a good idea to find and add your own background audio separately.
For that, you can use Mediaio Audio Converter. It lets you pull high-quality audio from major streaming platforms like Spotify, YouTube Music, Amazon Music, and Apple Music. You can use it to easily export non-copyright music in proper quality. After that, you can use them during your live streams or use them in your music videos.
To Sum Up
These tools make music performance background replacement possible, no matter what your setup looks like. While live streaming, you can pick from Prism Live Studio, StreamYard, or XSplit, depending on the device you are on. And tools like VEED, CapCut, and DaVinci Resolve help when you are in the post-production phase.
You can also use Mediaio Audio Converter to source copyright-free background music and ambient tracks. That way, no part of your live stream or music edit feels dull, empty, or silent.