Many users cancel Apple Music, only to find they’ve still been charged — or can’t even find the cancel button.
If that’s what brought you here, you’re not alone. Apple’s subscription system can be confusing, especially if you use multiple devices or Apple IDs.
This guide walks you through exactly how to cancel Apple Music on iPhone, Mac, or the web — and how to make sure it actually worked.
Part 1: Common Misunderstandings Before Canceling Apple Music
Before you rush to cancel your Apple Music subscription, here are some important things you should know to avoid confusion after cancellation.
Many users think access ends immediately — it doesn’t.
When you cancel Apple Music, you can still listen until the end of your billing cycle. For example, if your subscription renews on the 20th and you cancel on the 5th, you will still enjoy access to music and other features on Apple Music until the 20th.
Downloaded songs stop working after the subscription expires
Unfortunately, Apple Music does not save downloaded songs to the user’s device storage. Even though you can listen to them offline, Apple’s DRM (Digital Rights Management) protection prevents those tracks from being permanently stored. So, once your subscription ends, all downloaded songs will become unplayable.
Free trial users: why timing matters more than you think
If you’re using Apple Music on a free trial, cancelling at the right time is crucial. Apple typically converts free trials into paid subscriptions unless you cancel before the trial ends.
Unfortunately, most users wait until the last day to cancel, which may result in a charge.
To be safe, cancel your free trial 24-48 hours before the renewal date to avoid any unexpected charges. This also applies to paid subscription users looking to cancel.
Part 2: Why You Can’t Find or Cancel Your Apple Music Subscription
If you can’t find or cancel your Apple Music subscription, you’re not alone. Many users report running into this issue, and in most cases, the reason is simpler than it seems.
Below are the most common explanations — and how to fix each one.
Why can’t I find Apple Music under Subscriptions?
If Apple Music doesn’t appear under Settings > Subscriptions, it usually means one of the following:
- You’re signed in with the wrong Apple ID
- Your Apple Music subscription is no longer active
- The subscription is managed through Family Sharing
In most cases, switching to the correct Apple ID immediately makes the subscription visible again.
What if I signed in with the wrong Apple ID?
Apple Music subscriptions are tied to the Apple ID used at the time of sign-up.
If you’re logged in with a different Apple ID on your device, the subscription won’t appear under your account.
How to fix it:
Sign in with the Apple ID you originally used to subscribe to Apple Music,
What if Apple Music is managed by Family Sharing or a mobile carrier?
If you’re part of an Apple Family Sharing plan, only the family organizer can cancel the subscription.
Similarly, if Apple Music came bundled with a mobile carrier plan, the subscription must be canceled directly through the carrier.
In these cases, Apple won’t show a cancel option under your personal Apple ID.
Part 3: How to Cancel an Apple Music Subscription on Any Device
You can cancel Apple Music on any device as long as you’re signed in with the correct Apple ID. Choose the method that best matches how you usually manage your subscriptions.
Method 1: Cancel Apple Music Subscription on iPhone
Use this method if you usually manage subscriptions directly on your iPhone.
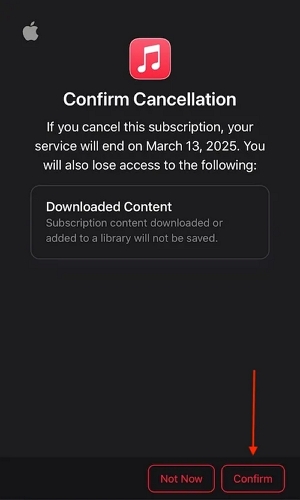
Step 1: Open the “Settings” app and tap on your Apple ID banner.
Step 2: Select “Subscriptions” > “Apple Music.”
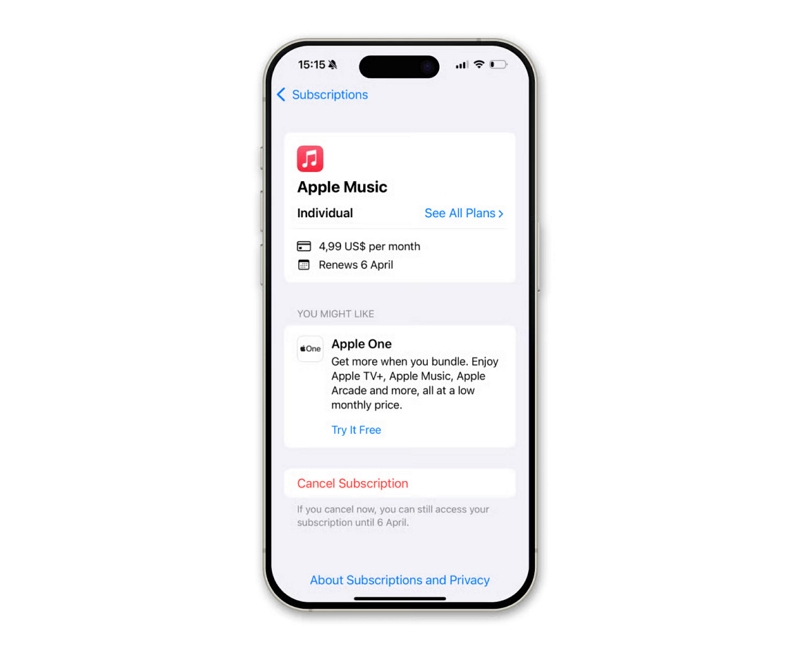
Step 3: Tap “Cancel Subscription” and confirm your choice.
Method 2: Cancel Apple Music Subscription on Mac
Best for users who manage Apple services from a Mac.
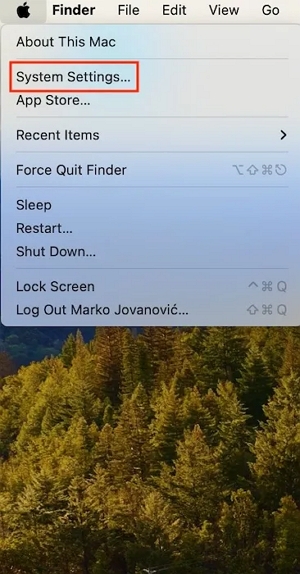
Step 1: Click on the “Apple Menu” at the top-left side and select “System Settings.”
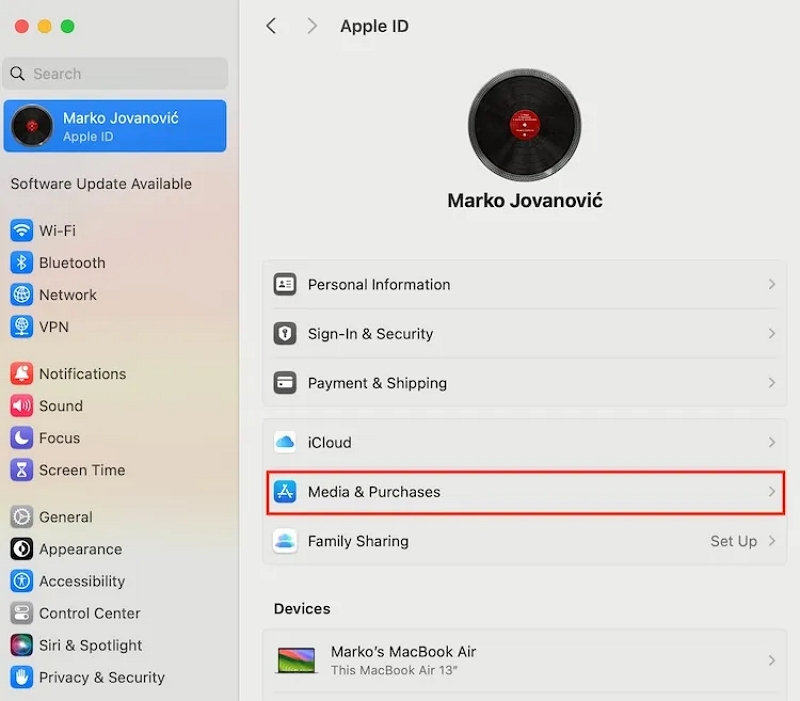
Step 2: Click on your profile icon to access the “Apple ID” screen. Then, select “Media & Purchases.”
Step 3: Find the “Subscriptions” option and select “Manage.”

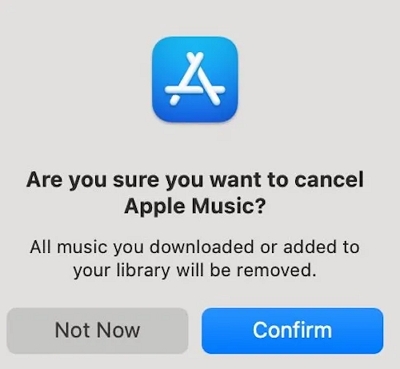
Step 4: Choose “Apple Music” and click on the “Cancel” button to proceed.
Step 5: Click “Confirm” to cancel your subscription.
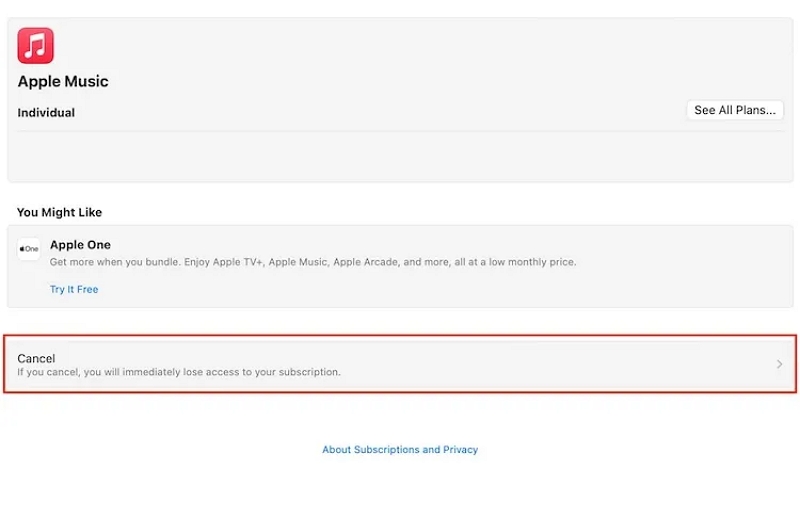
Method 3: Cancel Apple Music Subscription Via Web
Ideal if you don’t have access to your Apple devices.
Step 1: Open “music.apple.com” in your mobile or desktop browser.
Step 2: Click the “Sign in” button at the top-right and log in using the Apple ID tied to your Apple Music.
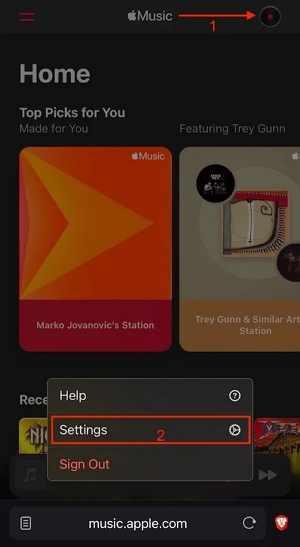
Step 3: Once you sign in, click on your “profile icon” and select “Settings” from the menu.
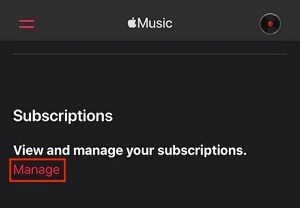
Step 4: Navigate to “Subscription” and click on “Manage.”
Step 5: Click on the “Cancel Subscription” button.

Step 6: Select “Confirm” to finish cancelling your Apple subscription.
Tip: How to Confirm Your Apple Music Cancellation Worked
To avoid unexpected charges, always double-check after canceling:
1. Check your email for a cancellation confirmation from Apple.
2. Check your subscription status manually:
- Go to Settings > Apple ID > Subscriptions
- Select Apple Music
- Look for “Expires on (date)”
Important: If you don’t see an expiration date, the subscription is likely still active. Seeing “Active” doesn’t necessarily mean you’ll be charged again — always check the renewal or expiration date.
Part 4: Want to Cancel but Keep Your Music? Here’s What You Should Know
Before canceling Apple Music, it’s important to understand what happens to your downloaded songs.
Apple Music uses Digital Rights Management (DRM) to protect licensed content. This means that even though you can download songs for offline listening, those files are not permanently stored on your device. Once your subscription expires, downloaded tracks will no longer play, even if they remain visible in your library.
If you’re canceling simply because you no longer need the service, you can stop here. No further action is required.
However, if you’ve spent years building playlists and want to keep a personal offline backup of your music before your subscription ends, there are a few things worth considering.
How to Save Apple Music Songs for Personal Offline Backup
Apple does not provide an official way to permanently keep Apple Music downloads after cancellation. As a result, some users choose to create a personal offline backup before their subscription expires.
One optional solution is Mediaio Audio Converter, a desktop tool designed to convert DRM-protected music from streaming services—such as Apple Music, Spotify, and Amazon Music—into standard audio formats like MP3, WAV, or FLAC for offline playback.
This approach is mainly useful for users who:
- Plan to permanently cancel Apple Music
- Want to keep playlists for offline listening on their own devices
- Understand Apple Music’s DRM restrictions and licensing limits
Mediaio Audio Converter supports batch conversion and preserves essential track information, such as song titles, artists, and albums, which helps keep your music library organized after conversion.
Why This Option Isn’t for Everyone
This method is optional and may not be necessary for all users. If you only use Apple Music occasionally or don’t need offline access after cancellation, simply canceling your subscription is enough.
But for users who want long-term access to their favorite playlists for personal use, creating an offline backup in advance can help avoid losing access later.
Part 5: Not Ready to Cancel Yet? Consider These Alternatives
This section is for users who are unsure about canceling completely but still want more control over their subscription.
Switch to a Cheaper Plan (Individual → Student or Family)
If you’re currently on an Individual plan, switching to a Student or Family plan can significantly reduce monthly costs.
The Family plan allows sharing with up to six people, while the Student plan offers a discounted rate for eligible users.
Turn Off Auto-Renew Without Canceling Immediately
Turning off auto-renew lets your subscription expire naturally at the end of the billing cycle.
When auto-renew is disabled:
- You keep full access until the expiration date
- You avoid being charged again
- The subscription won’t renew unless you turn it back on
This option works well if you only need Apple Music temporarily.
You can always cancel later — Apple doesn’t penalize reactivation, and your playlists remain linked to your Apple ID.
FAQs
Yes, you can cancel your Apple Music subscription directly from your phone. On an iPhone, go to Settings > [your name] > Subscriptions, select Apple Music, and tap Cancel Subscription. As long as you’re signed in with the correct Apple ID, the cancellation will take effect immediately and remain active until the end of your billing period.
You can manage your Apple Music subscription on your iPhone, iPad, Mac, or the Apple Music website. All changes sync across devices, so you only need to cancel or modify the subscription in one place.
No. Canceling Apple Music only stops the music subscription service. It does not delete or affect your Apple ID. Your Apple ID will continue to work for iCloud, App Store purchases, iMessage, FaceTime, and other Apple services.
After you cancel Apple Music, your playlists and library data remain saved in your Apple ID. However, any downloaded tracks become unplayable once your current billing period ends unless you resubscribe.
Conclusion
As you’ve seen, it’s easy to cancel your Apple Music subscription without getting charged.
Our article explained the ways to cancel subscription on an iPhone, Mac, and via web browser.
If you’re looking to save your Apple Music playlist forever before cancelling the subscription, we recommend using the Mediaio Audio Converter to convert the songs.