Clone Hero gives you full control over what you play, but there’s no built-in store or catalog to quickly find song charts. And even when you find one, getting it to show up inside Clone Hero isn’t clear.
This guide shows you how to add songs to Clone Hero from start to finish. You’ll learn where to find large community libraries, including sites and master spreadsheets that host over 100,000 charts and understand how to add them correctly into Clone Hero on Windows, macOS or Android. Besides, if you can’t find a desired song there, we’ll also show you how to create your own chart using Mediaio and Moonscraper.
Songs for Clone Hero: What You Need to Know
If you’re new to building your setlist in Clone Hero, there are a few things you need to know about how custom songs actually work.
1. A "Song" Is Actually a Package
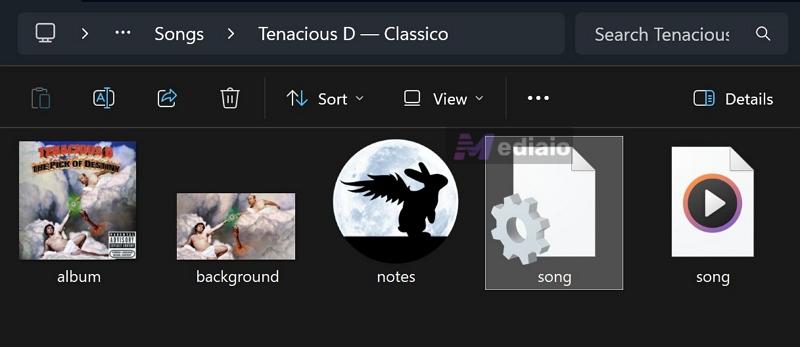
You can’t drag an MP3 into the game folder and expect it to work. Clone Hero needs each song to be in a folder structure with specific files:
- Audio: This is your actual song file, usually in .ogg format/.mp3 format and it should be in good quality.
- Chart file: Either a notes.chart or .mid file — this is the map of the notes and timing that tells the game what to play.
- Metadata: A song.ini file that stores details like artist name, song length, year, and difficulty ratings.
- Album art: A .png or .jpg image that shows up in the track selection screen.
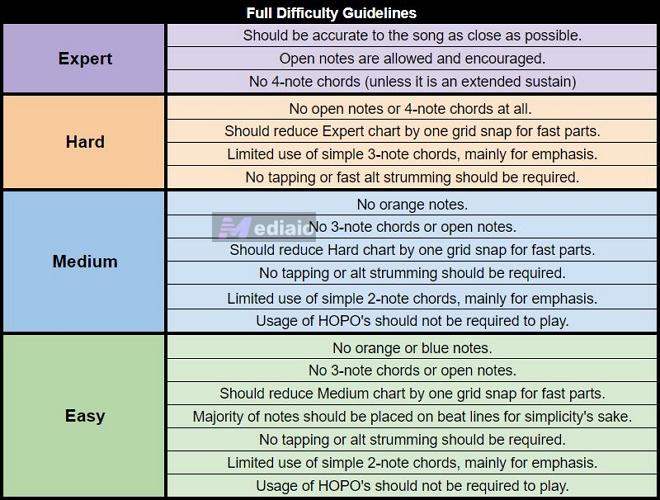
2. Difficulty Levels Vary Wildly
In official Guitar Hero games, songs almost always include all difficulty levels.
In Clone Hero, charts are made by the community, so many are Expert-only. This means lower difficulty levels could be missing.
Still, here’s a community convention you should know. The FD (Full Difficulty) tag is commonly used to indicate that all difficulties are charted, so you can practice at all levels — Easy, Medium, Hard and Expert.
3. You Have Two Ways to Build Your Library
Clone Hero relies entirely on community content. So you are in full control of what your setlist looks like. You have two main ways to build it:
- Download pre-made tracks: There are thousands of songs already available. Once you know where to find, you can quickly add them to your library.
- Create your own charts: If a song isn’t available, like if it’s an indie track or something very specific, you can use free tools to map it yourself and play it in the game.

How to Add Songs to Clone Hero (Downloaded Songs)
The good thing about Clone Hero is that you don’t always have to create songs yourself. The community has spent years charting almost everything — rock songs, game soundtracks and even niche tracks. Most of it is already out there.
So instead of starting from scratch, you can find these pre-made charts, add them to your CloneHero’s setlist and start practicing. All you need is to know where to find them and how to add them properly. Here’s how to get started.
Step 1. Download Clone Hero songs
Here are the main places that most Clone Hero players rely on to build their setlist:
Option 1. Enchor.us(formerly Chorus)
This is the official search engine of the charting community. Yes, almost all the active charters upload their work here, It indexes a massive number of songs, easily over 100,000 charts. You should bookmark this site!
Searching on the site is also straightforward. You can filter by song name, artist, difficulty, or instrument. This helps you avoid downloading the wrong chart, for example, grabbing a drum chart when you’re looking for guitars.
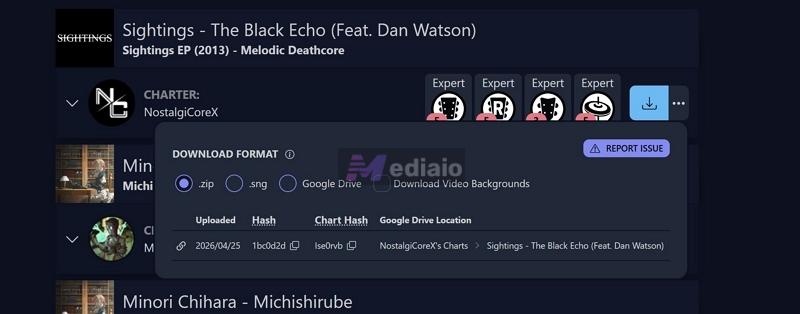
To download from Enchor.us:
- Go to the site.
- Search for your song. Click Download icon next to it. Or click the three dots to choose a specific format and then press the Download icon.
The download will come as a ready-to-use zip, containing everything Clone Hero needs.
Option 2. Clone Hero Discord
Joining the Discord is honestly important if you plan to stick with the game. It’s not just a place to download songs but it’s an active community. Inside the server, you can:
- Browse channels like #customs-songs — new charts are shared regularly.
- There is a request channel, where you can ask charters to make specific songs.
- You can get help with setup, errors or charting issues.
Over time, Discord’s Clone Hero will become your go-to place, especially when you’re looking for something specific.
Option 3. YouTube
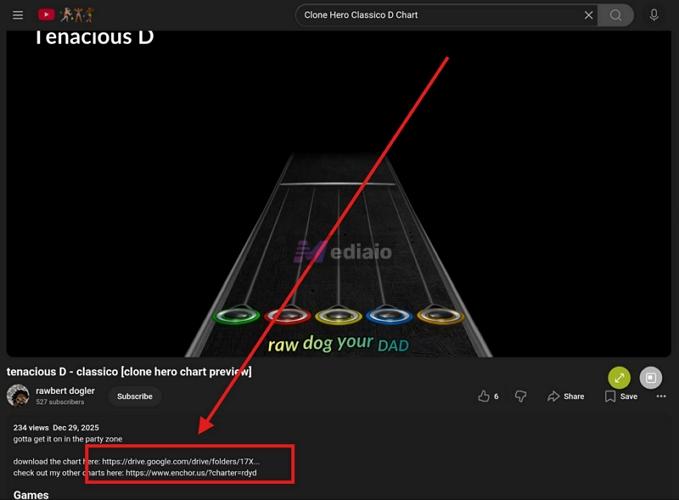
Searching on YouTube helps you in another way. You can watch the chart being played before downloading it. This way, you can judge if it looks accurate or fun, instead of filling your library with random charts.
Search like this:
- Type in the search bar: Song Name + Clone Hero + Chart
- Many creators upload gameplay previews of their charts.
- Most of the time, the chart’s download link (usually Google Drive or Media Fire) will be in the video description.
- Click on the link and download the file.
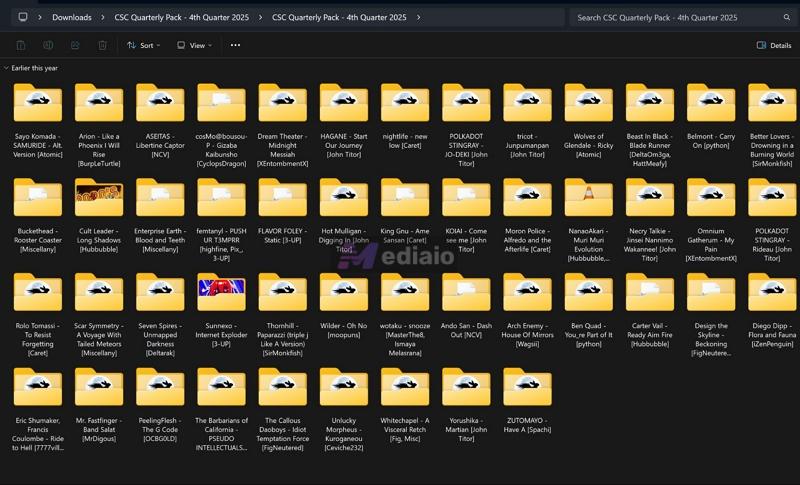
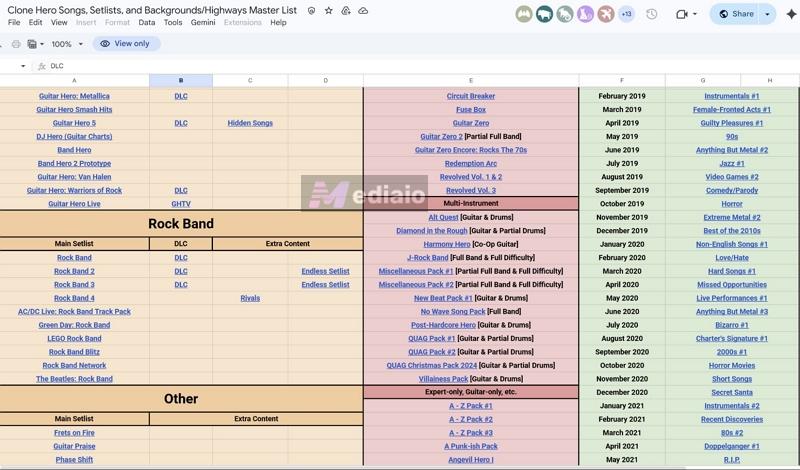
Option 4. Google Drive/Song Packs
Google Drive is the backbone of Enchor.us. Many charts are hosted there, and when the site goes down or a download fails, you’ll often need to access the files from Drive links. One of the main community spreadsheets used to track charts is:
https://docs.google.com/spreadsheets/d/13B823ukxdVMocowo1s5XnT3tzciOfruhUVePENKc01o/edit?gid=1870223413#gid=1870223413
It keeps track of new uploads across sites like Custom Songs Central, giving you access to thousands of charts.
Beyond that, many charts, especially newer or niche ones, are shared through Google Drive folders and large song packs. You’ll usually find such drive links on:
- Discord servers
- YouTube descriptions
- Reddit threads
Here are some links that feature many songs and even full packs:
- https://drive.google.com/drive/folders/1UJio9Hex7WgPplugzzKErvgn0GWkD59E
- https://drive.google.com/drive/folders/18Rxf5k2qIwAKePuSjUhf8xACZOPHVOuR
- https://drive.google.com/drive/folders/1hyMXi91jCUuZCNtizm7m1vdR_sUl1EnI
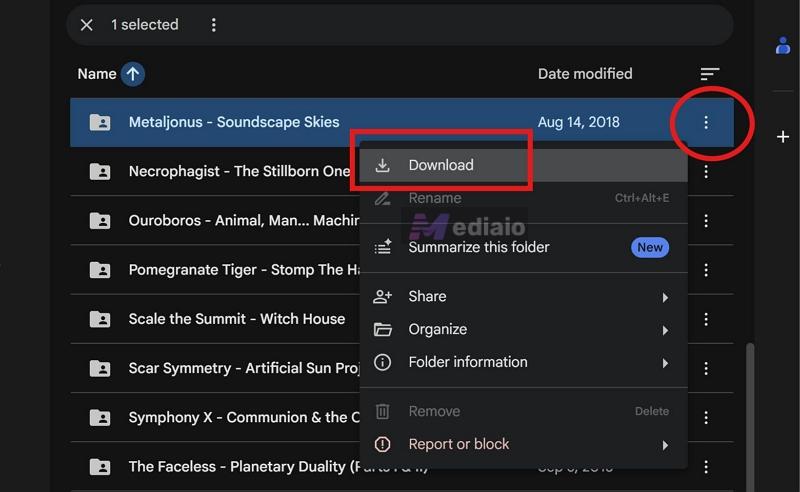
To download from Google Drive:
- Open the folder.
- Click the three dots at the far end.
- Click Download.
Step 2: Import Downloaded Song to Clone Hero Folder
Now comes the actual import part. No matter where you downloaded the song from — Chorus, YouTube, or Google Drive, you will usually end up with a .zip or .7z file. Clone Hero cannot read these directly. So before moving anything, you need to extract them by following these steps:
- Windows: Right-click the .zip file. Select Extract All.
- macOS: Double-click the .zip file. It will extract automatically.
- Android: Use your file manager or extract the file before moving it.
Once extracted, you will get a folder, usually named something like: Artist – Song Name.
That parent folder will already contain everything needed (audio, chart, metadata, artwork). After that is done, here is how to place that folder exactly where the game can find it.
On Windows or macOS
The process on both Windows and macOS is the same, only the location of that folder differs between systems. You can place your song folder like this:
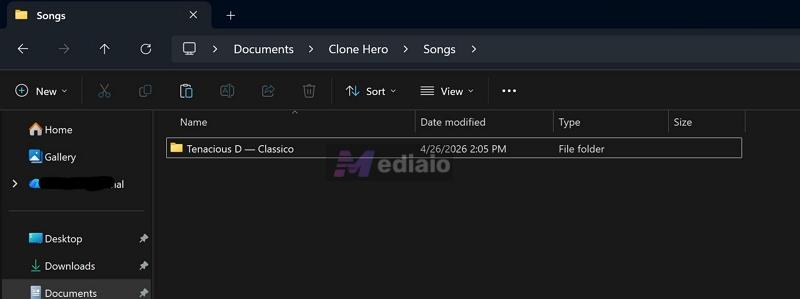
Windows:
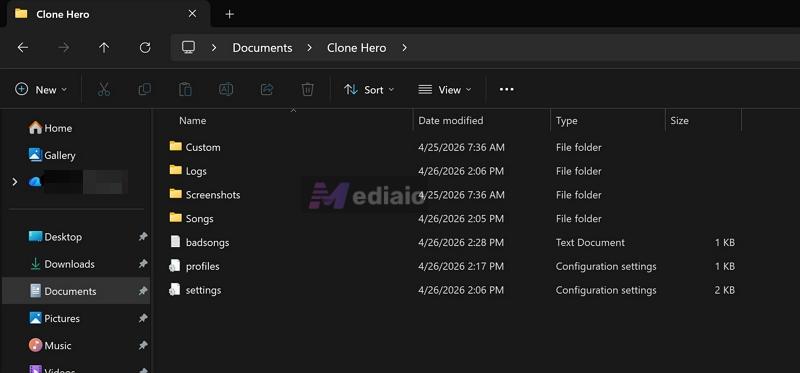
By default, Clone Hero creates its main folder inside your Documents. So:
- Go to Documents.
- Open the Clone Hero folder.
- Inside it, you’ll find the Songs folder.
macOS:
- Open Finder.
- Press Command + Shift + G, and type: ~/Clone Hero/Songs.
- Press Enter.

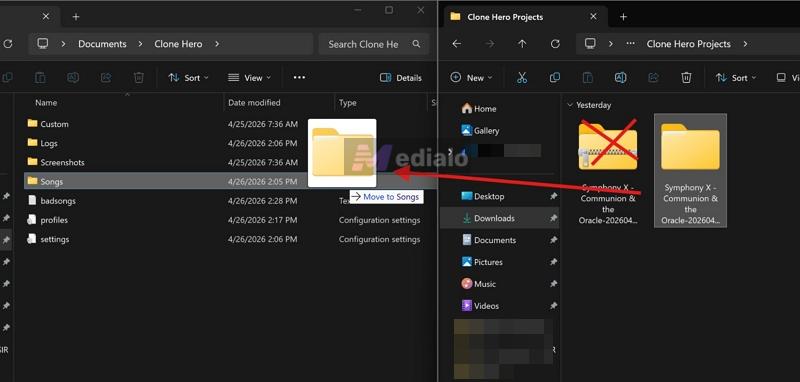
Once you locate the Songs folder, keep it open. Now open another window and go to your extracted song folder. Drag the entire folder and bring it into the Clone Hero’s Songs directory.
Note: Do not copy individual files. Do not rename anything. These folders are already structured correctly. If you move files separately, the game will not be able to link the audio with the chart.
On Android
After extracting the file, open your file manager. Navigate to the extracted folder:
- Long-press it.
- Select Move or Copy.
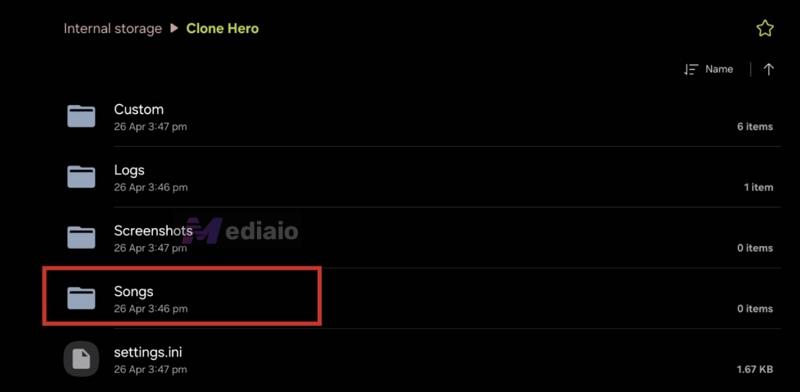
- Now go to: Internal Storage > Clone Hero > Songs.
- Paste the folder there.
Scan Songs in Clone Hero
After placing the folder, the song will not appear immediately. Clone Hero does not constantly monitor your storage, so the song will not appear on its own. You will need to scan manually. Do this:
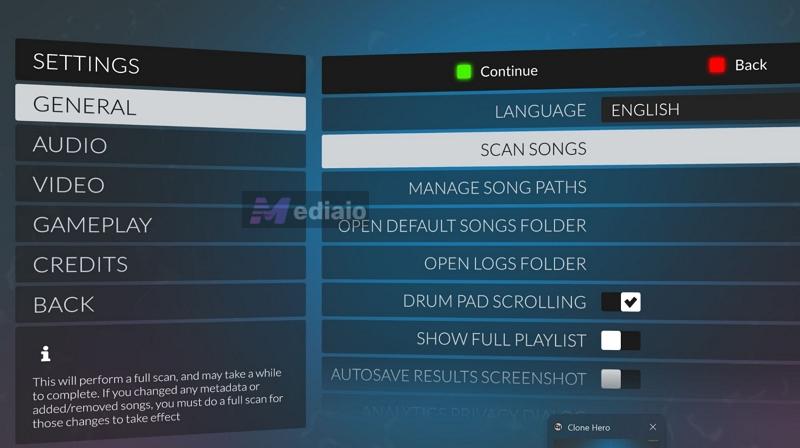
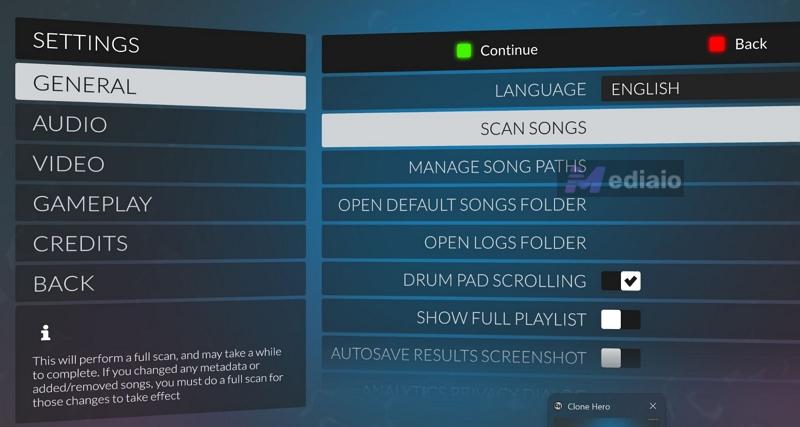
- Open Clone Hero.
- Press Spacebar (or Start button on your controller) to open Settings.
- Inside General, select Scan Songs. The game will show a progress bar while it indexes your files.
- Once the scan is complete, go back to the main menu. Open Quick Play — your newly added songs will now appear in the setlist.
How to Add Songs to Clone Hero (Self-Created Songs)
Playing community charts is great, but you won’t always find your favorite songs charted. Creating your own charts gives you full control—you can map the song exactly how you want, at your preferred difficulty and style.
At first glance, charting can look complicated. In reality, you don’t need music theory or any kind of audio engineering background to get started. A basic sense of how notes feel—beats, spacing, and simple patterns, is enough.
And using the tools isn’t difficult either. You just need a high-quality song, the right tools, and basic understanding of the process. Here’s how it all works.
Step 1. Save the Desired Song in a Compatible Format
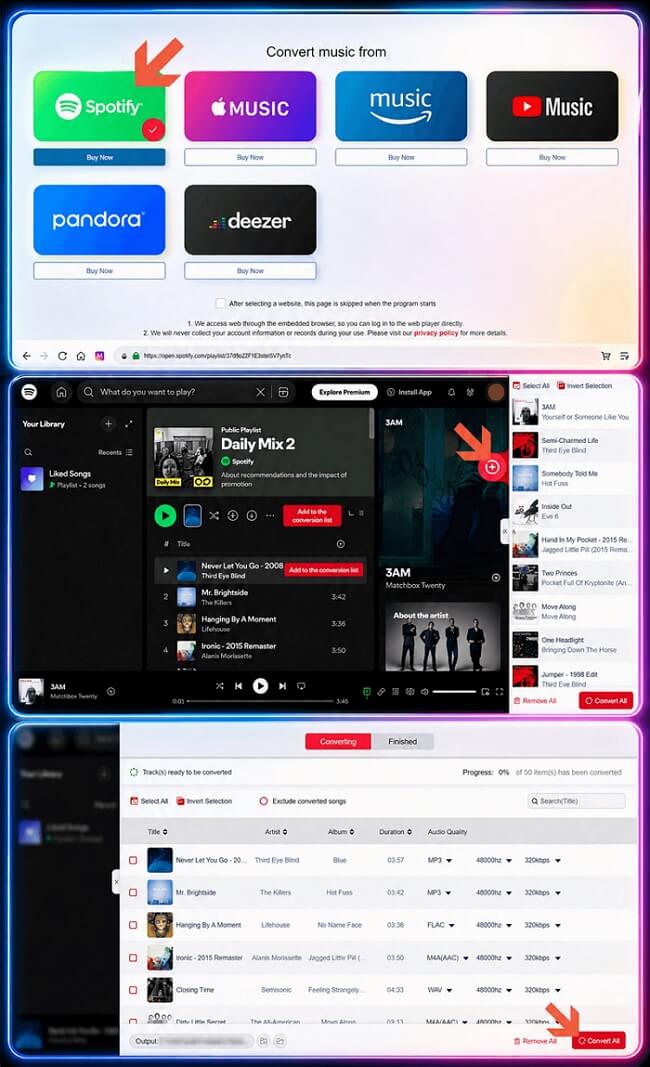
Start with acquiring your favorite song in high quality. The absolute best way to do that is Mediaio Audio Converter.
Mediaio connects with Spotify, Apple Music, Amazon Music — all offer high-quality tracks and lets you export them onto your computer without dropping quality. You can also choose to save the tracks in high-bitrate MP3 or go lossless WAV. Mediaio’s clean audio will let you hear the beats clearly and place the notes on charts more accurately.
Step 2: Turn Saved Song into Clone Hero Song
You can’t just throw that Mediaio exported MP3 into the Clone Hero folder and expect the game to read it. Clone Hero needs a proper song folder. And that folder should include the audio file, album art, and the actual .chart file. And you’ll need two tools to get this done:
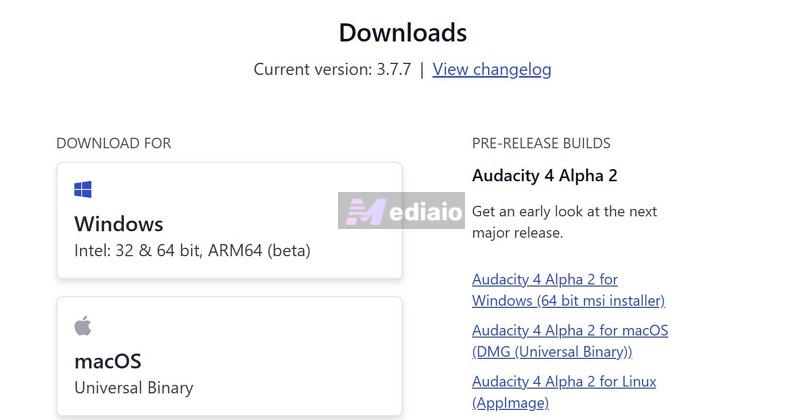
Audacity (a free audio editor available on Windows, macOS, and Linux). This is used to clean and prepare the audio before charting.
You can get it from here: https://www.audacityteam.org/download. (Make sure to download the non-Music Hub version — you don’t need the extra features for this.)
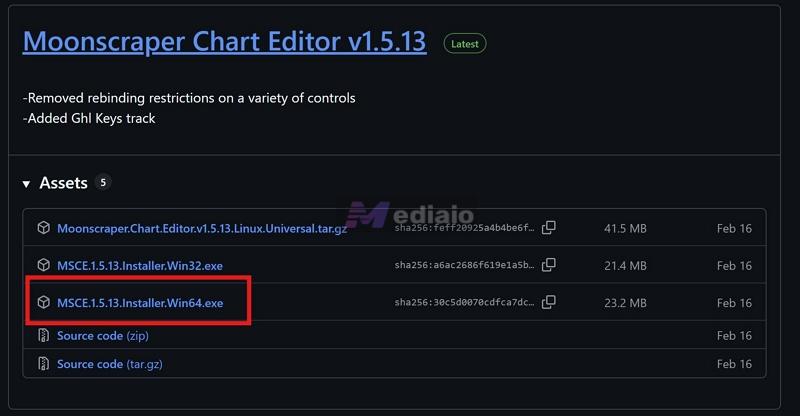
For the actual charting, you’ll need Moonscraper(a Windows-only program). It is considered the standard tool for Clone Hero charting — powerful, but still fairly easy to use once you get familiar with it.
To download it, go to the official GitHub page maintained by FireFox2000000: https://github.com/FireFox2000000/Moonscraper-Chart-Editor/releases
From there, download the file named: MSCE.1.5.13.installer.Windows64.exe Most of you will need this version.
Once both programs are installed, follow these steps.
1. Edit Desired Song with Audacity
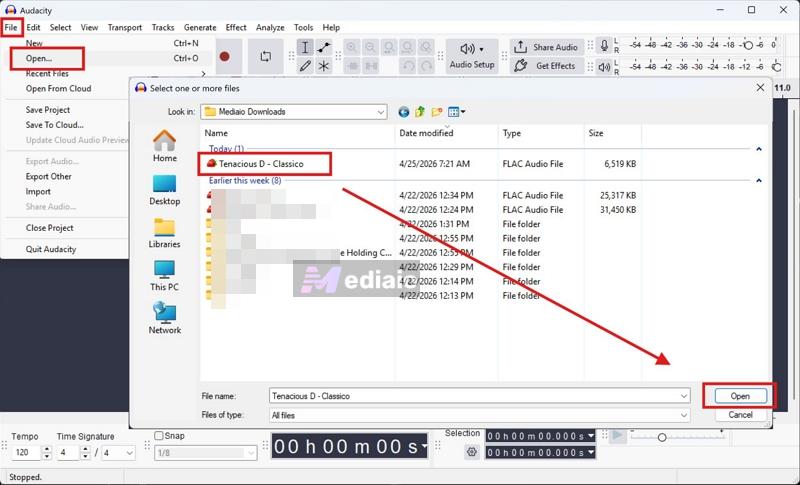
- Open Audacity. Then go to File > Open and load the Mediaio converted song. You will see two waveforms on the screen (left and right channels of the song).
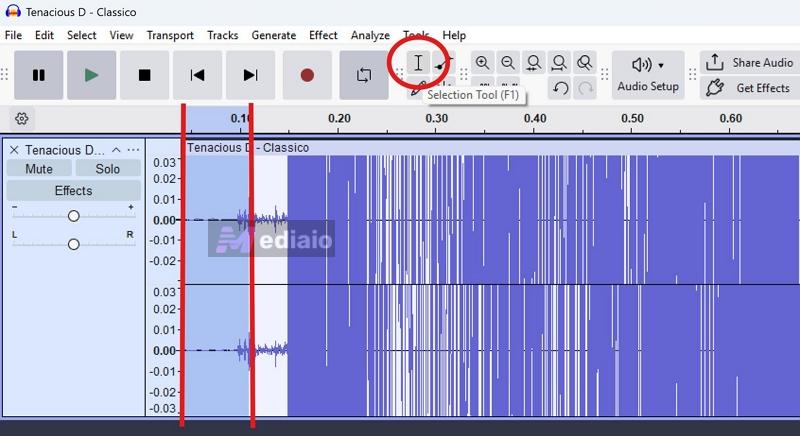
- From the toolbar, select the Selection Tool (or press F1) — it looks like a capital “I”.
- Now move to the very beginning of the track. If there is any dead space, click and drag to highlight it or hold Shift to mark from one point to another. Then press Delete to remove that dead space.
- After that, go to Generate > Silence. In the pop-up: set the duration to exactly 2 seconds. This is important as it creates a small buffer at the start, so Clone Hero loads the song properly before the notes begin.
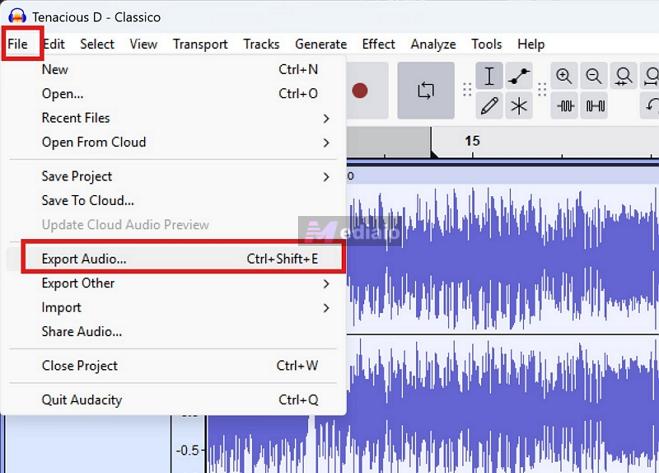
- Now export the file. Go to File and choose Export Audio option.

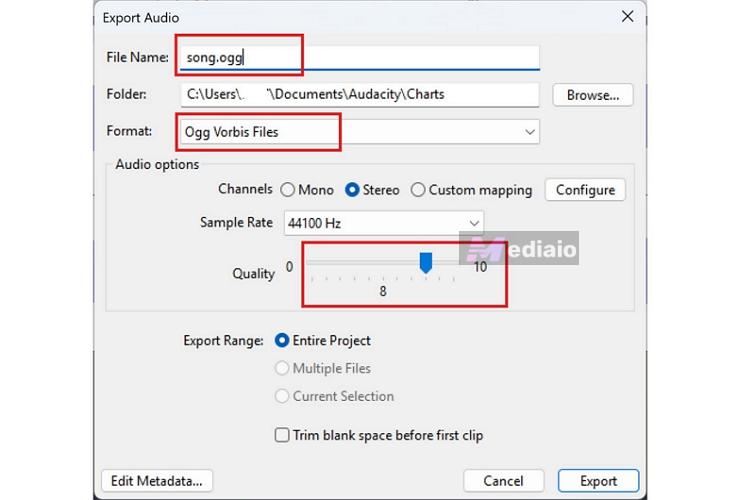
No matter which song you’re exporting, keep these settings consistent:
- File name: song.ogg (nothing else — you cannot even name it like song1.ogg or audio.ogg).
- Format: OGG Vorbis
- Channels: Stereo
- Sample rate: 44,100 Hz
- Quality: 8 (works best — it’s up to you).
- Then click Export.
Expert Tip:
You can also export the song in MP3 or WAV format supported by Mediaio, but OGG files are smaller and more compatible with charts.
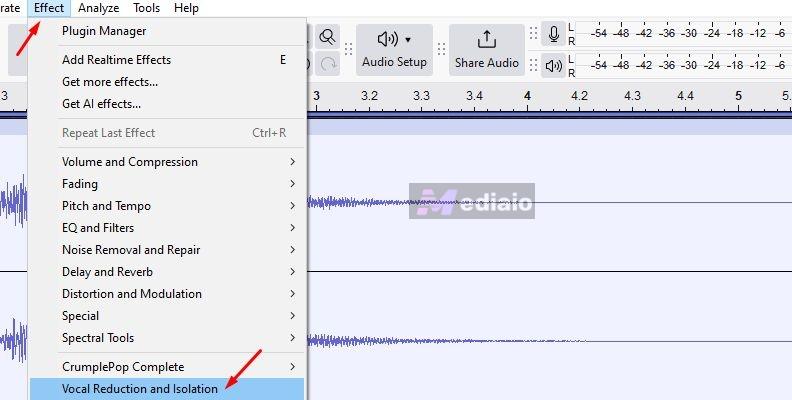
If you have trouble hearing guitar over vocals or drums, you can adjust this. Press Ctrl + A to select the full track. Then go to Effect > Vocal Reduction and Isolation and choose Remove Center. Export this as a separate file named: center_remove.ogg. Moonscraper lets you add stems, so you can upload it alongside the main song and hear the song more clearly while charting.
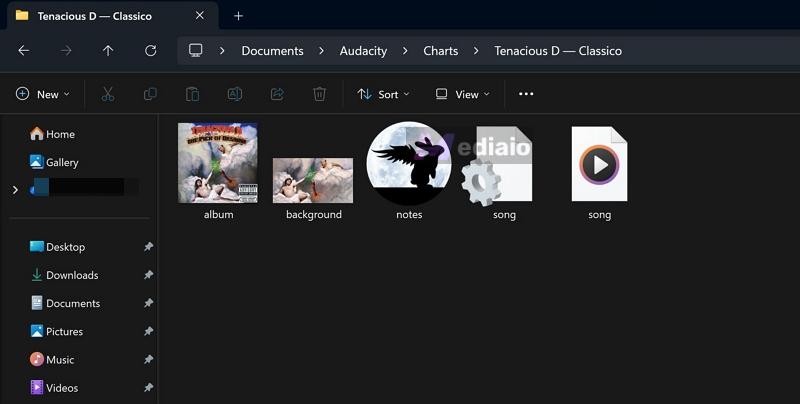
2. Pack Your Song into a Folder
You will have placed the exported song in a proper structure. Here’s how to do that:
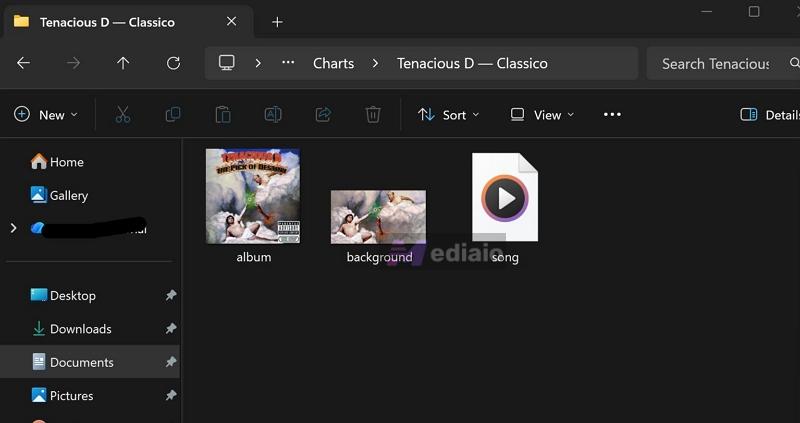
- Create a new folder. Name it like the Artist name — Song Name.
- Move the song.ogg file to that new folder.
- Save the album art from the web (square size: 500p×500p or 1000p×1000p). Rename it as album.png (do not name it anything else).
- You can also add a background image in a 16:9 format (optional) to the same folder.
So your folder will look like this:
- song.ogg
- album.png
- background.jpg (optional)
That’s it. Once this is ready, you can move on to Moonscraper.
3. Create the Chart in Moonscraper
Now you will turn that song.ogg file into a Moonscraper project and start placing notes.
When you open Moonscraper for the first time, it will look messy. It won’t make sense immediately. So before doing anything, take a few minutes to get used to it.
There is a short manual included on the GitHub page (around 4 pages). Go through it once and understand the basic controls: Moonscraper Manual. Once you’re familiar with the interface, here’s how to chart a song:
Phase 1: Setup & Beat Mapping
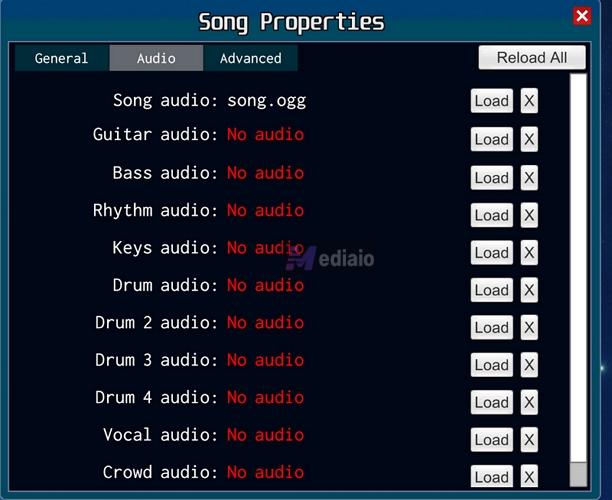
1. Go to the top menu and click Song Properties. Fill out the Title, Artist, Album, Charter (you can put your own name), and Year. Leave the Difficulty value for now.
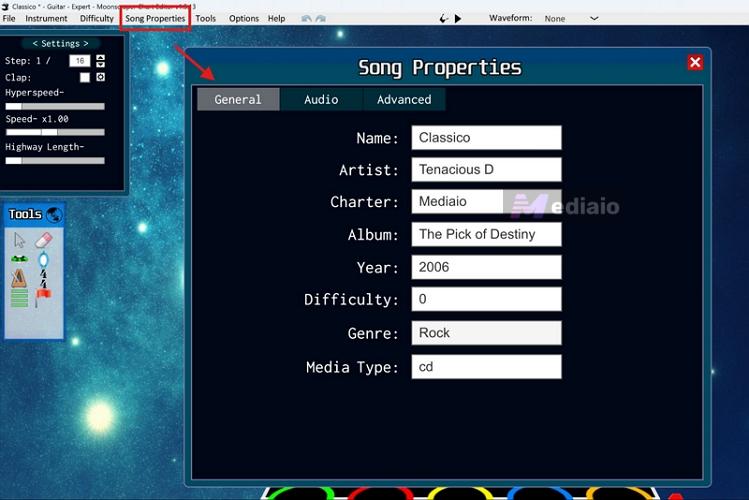
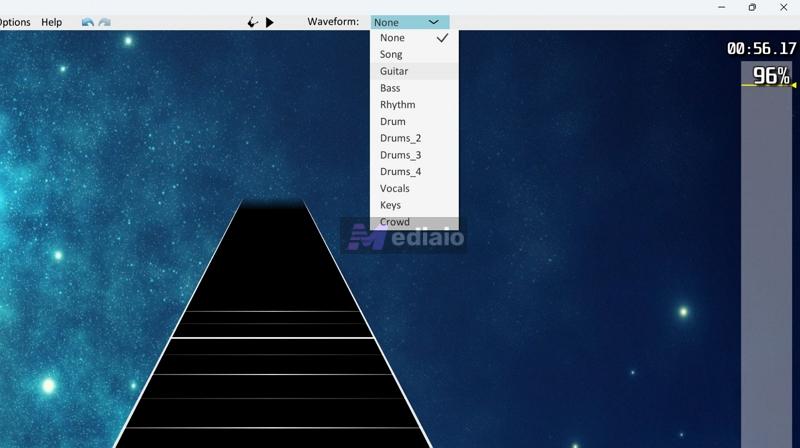
2. Switch to the Audio tab in the same menu. Click Load and select the song.ogg file you exported from Audacity. If you created an extra file like center_remove.ogg, you can load it as a secondary audio track.
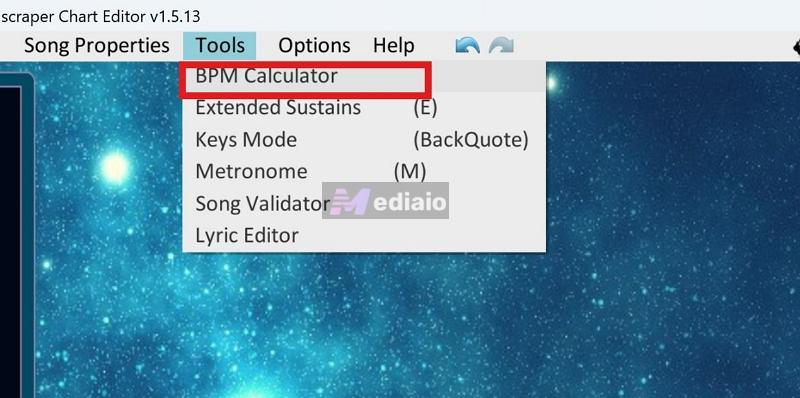
3. After this, you have to align the grid with the song. Press G (globe icon) to enter global view. This will show the waveform of your audio. Your goal is simple — align the grid with the waveform spikes. If you don’t know the BPM:
- Go to Tools > BPM Calculator.
- Play the song and tap along with the beat (using your keyboard).
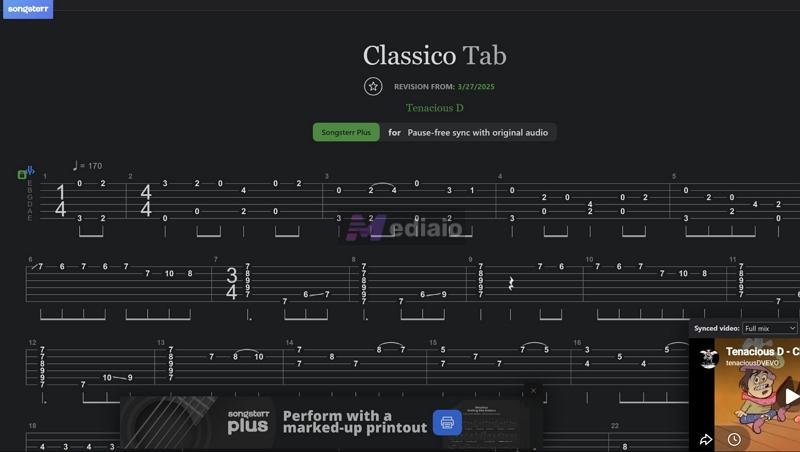
- Moonscraper will calculate a close estimate. Or you can use a site like Songsterr.
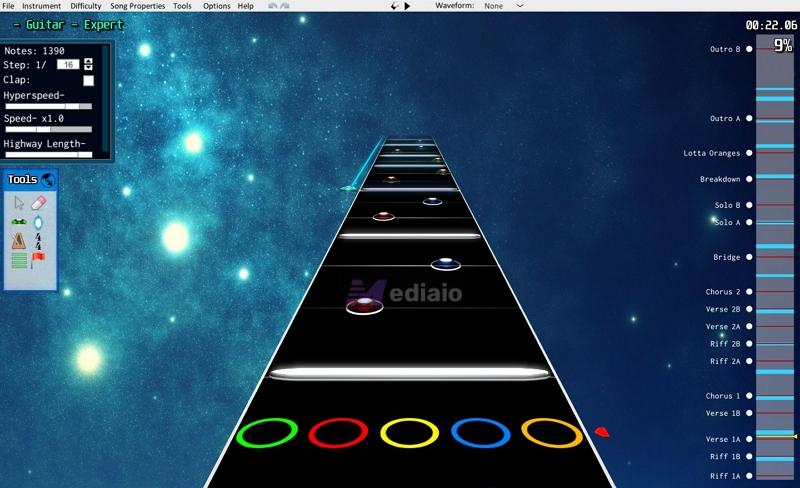
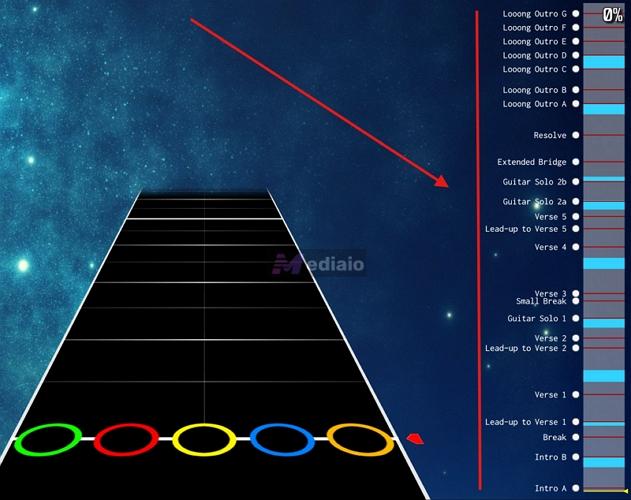
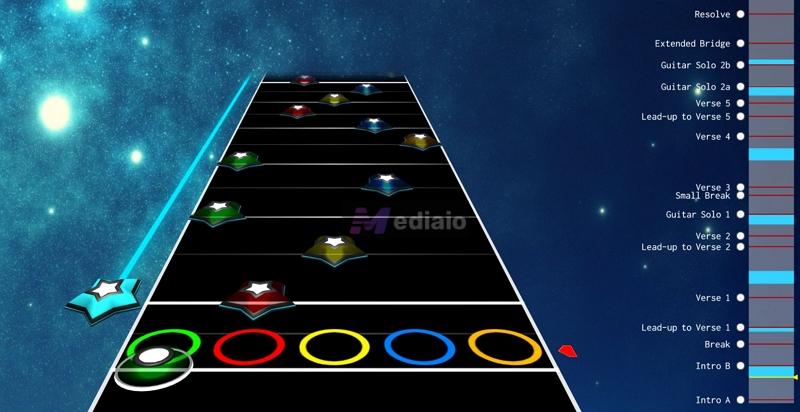
4. Place the Section Events (Intro, Verse 1, Chorus, Solo). This will show up in-game, but during charting itself — you can press Alt + Up/Down to instantly jump between sections while editing. So keep adjusting the BPM markers so the grid is aligned with the song from start to end.
Phase 2: Place Notes
Once the grid is locked to the audio, you can switch to the instrument view and start charting.
You will have to select your note type by pressing 1 through 5 (Green through Orange) or 0 for Open Notes. And you have to left-click on the grid to place the note. Here’s a simple breakdown of what you’ll use most:
In gameplay, you hold the fret and strum.
Most notes behave like this unless they become HOPO.
The longer the sound, the longer the sustain.
You also gain extra points for holding these.
Common in rhythm sections like chugs or repeated patterns, as you only need to strum these.
But you can adjust manually if needed. Shows up in fast passages, especially solos or quick transitions.
These are designed so you don’t have to strum every note.
The Copy/Paste Rule: You don’t have to re-chart the second chorus. Use press Ctrl + C to copy the notes. Then, press Alt + Down to jump to your next section marker and press Ctrl + V. This will save you a lot of time and also keep things consistent.
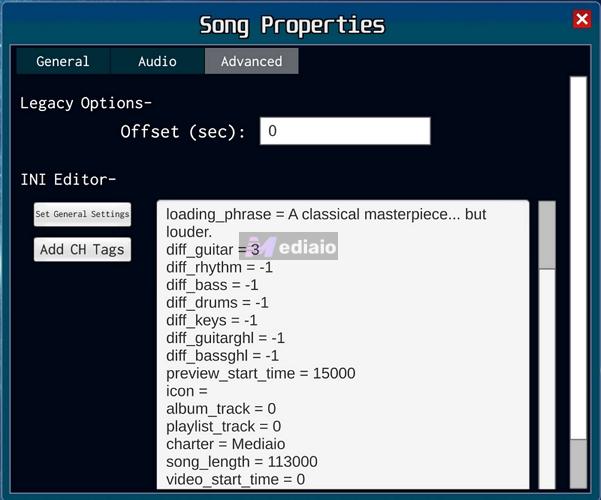
Phase 3. Fill the .ini File
Go back to Song Properties from the menu again. The basic fields you filled earlier (title, artist, etc.) are not what Clone Hero reads directly. Clone Hero actually will read from the .ini file, which you will find under the Advanced tab. Switch to that tab and use a proper template like this. Just copy this.
name=
artist=
album=
genre=
year=
loading_phrase=
diff_guitar=
diff_rhythm=-1
diff_bass=-1
diff_drums=-1
diff_keys=-1
diff_guitarghl=-1
diff_bassghl=-1
preview_start_time=
icon=
album_track=
playlist_track=
charter=
song_length=
explicit_lyrics=
Make sure these key fields look correct before saving:
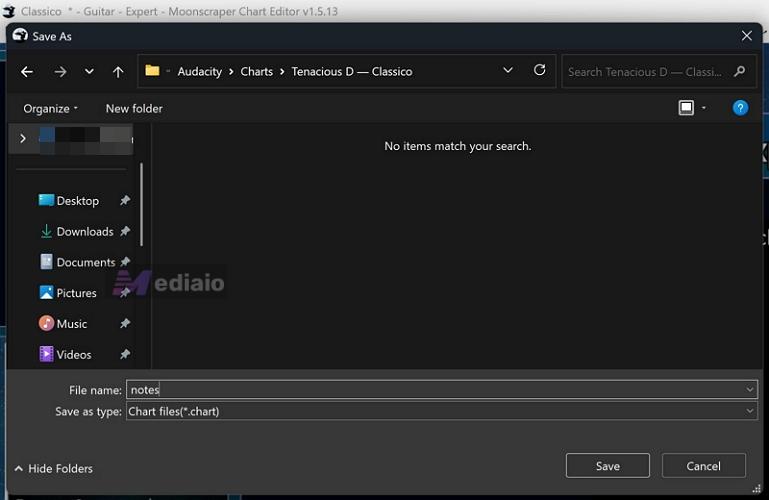
Now save your chart properly. Press Ctrl + S. From there, navigate to the folder you created earlier via the File Manager. And make sure your chart file is named: notes.chart (not notes1.chart, not chart.chart — only notes.chart).
Now, the folder structure will look like this:
- song.ogg
- album.png
- background.jpg (optional)
- notes.chart
- song.ini
That’s it. Your song is now fully prepared and ready to be loaded into Clone Hero.
Step 3: Put Custom Song into Clone Hero Directory
Now locate your Clone Hero songs folder, depending on your device:
- Windows: Open File Explorer. Go to Documents > Clone Hero > Songs.
- macOS: Open Finder. Navigate to your Clone Hero > Songs folder.
- Android: Go to Internal Storage > Clone Hero > Songs.
1. Once you’re inside the Songs folder, keep that window open. Now take the folder you created earlier (with song.ogg, notes.chart, album.png, song.ini, etc.) and copy the entire folder into the Songs directory.
2. Now open Clone Hero. Press Spacebar to open the Settings menu. Scroll down and go to General, select Scan Songs and confirm the scan.
3. Go back and exit the settings. Now open Quick Play and your song will be listed. Select it and start playing.

Conclusion
The beauty of Clone Hero is its freedom. You can build a library that fits your taste. Thanks to the community, most songs are already available on enchor.us or via Google Drive folders.
However, sometimes you want to play an indie track, a local release, or something that feels more personal. That’s where creating your own charts comes in. For that, you can first use Mediaio Audio Converter to get the song in high quality, then bring it into Moonscraper Chart Editor to build your chart.